Table of Contents
Advertisement
Advertisement
Table of Contents

Related Manuals for Youshiko YC9444


Summary of Contents for Youshiko YC9444
- Page 1 Youshiko YC9444 Radio Control Weather Sta on...
- Page 2 One Step Automatic Set Up: Connect main colour display indoor unit with power supply and insert required batteries in the sensor and wait for Weather Station to self set automatically by MSF Radio control system. With in few minutes to few hours or maximum by 05:00 am, depending on the signal or your location .
- Page 3 6. please use power supply for continuous colour display . We recommend to use Duracell or Energizer Alkaline Power Batteries for best results. Frequently Asked Questions: 1 : Why does the screen turn off after powering on the weather station? And sometimes during the night? What is RCC (MSF)? A: After powering on the weather station, it will soon activate RCC function (Radio-controlled automatic time-calibration, abbr.
- Page 4 Power on the weather station first. Then power on the sensor. Confirm that the clock and the sensor are in the same channel. After establishing a connection, the sensor transmits data every 60 seconds to update the temperature and humidity data. If the connection failed, please hold “▼”...
- Page 5 Features: MSF Radio control time function Perpetual Calendar Up to Year 2099 Time in optional 12/24 hour format. Daily Alarm Function Automatic snooze function The moon phase display Barometric pressure: — Barometric pressure measurement ranges: 600 hPa/mb~1100 hPa/mb & 17.72 inHg~32.50 inHg —...
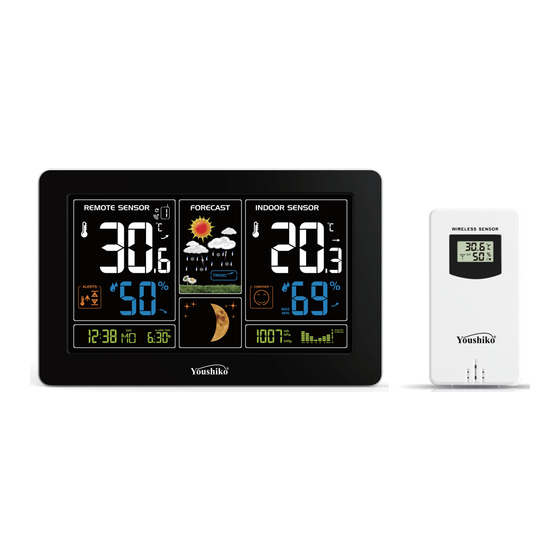
- Page 6 Weather Sta on Appearance: Part A-Posi ve LCD A1: Remote Temperature A2: Remote Humidity A3: Remote Temperature Alert A4: Time/Calendar or Alarm me/ Weed Indoor Temperature A5: Moon Phase A6: Barometric pressure A7: Histogram shows the trend of 24 hours of atmospheric pressure A8: Indoor Humidity A9: Indoor comfort A10: Indoor Temperature...
- Page 7 Part C –Wireless Remote Sensor: C1: LCD display – Temperature C2: LCD display – Humidity C3: Transmit signal LED C4: “°C/°F” bu on C5: “TX” bu on C6: “CHANNEL 1 or 2 or 3” switch C7: Ba ery compartment...
-
Page 8: Initial Operation
Initial operation: Open Weather Station battery compartment cover Insert 2 x AA batteries observing polarity [ “+” and “ –“ marks] and connect with power supply When you insert the batteries, all the icon on the LCD display will briefly light up for 3 seconds, and you will hear a beep tone, and detect indoor temperature &... -
Page 9: Manual Time Setting
We recommend a minimum distance of 2.5 meters to all sources of interference, such as televisions or computer monitors Radio reception is weaker in rooms with concrete walls (e.g.: in cellars) and in offices. In such extreme circumstances, place the system close to the window. ... -
Page 10: Switching Off The Alarm Signal
Alarm me starts to flash. Use the “▲” and “▼” bu ons to set the required hour. Press “ ” bu on to confirm your se ng, The Minute display of the Alarm me starts to flash. Use the “▲” and “▼” bu ons to set the required minute. ... -
Page 11: C/°F Temperature Display
°C/°F temperature display: The temperature is displayed either in °C/°F. Briefly pressing the “▲” button allows you to switch between the individual modes. Comfort display: Indoor comfort level is calculated according to the indoor temperature and humidity, a total of 5 levels. Comfortable too cold or too hot Displaying temperature/humidity/ barometric pressure and... -
Page 12: Maximum/Minimum Temperature/Relative Humidity
If the weather station failed to receive transmission from remote sensor (“- -”display on the LCD), press and hold “▼” button for 3 seconds to receive transmission manually. the remote temperature will show an animation of the RF antenna symbol,the Base Station will re receive the wireless signal of the remote sensor. -
Page 13: Low Battery
Before entering the setup, you must select the remote channel, different channels can set different temperature alarm range Temperature and frost alert: Press “ ” button to activate or deactivate the remote temperature alert, When the remote temperature alarm is activated, the temperature alarm icon is displayed in the remote sensor bar ... - Page 14 weather settings, the pressure units will be flashing display, Use the “▲” and “▼” button to set the pressure unit to display in the "hPa/mb" or "inHg". Press the “ ” key to confirm the settings and switch to the weather, the weather graphics will be flashing display, Use the “▲”...
-
Page 15: Background Lighting
this is how it works , analyzing air pressure all the time , it will change in due course when weather station data thinks and value will go up or down for your pin point location ( Automatically ) , this cannot be changed manually . it will settle down in due course . -
Page 16: Declaration Of Conformity
• Do not open the inner back case or tamper with any components of this unit. Declaration of Conformity: Youshiko Ltd hereby declares that the product fully complied to applicable guidelines and corresponding standards and requirements of UKCA and other relevant provisions of Directive 1999/5/EC. - Page 17 • No part of this manual may be reproduced without wri en authoriza on of the manufacturer. Supplied in Box: 1 x Youshiko YC9444 Weather sta on main Unit 3 x outdoor transmi er ( Model: YC9312 ) Instruc on manual Power supply (Ba eries are not included) All enquiries: service@youshiko.co.uk...
Need help?
Do you have a question about the YC9444 and is the answer not in the manual?
Questions and answers