Table of Contents
Advertisement
Advertisement
Table of Contents

Subscribe to Our Youtube Channel
Related Manuals for Key-Disp KD686


Summary of Contents for Key-Disp KD686
-
Page 2: Table Of Contents
Contents Product name and model ......................... 1 Specification ............................1 Appearance and dimension ......................1 Function summary ........................2 Function layout ..........................2 Button definition ..........................3 General operation ........................3 ◆Switch the E-bike system ON/OFF ....................3 ◆Display interface ..........................3 ◆Switch the push-assist mode ON/OFF .................... 4 ◆Light sensor function &... - Page 3 Password disable ........................14 ◆Exit Settings .......................... 14 Display Connection Layout .......................15 Attached list 1:error code definition ..................15 Attached list 2:PAS level ratio defaults ................. 16 Quality assurance and warranty scope ..................16 Warnings ..........................16...
-
Page 4: Product Name And Model
Product model E-bike Intelligent color display Model: KD686 Specifications ● IPS TFT " ● 36V/48V/52V/60V/72V Power Supply ● Rated working current :22mA ● Off-state leakage current: <1μA ● Operating temperature: -10℃~ 60℃ ● Storage temperature: -20℃~ 70℃ Appearance and dimension... -
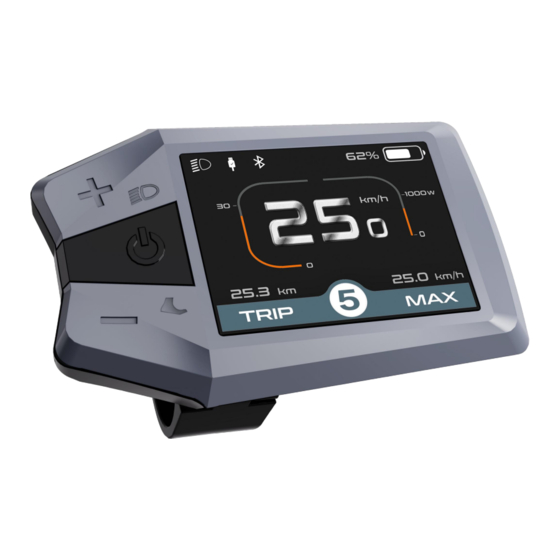
Page 5: Function Summary
Function Summary KD686 has many functions to meet the Users’ needs. The indicating contents are as follows: ●Battery indicator: voltage value or battery percentage ●Intelligent indication of TRIP, ODO, Current speed, MAX. speed and AVG. Speed, and TRIP time ●Motor power ●assist-level selection and indication... -
Page 6: Button Definition
Button definition 3 buttons on KD686 display,on/off, +/light, -/push-assist General Operation ◆Switching the E-bike System On/Off Hold the on/off button to switch on E-bike system and provide the power supply for the controller. When display is on, hold the on/off button to switch off the bike system.The E-bike system no longer uses the battery power.When the E-bike system is switched off, the... -
Page 7: Switch The Push-Assist Mode On/Off
◆Switching Push-assist Mode On/Off To activate the push-assist function, keep holding “-” button. After 2 seconds , E-bike is activated to go at a uniform speed of 6 Km/h while the screen displays The push-assist function is switched off as soon as you release the “-” button. The E- bike system stops the power output immediately and get backs to the status before the push- assist is activated. -
Page 8: Battery Indicator
Assist Level Interface ◆Battery Indicator Battery voltage is switchable between 36 and 48 volts. The default voltage is 36V. and the voltage bar values for 36v are 31.5V-34.5V-35.6V-37.4V-39.2V Battery Indicator interface ◆Motor Power Indicator The power of the motor is shown below Motor Power Indication Interface ◆Error Code Indication The components of the E-bike system are continuously and automatically monitored. -
Page 9: Settings
■ when an error code appears, please repair the fault. Or you will not be able to ride the bike normally. Settings( DisPlay Setting) Press the power button to switch on the display.To access settings page, hold both the “+ and -”... -
Page 10: Wheel
“Metric”.To toggle unit, press the “+” button or the “-” button to choose the desired setting item, and then press the “on/off ” button to save and return back to “Toggle Unit” Hold “on/off ” button to return to home page or press BACK to return home page. Toggle unit interface ◆Wheel represents wheel diameter settings. -
Page 11: Set Voltage
◆Set Voltage represents voltage settings. Press on/off button to set the voltage power bar values. 5 bar values are to be set one by one. For example (36V mode), the first bar voltage value by default is 31.5V and press +/- button to change this value and press on/off to confirm and access the next bar value setting. -
Page 12: Al Sensitivity
◆AL Sensitivity AL Sensitivity means light sensor sensitivity. Press +/- button to change the sensitivity value, the optional value is 01 to 05. press on/off button to confirm and store a changed setting. Hold “on/off” button to return to home page or press BACK to return to home pag AL Sensitivity interface ●Advanced Settings When DisPlay Setting is done, choose BACK and press ON/OFF button to return to... -
Page 13: Current Limit
value, and press the " on/off " button to confirm and move to the next assist level ratio settings.After all assist level ratios were set, *Please refer to assist level ratio defaults in Attached list 2. hold on/off button to confirm and store the settings. Assist level ratio settings ◆Current limit Current Limit represents controller current limit settings. -
Page 14: Speed Sensor
Assistant Num interface ◆Speed Sensor Speed Sensor represents speed sensor settings. The default value is 01.To change speed sensor settings, press the “+” or the “-” button to select the numbers of magnets in the speed sensor (the settable range is 01 to 12).To confirm and store a changed setting, hold the “on/off” button. -
Page 15: Lcd Luminance
◆LCD luminance LCD Luminance represents display backlight brightness. 100% is the highest brightness. 10% is the lowest brightness. 5 settable levels: 100%-75%-50%-30%-10%. The default is 100%. To change the backlight brightness, press the “+” button or the “-” button to choose the desired percentage.To confirm and store a changed setting, press the “... -
Page 16: Password Enable
Password input setting interface ◆Power-on password enable In “Start PassWord” interface, choose ‘ON’ and press on/off to confirm. Meanwhile, display interface asks for a password. Press +/- button to increase or decrease numbers and press on/off to confirm the first digit and move to the next digit. After 4 digits of a password are input, press on/off to confirm and the interface will prompt for re-entering the password. -
Page 17: Password Change
◆Password Change. When password is enabled. ‘Reset password’ will add to Password interface. Press +/- button to select ‘Reset Password’ and press on/off to confirm. Meanwhile, the interface asks for current password. When the correct password is input, the interface prompts to set a new password. -
Page 18: Display Connection Layout
■If there is no operations in one minute, the display will exit the settings state. Display connection layout: ◆ Julet 5 pins male connector. Type: JL-F39-Z508JG Light sensor Display male connector wiring Wire no. Code function Display power supply Controller power control wire Display GND RX/CAN H Display - RXD... -
Page 19: Attached List 2:Pas Level Ratio Defaults
◆Try to avoid hitting the display. ◆Don’t modify system parameters to avoid parameter disorder. ◆Make the display repaired when error code appears. Special note: this KD686 manual is a general-purpose version, and the parameter values are for reference only.
Need help?
Do you have a question about the KD686 and is the answer not in the manual?
Questions and answers