Table of Contents
Advertisement
Quick Links
1
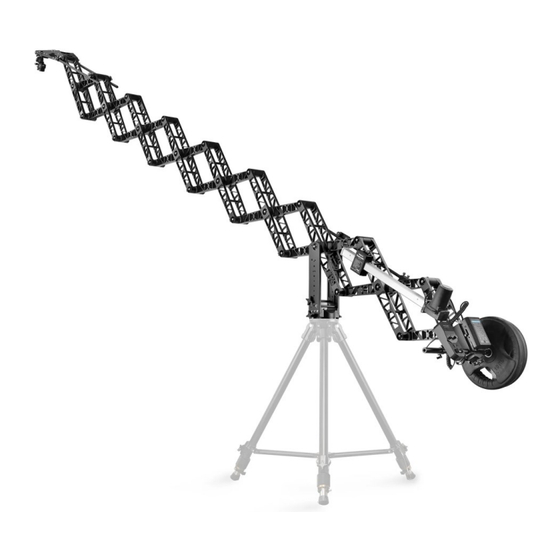
Powermatic Scissor Pro 17ft Telescopic Camera Jib Crane
(JB-SCSR-02)
A s s e m b l y M a n u a l
What's In The Box
Please inspect the contents of your shipped package to ensure you have received everything that
is listed below.
3 x Guide Rods
Weight Rod
Hub Locking Knob
Ronin
2 x Weight Closers
Controller
Powermatic Scissor Jib with
Speed Controller
bracket
Gimbal Fluid Head
Monitor Arm
Remote
All rights reserved.
No part of this document may be reproduced, stored in a retrieval system, or transmitted by any form or by any means,
electronic, mechanical, photo-copying, recording, or otherwise, except as may be expressly permitted by the applicable copyright
statutes or in writing by the Publisher.
Advertisement
Table of Contents

Related Manuals for PROAIM CINEMA JB-SCSR-02


Summary of Contents for PROAIM CINEMA JB-SCSR-02
- Page 1 Powermatic Scissor Pro 17ft Telescopic Camera Jib Crane (JB-SCSR-02) A s s e m b l y M a n u a l What’s In The Box Please inspect the contents of your shipped package to ensure you have received everything that is listed below.
- Page 2 Female to Female Connector BNC Wire HDMI Male to Male Wire 15V AC Adapter 2 x Fuse Female to Female Connector Controller Box with Battery plate 3 x T-Type Allen Keys 3/16” Allen Key (2.5mm , 3mm & 4mm) 18mm Wrench able Tie Flight Case...
-
Page 3: Safety Hints
Safety Hints ATTENTION: PLEASE READ THIS BEFORE USING THE CRANE TO PREVENT DAMAGE! Assembly Caution: Be attentive when assembling the Dolly, Tripod, and Crane to prevent equipment damage. Avoid assem- bling under the influence of alcohol or drugs. Watch Your Hands: Operate cautiously to avoid pinching hands or fingers between arms. - Page 4 INDEX Sr. No Particulars Page No. Powermatic Scissor Pro Camera Jib Crane Setup Controller Box Mounting Weight Rod Mounting Speed controller Remote Mounting Wires Attaching Weight Mounting Battery Mounting LCD Monitor Arm Mounting 9-10 Gimbal Fluid Head Setup 10-11 Attaching the Cable Tie Retraction/Expansion Direction Control 11-12...
- Page 5 Powermatic Scissor Pro Camera Jib Crane Setup • Insert the bolt into the hub mounting hole of the Scissor Crane. • Now, secure the bolt using a 18mm wrench. • Place the Scissor Jib with the Hub Mounting on top of the Jib Stand. •...
- Page 6 FEATURE: Pan Lock enables locking the jib’s pan movement for achieving high/low angle shots. And, Tilt Lock allows you to fix the jib’s tilt angle to get linear tracking shots. Guide High speed special bearing NOTE: While using the jib at an extremely high angle, the rear part of Gimbal will touch Gimbal Bracket.
- Page 7 • After positioning the weight rod centrally, re-tighten it using the flower knob. Speed Controller Remote Mounting • Loosen the ratchet knob (red) of the Speed Controller Remote and then slide the Speed Controller Remote Clamp according to your requirement. •...
- Page 8 Wires Attaching • After attaching the Speed Controller Remote to the weight rod affix the pin of a spiral cable to the Speed Controller Remote. • Tighten the pin of the spiral cable. • Connect the speed Controller cable to the 6-pin (Remote Out) of the Battery Plate.
-
Page 9: Battery Mounting
Weight Mounting • Insert the weight into the weight rod. NOTE: Weight will be added according to the setup required to balance the camera properly. • Insert the weight closer and press its lever to secure it. Battery Mounting • mount your V-Mount... - Page 10 • Fix LCD Monitor (Not Included) on the Monitor Arm and lock it using the provided locking knob. • To power your LCD, insert its first port in the power plug of the motor and the second port in the back side of the LCD. •...
-
Page 11: Attaching The Cable Tie
• Loosen the back knob (shown in the left image) of the Ronin Controller bracket and slide it onto the weight rod, • Re-tighten the knob to secure the bracket. • Now, loosen the top knob of the Ronin Controller bracket and insert the controller into the bracket’s knob and tighten it. -
Page 12: Bearing Maintenance
• Upgraded Controller Kit has now been properly attached to the Scissor Jib Crane. Maintenance Bearing Maintenance If after a period of time your bearings don’t smoothly, lubricate with light machine oil. Be sure to keep oil away from your camera, & clean up any over-spill. Cleaning Do not use solvents or harsh cleaners of any kind on your crane. - Page 13 YOUR PROAIM POWERMATIC SCISSOR PRO 17FT CAMERA JIB CRANE ALL DRESSED UP AND READY TO GO! (SHOWN WITH OPTIONAL ACCESSORIES) Warranty: We offer a one-year warranty for all our products from the date of purchase. Within this period, we will repair it without charge for labor or parts. The warranty doesn’t cover transportation costs, nor does it cover a product subjected to misuse or accidental damage.
Need help?
Do you have a question about the CINEMA JB-SCSR-02 and is the answer not in the manual?
Questions and answers