
Subscribe to Our Youtube Channel
Related Manuals for NCR CX3 POS


Summary of Contents for NCR CX3 POS
- Page 1 NCR CX3 POS (7776) User Guide 7776 BCC5-0000-5565 Issue E Confidential and proprietary information of NCR. Unauthorized use, reproduction and/or distribution is strictly prohibited...
- Page 2 The product described in this document is a licensed product of NCR Corporation. NCR is a registered trademark of NCR Corporation. Product Type is a trademark of NCR Corporation in the United States and/or other countries. Other product names mentioned in this publication may be trademarks or registered trademarks of their respective companies and are hereby acknowledged.
- Page 3 Audience This book is written for store personnel, system integrators, and field engineers. Note This document is NCR proprietary information and is not to be disclosed or reproduced without consent. Confidential and proprietary information of NCR. Unauthorized use, reproduction and/or distribution is strictly prohibited.
-
Page 4: Table Of Contents
I/O Board Connector Pinouts USB 3.0 Cash Drawer RJ45 Serial Port 24V Power In Operator Control Power Switch LED Indicator Power Status LED Label Locations Hardware Installation Installation Restrictions Confidential and proprietary information of NCR. Unauthorized use, reproduction and/or distribution is strictly prohibited. - Page 5 Cleaning the Touchscreen Magnetic Stripe Reader Using the MSR Care of Cards Card Thickness Biometrics Fingerprint Reader Using the Biometrics Reader Cleaning the Sensor Software Drivers Confidential and proprietary information of NCR. Unauthorized use, reproduction and/or distribution is strictly prohibited.
- Page 6 Cleaning the Cabinet Disk Image Backup and NCR Image Recovery Tool Introduction Running the NCR Image Recovery Tool Starting the NCR Image Recovery Tool Main Screen Save or Load Image Change Settings Shutdown or Reboot System Information Save or Load Image Saving an Image...
- Page 7 Initial Terminal Imaging Introduction Imaging Procedure APA Graphical Display Required Packages Installing the NCR-PSx-Common Installing the NCR-PSx-Driver Installing the NCR-PSx-LineDisplay Installing the NCR-PSx-Utility CX Display Touch Tool Confidential and proprietary information of NCR. Unauthorized use, reproduction and/or distribution is strictly prohibited.
- Page 8 Current Leakage to G3 Mechanical Off section Mar 2023 Installation Restrictions section: Added warning regarding scanner/scale May 2023 Converted to Guild template Added Appendix: CX Display Touch Tool Confidential and proprietary information of NCR. Unauthorized use, reproduction and/or distribution is strictly prohibited.
-
Page 9: Ncr Cx3 Pos (7776) Overview
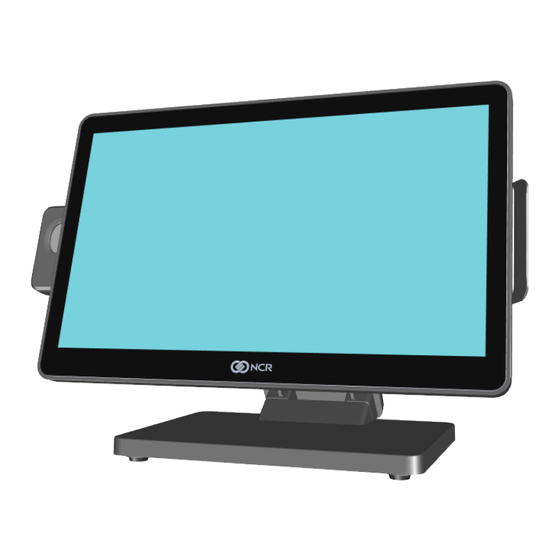
NCR CX3 POS (7776) Overview ® The NCR CX3 POS (7776) is powered by the 8th Gen Intel Whiskey Lake U Core™ ® SoC i3 and Celeron BGA on-board processor. The CX3 features a sleek design, packed with superior performance. It comes in a 15.6-inch display with a projected capacitive (PCAP) touchscreen. -
Page 10: Features
APA (All-Point Addressable) Graphical Display Features Power Cord F100 US Power Cord F101 International Power Cord Optional Features Optional Feature Description Ethernet Cable F110 10/100/1000 Ethernet Cable Confidential and proprietary information of NCR. Unauthorized use, reproduction and/or distribution is strictly prohibited. -
Page 11: Operating Systems
Orderman Windows 10 IoT Enterprise 2019 LTSC Entry (64 bit) (UEFI BIOS) Embedded OS 7776-F740 Orderman Windows 10 IoT Enterprise 2019 LTSC Value (64 bit) (UEFI BIOS) Embedded OS Base client and third-party software are also available on the public NCR Platform Software Website: http://www.ncr.com/support/support_drivers_ patches.asp?Class=External\display Confidential and proprietary information of NCR. -
Page 12: Specifications
Yes (via keyboard function) Odometer Chip RAID Support Memory Memory Type DDR4-2133 DDR4-2400 Form Factor SODIMM SODIMM Memory Slots Standard Memory 8GB (1 x 8GB) 8GB (1 x 8GB) Confidential and proprietary information of NCR. Unauthorized use, reproduction and/or distribution is strictly prohibited. - Page 13 Anti-Glare VESA Pattern 75mm 75mm Peripherals 3-track Encrypted Option Option Integrated Option Option Biometric Reader 2-in-1 Sign-in Option Option Device Consumer Displays APA Customer Option Option Display Confidential and proprietary information of NCR. Unauthorized use, reproduction and/or distribution is strictly prohibited.
- Page 14 (380.2 mm x 210.6 mm x 299.1 mm) (CX3 with Stand) (w x d x h) Terminal Weight 6.08 kg (13.40 lbs) (CX3 with Stand) Note Weight varies by configuration. Confidential and proprietary information of NCR. Unauthorized use, reproduction and/or distribution is strictly prohibited.
-
Page 15: Mounting Configurations
The NCR CX3 POS (7776) can be mounted on a table top using the stand feature. Wall/VESA Mount The NCR CX3 POS (7776) can be mounted on a wall or on a VESA display mount. The VESA mounting pattern is 75 mm by 75 mm. -
Page 16: I/O Ports
I/O Ports The following is the default I/O ports for the NCR CX3 POS (7776). Callout Port Name RJ45 LAN Port USB 3.0 (x2) Note Each USB 3.0 supports +5V at 0.9A max. USB 2.0 (x4) Note Each USB 2.0 supports +5V at 0.5A max. -
Page 17: I/O Board Connector Pinouts
The CX3 Motherboard provides a dual-stack USB 3.0 Type A connector. Each USB 3.0 port is capable of supplying +5V at 0.9A max. Signal D– Rx– Tx– Confidential and proprietary information of NCR. Unauthorized use, reproduction and/or distribution is strictly prohibited. -
Page 18: Cash Drawer
A Y-cable is required when connecting to any 12V cash drawer or to dual cash drawers. Signal Name Frame Gnd Solenoid A Drawer A/B +24V/12V Solenoid B Logic Gnd Confidential and proprietary information of NCR. Unauthorized use, reproduction and/or distribution is strictly prohibited. -
Page 19: Rj45 Serial Port
RJ45 Serial Port The CX3 Motherboard provides one dual package RJ45 serial port. The color of the connector is yellow. Signal Name DTR/5V RTS/12V Confidential and proprietary information of NCR. Unauthorized use, reproduction and/or distribution is strictly prohibited. -
Page 20: 24V Power In
24V Power In The CX3 Motherboard accepts +24V DC voltage input from an external power supply. The Power In connector is a 4-pin DC IN. Signal Name Confidential and proprietary information of NCR. Unauthorized use, reproduction and/or distribution is strictly prohibited. -
Page 21: Operator Control
Operator Control Power Switch The Power Switch is located at the bottom of the display. This switch is a momentary contact, push-on-push-off switch. Confidential and proprietary information of NCR. Unauthorized use, reproduction and/or distribution is strictly prohibited. -
Page 22: Led Indicator
Color Description Solid Green Terminal is ON and all voltages from power supply and motherboard are okay. Terminal is in SUSPEND (S3/S4/S5) mode. Confidential and proprietary information of NCR. Unauthorized use, reproduction and/or distribution is strictly prohibited. -
Page 23: Label Locations
Label Locations Confidential and proprietary information of NCR. Unauthorized use, reproduction and/or distribution is strictly prohibited. -
Page 24: Hardware Installation
Hardware Installation Installation Restrictions The NCR CX3 POS (7776) conforms to all applicable legal requirements. To view the compliance statements, see the NCR POS Terminals Safety and Regulatory Information (B005-0000-1589). When installing the terminal, follow these guidelines: Install the CX3 near an electrical outlet that is easily accessible. Use the power cord as a power disconnect device. -
Page 25: Ergonomic Workplace
Ergonomic Workplace Due to the high brightness LCD of the NCR CX3 POS (7776) refer to the following recommendations for an ergonomic workstation: Avoid direct–glaring and reflective–glaring light. When installed next to windows, position the terminal so it does not reflect the outside light. -
Page 26: Installing The Terminal
The POS LCD has a protective film. After removing the film, the LCD should be cleaned. For more information, refer to Cleaning the Touchscreen on page 29. Confidential and proprietary information of NCR. Unauthorized use, reproduction and/or distribution is strictly prohibited. -
Page 27: Connecting Ac Power
The CX3 receives power from an external 24V power brick. Caution The CX3 requires the NCR 24V power supply that is shipped with the terminal. Use of other power bricks may cause damage to the unit. 1. Connect the Power Supply cable to the Power In connector on the terminal. -
Page 28: Connecting To A Network
2. Connect the other end of the 10/100/1000 Ethernet cable to a network hub. Note Consult with your business Information Technology (IT) representative to determine the available connection and to locate the network hub. Confidential and proprietary information of NCR. Unauthorized use, reproduction and/or distribution is strictly prohibited. -
Page 29: Installing The Cash Drawer
The Cash Drawer can be connected to the Cash Drawer connector on the terminal or to a transaction printer. Note The following example shows the NCR 7199 printer. Confidential and proprietary information of NCR. Unauthorized use, reproduction and/or distribution is strictly prohibited. -
Page 30: Installing The Second Cash Drawer
The two cables look very similar. Make sure you use the correct one. Connecting the wrong cable can cause system damage. To identify the cable part number, check the label attached to the cable. Confidential and proprietary information of NCR. Unauthorized use, reproduction and/or distribution is strictly prohibited. -
Page 31: Configuring Gen3 Cash Drawer Switch Polarity
2. Set the value of the new DWORD to 1 For Cash Drawer 2 1. Create a new DWORD registry value at HKLM/Software/Radiant/Platform/CashDrawer/ReverseOpenDetect2 2. Set the value of the new DWORD to 1 Confidential and proprietary information of NCR. Unauthorized use, reproduction and/or distribution is strictly prohibited. -
Page 32: Installing The Transaction Printer
Connect the USB Printer Interface Cable or the Serial Cable to the printer and to the terminal, depending on the connection type. Serial Connection Note The following example shows the NCR 7199 printer. Confidential and proprietary information of NCR. Unauthorized use, reproduction and/or distribution is strictly prohibited. -
Page 33: Usb Connection
1639-K410 RJ45M TO RJ45F Remote Serial Printer Converter Dongle 1639-K467 RJ45M to HSR RJ12 Serial Converter Dongle USB Connection Note The following example shows the NCR 7199 printer. Confidential and proprietary information of NCR. Unauthorized use, reproduction and/or distribution is strictly prohibited. -
Page 34: Powering Up The Terminal
Checking video performance 3. Accept the License Terms Agreement. Note Depending on the installed operating system and the selected settings, the time it takes to boot up varies. Confidential and proprietary information of NCR. Unauthorized use, reproduction and/or distribution is strictly prohibited. -
Page 35: Removing The Stand
Always use a soft material (cloth or foam) to protect the display screen when placing the terminal face down. 2. Loosen the thumbscrew. 3. Slide the Stand in the direction shown to unhook it from the Terminal. Confidential and proprietary information of NCR. Unauthorized use, reproduction and/or distribution is strictly prohibited. -
Page 36: Operation And Cleaning
The active surface of PCAP touchscreens is not directly touched and does not wear off by normal use because it is located on the back side of the touchscreen, instead of the front side. Therefore, the NCR CX3 POS (7776) can be used in severe environmental conditions. -
Page 37: Cleaning The Touchscreen
4. Clean the screen further using a cloth dampened with isopropyl alcohol solution, or using pre-packaged wipes. 5. Ensure that the glass and screen edges are completely dry before using the unit. Confidential and proprietary information of NCR. Unauthorized use, reproduction and/or distribution is strictly prohibited. -
Page 38: Magnetic Stripe Reader
Cards should never be bent or folded in any way. Cards should never come in close proximity to a magnetic field. Card Thickness The MSR module accepts standard cards within the thickness range of 0.68–0.84 Confidential and proprietary information of NCR. Unauthorized use, reproduction and/or distribution is strictly prohibited. -
Page 39: Biometrics Fingerprint Reader
Scotch tape can be used to clean fingers. Stick the tape to the finger and then pull it off. Confidential and proprietary information of NCR. Unauthorized use, reproduction and/or distribution is strictly prohibited. -
Page 40: Cleaning The Sensor
Crossmatch website for drivers and application developer tools. https://www.crossmatch.com/company/support/request/ Cleaning the Cabinet To clean the cabinet of the NCR CX3 POS (7776), follow these steps: 1. Disconnect the unit from the AC outlet. Warning Do not use alcohol (methyl, ethyl, or isopropyl) or any strong dissolvent. -
Page 41: Disk Image Backup And Ncr Image Recovery Tool
HDD/SSD, making an exact duplicate of everything contained on the terminal. The NCR Image Recovery Tool uses the Windows Image (.WIM) file format to store the OS image. This is a file-based format for use with the ImageX and DISM tools that Microsoft created for use with Windows Vista and later OS versions. -
Page 42: Running The Ncr Image Recovery Tool
1. Ensure that the terminal is OFF. 2. Apply power to the terminal. 3. During boot, press and hold F9 until the NCR logo flashes on the screen. Confidential and proprietary information of NCR. Unauthorized use, reproduction and/or distribution is strictly prohibited. -
Page 43: Main Screen
This button opens the screen to properly Shutdown and Reboot the POS. System Information This is where useful information of the POS is displayed, such as Serial Number and Image Names. Confidential and proprietary information of NCR. Unauthorized use, reproduction and/or distribution is strictly prohibited. -
Page 44: Save Or Load Image
This function is used to either Save or Load an image from a storage device or network. 1. On the Main Screen, select Save or Load Image. 2. Enter the Password. The factory default password is Recovery1234. Confidential and proprietary information of NCR. Unauthorized use, reproduction and/or distribution is strictly prohibited. -
Page 45: Saving An Image
After the factory image is copied into the Recovery Partition, there is approximately 3GB remaining in the 8GB partition. Any data stored as an Confidential and proprietary information of NCR. Unauthorized use, reproduction and/or distribution is strictly prohibited. -
Page 46: Output Options
A typical, large POS software installation will not outpace the constraints of the local storage. Backups to separate slots in the NCR Image Recovery Tool only increase the total storage required by the amount of data added to the image. When the contents... - Page 47 2. Select the USB Button. If this is the first backup performed on this POS, the image is automatically saved as a Site backup. Confidential and proprietary information of NCR. Unauthorized use, reproduction and/or distribution is strictly prohibited.
- Page 48 User Image – Use this option for routine day-to-day or periodical backups. Note Site and User backups are separate independent backups. The image information is updated with the new image date. Confidential and proprietary information of NCR. Unauthorized use, reproduction and/or distribution is strictly prohibited.
-
Page 49: Loading An Image
"Windows failed to load" or "missing or corrupt registry". If this happens, you can do an Image load of the Factory image with the NCR Image Recovery Tool. 1. Select the arrow that points from the desired load device to the terminal. - Page 50 2. Select the USB Button. If you are loading from a network, the Select a Network Drive dialog screen will open. Confidential and proprietary information of NCR. Unauthorized use, reproduction and/or distribution is strictly prohibited.
- Page 51 User Image – Most recent routine backup. Site Image – Image of the terminal after application components were loaded. Factory Image – The NCR Base Image as shipped from the factory. Confidential and proprietary information of NCR. Unauthorized use, reproduction and/or distribution is strictly prohibited.
- Page 52 All the information in the current productive/working image on the drive is lost with this operation! A progress bar is displayed as the image is applied. Confidential and proprietary information of NCR. Unauthorized use, reproduction and/or distribution is strictly prohibited.
- Page 53 A message is displayed when the load is complete. 5. Reboot the POS. Confidential and proprietary information of NCR. Unauthorized use, reproduction and/or distribution is strictly prohibited.
-
Page 54: Change Settings
On the Main Screen, select Change Settings. There are four functions available on the Change Settings screen: Change Network Settings Change Password Replace Recovery Image Change Language Confidential and proprietary information of NCR. Unauthorized use, reproduction and/or distribution is strictly prohibited. -
Page 55: Change Network Settings
Change Network Settings 1. On the Change Settings Screen, select Change Network Settings. 2. Enter the network configuration settings and then select Save. Confidential and proprietary information of NCR. Unauthorized use, reproduction and/or distribution is strictly prohibited. -
Page 56: Change Password
2. Enter the current password and the new password, and then select Enter. If you have forgotten or lost the password, select Lost Password. A unique code is generated that you can provide to NCR Support to receive a new temporary password. -
Page 57: Replace Recovery Image
Replace Recovery Image This feature is used to update the NCR Image Recovery Tool and the environment that it runs in. 1. On the Change Settings Screen, select Replace Recovery Image. 2. Select the source of the Recovery Image. Confidential and proprietary information of NCR. -
Page 58: Change Language
3. Complete the image replacement in the same manner as with the POS Site/User image restore procedures. Change Language 1. On the Change Settings Screen, select Change Language. 2. Select the language of choice. Confidential and proprietary information of NCR. Unauthorized use, reproduction and/or distribution is strictly prohibited. -
Page 59: Creating A Disk Image
This terminal has an Image Recovery function that permits end users to quickly restore a disk backup from a hidden partition on the NCR system storage. To utilize this valuable feature, the image must be created using the NCR Imaging Suite. -
Page 60: Power Management
Working state. The system's context will not be preserved by the hardware. The system must be restarted to return to the Working state. It is not safe to disassemble the machine in this state. Confidential and proprietary information of NCR. Unauthorized use, reproduction and/or distribution is strictly prohibited. -
Page 61: G1 Sleeping
The CX3 does not support S1 state. Turning off the backlight and hard drives provides the equivalent power savings (due to Intel's processor C-states feature) at nearly zero latency. S2: Not supported Confidential and proprietary information of NCR. Unauthorized use, reproduction and/or distribution is strictly prohibited. - Page 62 (the OS is responsible for maintaining the caches and CPU context). Control starts from the processor's reset vector after the wake event. In NCR systems, during S3, power is only provided to the USB 3.0 ports.
- Page 63 1.91W 1.61W 0.96W 4205U Core i3 31.73W 17.46W 1.43W 1.19W 1.19W 8145UE Wake Options Power Switch Touch USB Keyboard USB Mouse LAN (magic packet) RTC Alarm Confidential and proprietary information of NCR. Unauthorized use, reproduction and/or distribution is strictly prohibited.
-
Page 64: Enabling Wake On Lan
In order for Wake on LAN to function, the Network driver must be enabled (factory default). 1. Right-click on Start, then select Device Manager. 2. Select Network adapters. Confidential and proprietary information of NCR. Unauthorized use, reproduction and/or distribution is strictly prohibited. - Page 65 3. Right-click Intel(R) Ethernet Connection I219-LM >> Properties. 4. Under the Advanced tab, Wake on Magic Packet and Wake on Pattern Match should be enabled. Select OK after making the changes. Confidential and proprietary information of NCR. Unauthorized use, reproduction and/or distribution is strictly prohibited.
- Page 66 5. Under the Power Management tab, Allow this device to wake the computer option box should be checked. Select OK after making the changes. Confidential and proprietary information of NCR. Unauthorized use, reproduction and/or distribution is strictly prohibited.
-
Page 67: Bios Setup
1. Connect an alphanumeric USB keyboard to the terminal. 2. Apply power to the terminal. 3. When you see the NCR logo displayed, press Del or F2. Selecting Menu Options The following keyboard controls are used to select the various menu options and to make changes to their values. -
Page 68: Bios Updating Procedure
The BIOS is located in the Serial Peripheral Interface (SPI) chip on the processor board. This chapter discusses procedures on how to update the terminal SPI and/or BIOS. The update software is distributed via the NCR Website: http://www5.ncr.com/support/support_drivers_patches.asp The BIOS update can be performed using the following methods:... -
Page 69: Spi/Bios Updating Procedures
Download the Rufus Tool from the Rufus Website: https://rufus.ie/ use the tool to deploy image into USB key. a. Select the device from the Device drop-down list. Confidential and proprietary information of NCR. Unauthorized use, reproduction and/or distribution is strictly prohibited. - Page 70 Press Select to choose the image from the Boot Selection drop-down list. Confidential and proprietary information of NCR. Unauthorized use, reproduction and/or distribution is strictly prohibited.
- Page 71 Press Start to load the image. Confidential and proprietary information of NCR. Unauthorized use, reproduction and/or distribution is strictly prohibited.
- Page 72 After the update has completed and the terminal is rebooted, the terminal may reboot additional times as it powers up. This is normal and expected behavior due to the nature of the features of the BIOS/SPI. Confidential and proprietary information of NCR. Unauthorized use, reproduction and/or distribution is strictly prohibited.
-
Page 73: Using The Windows Flash Executable
The terminal will reboot after the flash process has completed. Caution The reboot is important to ensure the BIOS initializes properly. Do not interrupt the reboot process. Confidential and proprietary information of NCR. Unauthorized use, reproduction and/or distribution is strictly prohibited. -
Page 74: Initial Terminal Imaging
3. Power on the terminal and boot from the USB Flash Drive. This can be done by pressing F8 during the boot and choosing the USB option (NCR), or by entering BIOS Setup and changing the boot order. The system boots in the Windows PE OS environment. -
Page 75: Apa Graphical Display
APA Graphical Display Required Packages 1. Go to the NCR Drivers and Patches page : https://www5.ncr.com//support/support_drivers_ patches.asp?Class=External/NCRPSL\NCRPSW\Platform\display 2. Using the email link on the bottom of the Drivers and Patches page, request for the following packages: NCR-PSx-Driver – driver package for all terminals/peripherals NCR-PSx-Common –... -
Page 76: Installing The Ncr-Psx-Common
Installing the NCR-PSx-Common To install the NCR-PSx-Common, follow these steps: 1. Run NCR-PSx-Common. The NCR-PSW-Common-x86 Setup Wizard is displayed. 2. Select Next. The Business Unit Selection window is displayed. Confidential and proprietary information of NCR. Unauthorized use, reproduction and/or distribution is strictly prohibited. - Page 77 3. Do the following: Select the radio button for Retail POS. Select Next. The Configuration window is displayed. Confidential and proprietary information of NCR. Unauthorized use, reproduction and/or distribution is strictly prohibited.
- Page 78 Select the radio button for OLE for Retail (OPOS). Select the Yes radio button. Select Next. The Ready to Install window is displayed. 5. Select Next. The installation begins. Confidential and proprietary information of NCR. Unauthorized use, reproduction and/or distribution is strictly prohibited.
- Page 79 6. When the installation is completed, select Finish. Confidential and proprietary information of NCR. Unauthorized use, reproduction and/or distribution is strictly prohibited.
-
Page 80: Installing The Ncr-Psx-Driver
Installing the NCR-PSx-Driver To install the NCR-PSx-Driver, follow these steps: 1. Run NCR-PSx-Driver. The NCR-PSW-Driver Setup Wizard is displayed. 2. Select Next. The Ready to Install window is displayed. 3. Select Next. The installation begins. Confidential and proprietary information of NCR. - Page 81 4. When the installation is completed, select Finish. Confidential and proprietary information of NCR. Unauthorized use, reproduction and/or distribution is strictly prohibited.
-
Page 82: Installing The Ncr-Psx-Linedisplay
Installing the NCR-PSx-LineDisplay To install the NCR-PSx-LineDisplay, follow these steps: 1. Run NCR-PSx-LineDisplay. The NCR-PSW-Linedisplay-x86 Setup Wizard is displayed. 2. Select Next. The Ready to Install window is displayed. Confidential and proprietary information of NCR. Unauthorized use, reproduction and/or distribution is strictly prohibited. - Page 83 3. Select Next. The installation begins. 4. When the installation is completed, select Finish. Confidential and proprietary information of NCR. Unauthorized use, reproduction and/or distribution is strictly prohibited.
-
Page 84: Installing The Ncr-Psx-Utility
Installing the NCR-PSx-Utility To install the NCR-PSx-Utility, follow these steps: 1. Run NCR-PSx-Utility. The NCR-PSW-Utility-x86 Setup Wizard is displayed. 2. Select Next. The Ready to Install window is displayed. 3. Select Next. The installation begins. Confidential and proprietary information of NCR. - Page 85 4. When the installation is completed, select Finish. Confidential and proprietary information of NCR. Unauthorized use, reproduction and/or distribution is strictly prohibited.
-
Page 86: Cx Display Touch Tool
The tool supports the following CX terminals: NCR CX3 POS (7776) NCR CX5 POS (7773) NCR CX7 POS (7772) The tool is located in the following location: https://www5.ncr.com//support/support_drivers_ patches.asp?Class=External/CXDisplay%5CTouch%5CTool%5CDisplay Refer to the Readme document for the installation procedure. Confidential and proprietary information of NCR. Unauthorized use, reproduction and/or distribution is strictly prohibited.
Need help?
Do you have a question about the CX3 POS and is the answer not in the manual?
Questions and answers