Advertisement
Quick Links
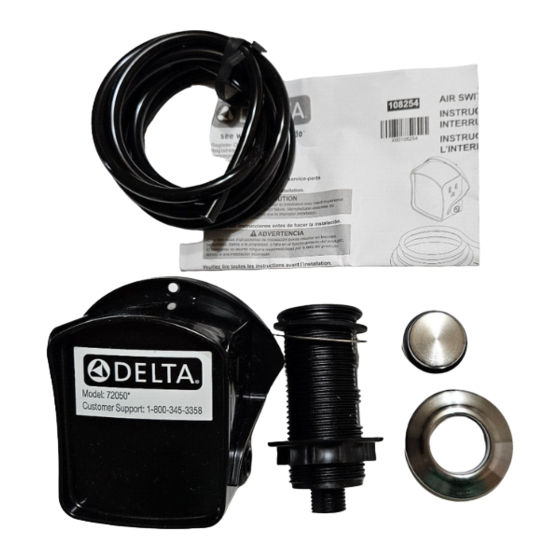
108254
Register Online
Regístrese en línea
S'enregistrer en ligne
www.deltafaucet.com/registerme
?
1-800-345-3358
www.deltafaucet.com/service-parts
Read all instructions prior to installation.
!
CAUTION
Failure to read these instructions prior to installation may result in personal
injury, property damage, or product failure. Manufacturer assumes no
responsibility for product failure due to improper installation.
Lea todas las instrucciones antes de hacer la instalación.
ADVERTENCIA
!
El no leer estas instrucciones de instalación puede resultar en lesiones
personales, daños a la propiedad, o falla en el funcionamiento del producto.
El fabricante no asume ninguna responsabilidad por la falla del producto
debido a una instalación incorrecta.
Veuillez lire toutes les instructions avant l'installation.
!
AVERTISSEMENT
L'omission de lire les présentes instructions avant l'installation peut
entraîner des blessures, des dommages matériels ou le bris du produit. Le
fabricant se dégage de toute responsabilité à l'égard d'un bris du produit
causé par une mauvaise installation.
1
2
3
4
5
Route the air tubing (5) to the power module (6) in a convenient path where it will not be kinked,
The push button (1) MUST be mounted within 5 feet of the controller outlet. Mount the push but-
cut or become disconnected. NOTE: DO NOT route the air tubing taut. Securely connect the re-
ton (1) either directly through a standard sink hole or through the counter top by drilling a 1 1/4"
maining end of the air tubing (5) to the fitting on the power module (6). Insert the power module
diameter hole. Select a location which is convenient for user operation. The push button body
(6) into a dedicated, grounded 120 Vac wall outlet that is continuously energized.
can be mounted through surfaces up to 2" thick.
Plug the disposer into the power module (6) outlet. CAUTION: The disposer may begin to oper-
The rubber gasket (2) MUST be located between the threaded body flange and the mounting
ate. If it does, simply press and release the push button to turn the disposer off. If applicable,
surface. NOTE: The optional stainless steel washer (3) is required for openings greater than 1
plug the second appliance to be controlled into the remaining power module (6) outlet.
1/4" diameter (1 11/32" Maximum). If utilized, the washer MUST be located between the rubber
Be sure that the control system is operating properly before using the disposer. Press and re-
gasket and the sink or counter top. Insert the threaded body through the mounting hole and
lease the push button to turn the disposer ON. Press and release the push button again to turn
re-secure the mounting nut (4). Tighten to ensure a watertight seal.
the disposer OFF, returning power to the second outlet.
Securely connect one end of the air tubing (5) to the fitting on the push button.
Guie el tubo de aire (5) al módulo de alimentación (6) en una ruta conveniente donde no se
El botón pulsador (1) DEBE montarse a menos de 5 pies de la salida del controlador. Monte
enrosque, corte o desconecte. NOTA: NO corra el tubo de aire de manera que quede tenso.
el botón pulsador (1) directamente a través de un orificio del fregadero estándar o a través de
Conecte finamente el extremo restante del tubo de aire (5) al accesorio del módulo de aliment-
la encimera perforando un orificio de 1 1/4"de diámetro. Seleccione una ubicación que sea
ación (6). Inserte el módulo de alimentación (6) en un tomacorriente de pared dedicado de 120
conveniente para la operación del usuario. El cuerpo del botón se puede montar a través de
V CA con conexión a tierra que recibe electricidad continuamente.
superficies de hasta 2" de espesor.
Enchufe el triturador a la salida del módulo de alimentación (6). AVISO: El triturador puede co-
El empaque de goma (2) DEBE ubicarse entre la brida del cuerpo roscado y la superficie de
menzar a funcionar. Si lo hace, simplemente presione y suelte el botón para apagar el triturador.
montaje. NOTA: Se requiere la arandela de acero inoxidable opcional (3) para aberturas de
Si corresponde, conecte el segundo electrodoméstico a controlar en la salida del módulo de
más de 1 1/4" de diámetro (1 11/32" máximo). Si se utiliza, la arandela DEBE ubicarse entre
alimentación (6) restante. Asegúrese de que el sistema de control esté funcionando correcta-
el empaque de goma y el fregadero o la encimera. Inserte el cuerpo roscado a través del
mente antes de usar el triturador. Presione y suelte el botón ON para encender el triturador.
orificio de montaje y vuelva a asegurar la tuerca de montaje (4). Apriete para asegurar un sello
Presione y suelte el botón OFF de nuevo para apagar el triturador, devolviendo la energía a la
hermético.
segunda salida.
Conecte fijamente un extremo del tubo de aire (5) al accesorio del botón pulsador.
Faites courir le tube d'air (5) jusqu'au module d'alimentation (6) en choisissant un parcours où
Le bouton-poussoir (1) doit être monté à moins de 5 pieds de la prise de courant du contrôleur.
il ne risquera pas d'être pincé ni débranché accidentellement. NOTE : Le tube d'air NE DOIT
Montez le bouton-poussoir directement dans un trou de l'évier ou percez un trou de 1 1/4 po de
PAS être tendu. Branchez solidement l'extrémité restante du tube d'air (5) au raccord du module
diamètre dans le comptoir. Choisissez un endroit pratique. Le corps du bouton-poussoir peut
d'alimentation (6). Enfichez le module d'alimentation (6) dans une prise de courant murale
être monté dans des surfaces dont l'épaisseur ne dépasse pas 2 pouces.
réservée et mise à la terre de 120 V c.a. qui est continuellement sous tension.
Le joint de caoutchouc (2) DOIT être situé entre la collerette du corps fileté et la surface de
Branchez le broyeur de déchets dans la prise du module d'alimentation (6). ATTENTION : Le
montage. NOTE : La rondelle en acier inoxydable facultative (3) est requise pour les ouvertures
broyeur de déchets peut se mettre en marche. Si c'est le cas, enfoncez simplement le bouton-
de plus de 1 1/4 po de diamètre (1 11/32 po maximum). Si vous utilisez la rondelle, vous DEVEZ
poussoir et relâchez-le pour interrompre le fonctionnement du broyeur de déchets. S'il y a lieu,
la placer entre le joint en caoutchouc et l'évier ou le comptoir. Introduisez le corps fileté dans
branchez le deuxième appareil à contrôler dans la prise restante du module d'alimentation (6).
le trou de montage et remettez l'écrou de montage (4) en place. Serrez l'écrou pour former un
Assurez-vous que le système de commande fonctionne correctement avant d'utiliser le broyeur
joint étanche.
de déchets. Enfoncez et relâchez le bouton-poussoir pour mettre le broyeur de déchets en
Branchez solidement l'une des extrémités du tube d'air (5) au raccord du bouton-poussoir.
marche. Enfoncez et relâchez le bouton-poussoir de nouveau pour interrompre le fonc-
tionnement du broyeur de déchets et remettre la deuxième prise de courant sous tension.
01/10/2024 Rev. C
AIR SWITCH INSTRUCTIONS
Troubleshooting
1. Is there a wall switch that controls the switched outlet? If YES, confirm that the switch is in the ON position.
INSTRUCCIONES PARA EL
If the switch is in the ON position or there is NOT a wall switch - proceed to STEP 2.
INTERRUPTOR DE AIRE
2. Confirm that the electrical circuit breaker (in breaker box) did NOT trip. If the breaker did NOT trip - proceed
to STEP 3.
INSTRUCTIONS CONCERNANT
3. Check to see that the controller is securely plugged into the outlet. If this is a GFCI protected outlet, confirm
L'INTERRUPTEUR PNEUMATIQUE
that the GFCI has not tripped. If the controller is securely plugged-in and the GFCI outlet has not tripped -
proceed to STEP 4.
4. Check to see that the tubing is securely connected to BOTH the controller and the topside on/off button as-
sembly. If securely attached - proceed to STEP 5.
5. Unplug the garbage disposal from the controller and remove the controller from the wall-outlet. Directly plug
the disposal into the wall-outlet. Does the disposal turn ON? If YES, unplug the Disposer from the outlet
and contact Customer Service.
Solución de averías
1. ¿Hay un interruptor de pared que controla la toma de corriente conmutada? En caso de que SÍ, confirme
que el interruptor está en la posición ON. Si el interruptor está en la posición ON o NO hay un interruptor
de pared, continúe con el PASO 2.
2. Confirme que el disyuntor eléctrico (en la caja de disyuntores) NO se disparó. Si el interruptor NO se dis-
paró, continúe con el PASO 3.
3. Verifique que el controlador esté bien enchufado a la toma de corriente. Si se trata de una salida protegida
con GFCI, confirme que el GFCI no se ha disparado. Si el controlador está enchufado de forma segura y la
salida GFCI no se ha disparado, continúe con el PASO 4.
RP101682p
Button Assembly & Hose
4. Asegúrese que el tubo esté bien conectado a AMBOS controladores y al ensamble del botón de encendido/
Conjunto de botones y manguera
apagado en la parte superior. Si está bien sujeto, continúe con el PASO 5.
Bouton et tuyau flexible
5. Desenchufe el triturador de basura del controlador y retire el controlador de la toma de corriente. Enchufe
directamente el triturador de desperdicios en la toma de corriente. ¿Se activa el triturador? Si se activa,
desconecte el triturador del tomacorriente y comuníquese con la Asistencia al Cliente.
Dépannage
1. La prise commandée par un interrupteur est-elle reliée à un interrupteur mural? Si la réponse est OUI,
assurez-vous que l'interrupteur est à ON. Si l'interrupteur mural est à ON ou il N'Y A PAS d'interrupteur
mural, passez à l'ÉTAPE 2.
2. Assurez-vous que le disjoncteur (dans le panneau de disjoncteurs) N'EST PAS déclenché. Si le disjoncteur
N'EST PAS déclenché, passez à l'ÉTAPE 3.
6
3. Assurez-vous que le contrôleur est bien branché dans la prise de courant. Si la prise de courant est munie
d'un disjoncteur de fuite à la terre, assurez-vous que le disjoncteur n'est pas déclenché. Si le contrôleur est
bien branché et le disjoncteur de la prise de courant n'est pas déclenché, passez à l'ÉTAPE 4.
4. Assurez-vous que le tube est raccordé solidement au contrôleur ET à la partie supérieure du bouton-pous-
5
soir. Si le tube est bien raccordé, passez à l'ÉTAPE 5.
5. Débranchez le broyeur de déchets du contrôleur et retirez le contrôleur de la prise de courant murale. Bran-
chez le broyeur de déchets directement dans la prise de courant murale. Le broyeur de déchets fonctionne-
t-il? Si la réponse est OUI, débranchez le broyeur de déchets de la prise de courant et communiquez avec
le Service à la clientèle.
LIMITED WARRANTY ON DELTA
ACCESSORY PRODUCTS
®
Delta
®
Accessories are warranted to the original consumer purchaser or commercial purchaser, as applicable, to be free from defects in material and workmanship for the applicable period specified
below:
Parts and Finish of Delta Accessories (excluding Sink Accessories): All parts and finishes (other than electronic parts and batteries) of Delta Accessories, other than sink accessories, purchased
from authorized Delta sellers are warranted to the original consumer purchaser to be free from defects in material and workmanship for as long as the original consumer purchaser owns the home in
which the accessory was first installed. For commercial purchasers, (a) the warranty period is ten (10) years for multi-family residential applications and (b) five (5) years for all other commercial applica-
tions, in each case from the date that the product is received by the original commercial purchaser or their authorized representative (installation contractor, etc.). For purposes of this warranty, the term
"multi-family residential application" refers to the purchase of the accessory from an authorized Delta seller by a purchaser who owns but does not live in the residential dwelling in which the accessory
is initially installed, such as in a rented or leased single unit or multi-unit detached home (duplex or townhome), or a condominium, apartment building or community living center. The following installa-
tions are not considered multi-family residential applications, are excluded from the 10-year warranty and are subject to the five-year warranty: industrial, institutional or other business premises, such
as a dormitory, hospitality premises (hotel, motel or extended stay location), airport, educational facility, long- or short-term healthcare facility (hospital, rehabilitation center, nursing, assisted or staged-
care living unit), public space or common area.
Parts and Finish of Delta Sink Accessories: All parts and finishes of Delta Sink Accessories purchased from authorized Delta sellers are warranted to the original purchaser to be free from defects in
material and workmanship for one (1) year from the date that the product is received by the original purchaser or their authorized representative (installation contractor, etc.).
Parts and Finish for Delta Recertified Accessories: Delta Faucet Company offers for sale on deltafaucet.com Delta Recertified Accessories. All parts (other than electronic parts and batteries) and
finishes of these Delta Recertified Accessories, (other than Sink Accessories) are warranted to the original consumer purchaser to be free from defects in material and workmanship for ten (10) years
from the date that the product is received by the original consumer purchaser or their authorized representative (installation contractor, etc.). For commercial purchasers, the warranty period is one (1)
year from the date that the product is received by the original commercial purchaser or their authorized representative (installation contractor, etc.). Delta Recertified Sink Accessories are warranted to
the original purchaser to be free from defects in material and workmanship for one (1) year from the date that the product is received by the original purchaser or their authorized representative (installa-
tion contractor, etc.).
Electronic Parts: Electronic parts (other than batteries), if any, of Delta Accessories purchased from deltafaucet.com or authorized Delta sellers are warranted to the original consumer purchaser to be
free from defects in material and workmanship for two (2) years from the date that the product is received by the original consumer purchaser or their authorized representative (installation contractor,
etc.) or, for commercial purchasers, for one (1) year from the date that the product is received by the original commercial purchaser or their authorized representative (installation contractor, etc.). No
warranty is provided on batteries.
What We Will Do: Delta Faucet Company will repair or replace, free of charge, during the applicable warranty period (as described above), any part or finish that proves defective in material and/or
workmanship under normal installation, use and service. If repair or replacement is not practical, Delta Faucet Company may elect to refund the purchase price in exchange for the return of the product.
These are your exclusive remedies.
What Is Not Covered: Because Delta Faucet Company is unable to control the quality of Delta products sold by unauthorized sellers, unless otherwise prohibited by law, this warranty does not cover
Delta products purchased from unauthorized sellers.
Any labor charges incurred by the purchaser to repair, replace, install or remove this product are not covered by this warranty. Delta Faucet Company shall not be liable for any damage to the product
resulting from reasonable wear and tear, outdoor use, misuse (including use of the product for an unintended application), abuse, neglect or improper or incorrectly performed installation, maintenance
or repair, including failure to follow the applicable installation, care and cleaning instructions. We also recommend that you use only genuine Delta ® replacement parts.
What You Must Do To Obtain Warranty Service or Replacement Parts: A warranty claim may be made and replacement parts may be obtained by calling
1-800-345-3358 or by contacting us by mail or online as follows (please include your model number, date of original purchase and documentation of the date of receipt of the product by the original
purchaser or their authorized representative (installation contractor, etc.)):
In the United States and Mexico:
In Canada:
Delta Faucet Company
Masco Canada Limited, Plumbing Group
55 E. 111th Street
Technical Service Centre
Carmel, IN 46280
350 South Edgeware Road
Attention: Warranty Service
St. Thomas, Ontario, Canada N5P 4L1
www.deltafaucet.com/service-parts/contact-us
Attention: Customer Service
http://www.deltafaucet.ca/customersupport/assistance.html
Proof of purchase (original sales receipt showing purchase date) and documentation of the date of receipt of the product by the original purchaser or their authorized representative (installation contrac-
tor, etc.) must be made available to Delta Faucet Company for all warranty claims unless the purchaser has registered the product with Delta Faucet Company or the product is a Delta Recertified
product purchased from deltafaucet.com. This warranty applies only to Delta accessories manufactured after January 1, 2019 and installed in the United States of America, Canada and Mexico.
Limitation on Duration of Implied Warranties: Please note that some states/provinces (including Quebec) do not allow limitations on how long an implied warranty lasts, so the below limitations may
not apply to you. TO THE MAXIMUM EXTENT PERMITTED BY APPLICABLE LAW, ANY IMPLIED WARRANTY, INCLUDING THE IMPLIED WARRANTIES OF MERCHANTABILITY AND OF FITNESS
FOR A PARTICULAR PURPOSE, IS LIMITED TO THE STATUTORY PERIOD OR THE DURATION OF THIS WARRANTY, WHICHEVER IS SHORTER.
Limitation of Special, Incidental or Consequential Damages: Please note that some states/provinces (including Quebec) do not allow the exclusion or limitation of special, incidental or conse-
quential damages, so the below limitations and exclusions may not apply to you. TO THE MAXIMUM EXTENT PERMITTED BY APPLICABLE LAW, THIS WARRANTY DOES NOT COVER, AND
DELTA FAUCET COMPANY SHALL NOT BE LIABLE FOR, ANY SPECIAL, INCIDENTAL OR CONSEQUENTIAL DAMAGES (INCLUDING LABOR CHARGES TO REPAIR, REPLACE, INSTALL OR
REMOVE THIS PRODUCT), WHETHER ARISING OUT OF BREACH OF ANY EXPRESS OR IMPLIED WARRANTY, BREACH OF CONTRACT, TORT, OR OTHERWISE. DELTA FAUCET COMPANY
SHALL NOT BE LIABLE FOR ANY DAMAGE TO THE ACCESSORY RESULTING FROM REASONABLE WEAR AND TEAR, OUTDOOR USE, MISUSE (INCLUDING USE OF THE PRODUCT FOR
AN UNINTENDED APPLICATION), ABUSE, NEGLECT OR IMPROPER OR INCORRECTLY PERFORMED INSTALLATION, MAINTENANCE OR REPAIR, INCLUDING FAILURE TO FOLLOW THE
APPLICABLE INSTALLATION, CARE AND CLEANING INSTRUCTIONS. Notice to residents of the State of New Jersey: The provisions of this warranty, including its limitations, are intended to apply to
the fullest extent permitted by the laws of the State of New Jersey.
Additional Rights: This warranty gives you specific legal rights, and you may also have other rights which vary from state/province to state/province.
This is Delta Faucet Company's exclusive written warranty and the warranty is not transferable.
If you have any questions or concerns regarding our warranty, please contact us as provided above or view our Warranty FAQs at www.deltafaucet.com.
© 2023 Delta Faucet Company of Indiana
Advertisement

Related Manuals for Delta 72050-BL-R


Summary of Contents for Delta 72050-BL-R
- Page 1 Le Any labor charges incurred by the purchaser to repair, replace, install or remove this product are not covered by this warranty. Delta Faucet Company shall not be liable for any damage to the product fabricant se dégage de toute responsabilité...
- Page 2 (installateur, etc.). Dans le libellé de la présente garantie, on entend par « application résidentielle multifamiliale », un ac- un vendedor autorizado de Delta por parte de un comprador que es propietario, pero no vive en la vivienda residencial en la que se instaló inicialmente el accesorio, como en una unidad individual cessoire acheté...