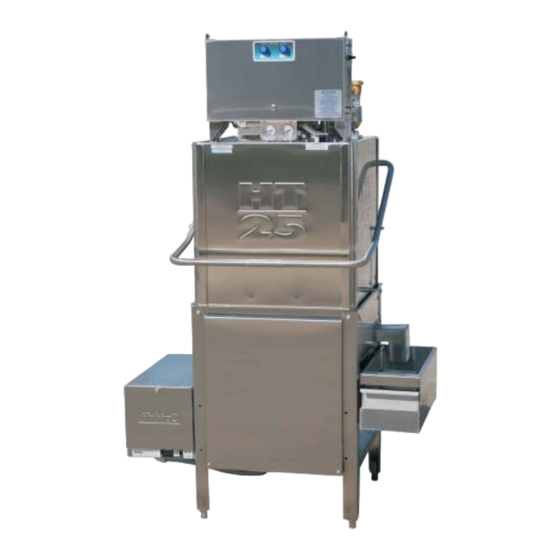
American Dish Service HT-25 Installation Instructions Manual
High temp dishmachine w/built-on booster combo
Hide thumbs
Also See for HT-25:
- Service manual (38 pages) ,
- Installation instructions manual (20 pages) ,
- Installation instructions manual (16 pages)
Advertisement
Quick Links
1
American Dish Service
INSTALLATION INSTRUCTIONS
Model HT-25, HT-34
208v/240v, 3-phase, 40a/5-Wire, Neutral
High Temp Dishmachine w/Built-on Booster Combo 208v/240v, 3-ph, 5-wire, 50a
Listed by UL #E68594, NSF/ANSI 3, ASSE 1004 #933, Mass. License P3-0111-306
If you have questions, call 800-922-2178 or visit our website at
www.AmericanDish.com
The electrical power supplied to this machine is an imminent hazard that could result in severe
bodily injury or death if not properly installed or hooked up correctly. When working in the control
box or on electrical parts, always disconnect power and tag-out before servicing. Replace cover
to control box and other protective covers when fi nished servicing this equipment.
Copyright ADS Installation Manual Model HT-25 (5 wire), Revision 3.0, 6/7/2013
Advertisement

Subscribe to Our Youtube Channel
Summary of Contents for American Dish Service HT-25
- Page 1 When working in the control box or on electrical parts, always disconnect power and tag-out before servicing. Replace cover to control box and other protective covers when fi nished servicing this equipment. Copyright ADS Installation Manual Model HT-25 (5 wire), Revision 3.0, 6/7/2013...
- Page 2 For HOT WATER SANITIZING, an additional booster heater must be installed to reach 180°F minimum for the fi nal rinse. This booster will require a rise of 70°. (The HT-25 does not have an internal booster heater, but ADS offers a combo package with a booster built-on to the left side of the machine and wired for a single point electrical connection.
- Page 3 NEU and GND, then tighten all wires. This model has 120v control circuit and components. THIS MODEL IS ALSO AVAILABLE WITHOUT A BOOSTER AT 40 AMPS. Copyright ADS Installation Manual Model HT-25 (5 wire), Revision 3.0, 6/7/2013...
- Page 4 Connections in the booster heater come from the HT-25/34 control box. The gray 3-phase power wires come from the 50a breaker in the HT-25/34 control box and connect to the incoming side of the booster contactor. The single yellow wire connects to the heater side of the contactor on the L1 terminal circuit.
- Page 5 To adjust pressure, turn adjustment screw atop the valve counter-clockwise to decrease pressure. Copyright ADS Installation Manual Model HT-25 (5 wire), Revision 3.0, 6/7/2013...
- Page 6 To adjust pressure, turn adjustment screw atop the valve counter-clockwise to decrease pressure. A chemical dispenser must be added that has a third pump for chlorine. Copyright ADS Installation Manual Model HT-25 (5 wire), Revision 3.0, 6/7/2013...
-
Page 7: Drain Requirements
There is NO CHEMICAL DISPENSER included with this model. Chemical dispensers must be provided and installed prior to operation. The installation of the dispenser is typically provided by the chemical supplier. Copyright ADS Installation Manual Model HT-25 (5 wire), Revision 3.0, 6/7/2013... - Page 8 INSTRUCTIONS FOR USING THE DE-LIME FEATURE ON A HT-25 are fi rst turn off the machine then empty all water out of the machine by removing the pump fi lter/drain plug. After all water has emptied out, replace the pump fi...
- Page 9 180°F, NOT in or at the sprays. If tapes are used to verify temperature, then only 165°F labels should be used, this is the temperature required on the surface of the plates--NOT 180°F. This is according to the NSF/ANSI Standard 3 test protocol. Copyright ADS Installation Manual Model HT-25 (5 wire), Revision 3.0, 6/7/2013...
- Page 10 Verify incoming water temperatures and fi nal rinse pressure (20 psi during fi nal rinse). Remove any of the white protective fi lm from stainless surfaces such as doors or panels. Copyright ADS Installation Manual Model HT-25 (5 wire), Revision 3.0, 6/7/2013...
- Page 11 The fl oat switch (#291-3014) is specifi cally made with this spring tension so the water control system will operate correctly. Do not replace with a timer switch even though they look the similar. Copyright ADS Installation Manual Model HT-25 (5 wire), Revision 3.0, 6/7/2013...
- Page 12 HT-25 WASH ARM BEARING REPLACEMENT OR CLEANING Remove 4 screws and lift top shell Remove top shell, exposing top bearing race Races are interchangeable, capture shells are Top race removed, ball bearings for replacemen also Copyright ADS Installation Manual Model HT-25 (5 wire), Revision 3.0, 6/7/2013...
- Page 13 Tab on endcap bent inward, causing loose fi t Straighten tab in line with the coin edge to tighten APPENDIX 089-9336---HT-25 Parts Manual 089-9451---Wire diagram 089-9345---Service Manual 089-9434---Brochure 089-9370---Wall Chart 089-9418---Spec Sheet 089-9377---Installation Manual HT-25 (5-wire) Copyright ADS Installation Manual Model HT-25 (5 wire), Revision 3.0, 6/7/2013...
- Page 14 34.4a 3-ph 8kW 208v 200 volts 7.4 kW 21.4a 3-ph (391-9001) 208 volts 8.0 kW 22.2a 3-ph 220 volts 8.9 kW 23.4a 3-ph 240 volts 10.6 kW 25.5a 3-ph Copyright ADS Installation Manual Model HT-25 (5 wire), Revision 3.0, 6/7/2013...
- Page 15 AUTO START OPTION FEEDER OPTION HOOD FAN OPTION BOOSTER OPTION DELIME SWITCH OPTION TANK HEATER HEAT-ON UPDATE CONTACTOR YELLOW 10A FUSE BOOSTER HEATER (OPTION) GRAY 13 KW THERMOSTAT BOOSTER CONTACTOR Copyright ADS Installation Manual Model HT-25 (5 wire), Revision 3.0, 6/7/2013...


Need help?
Do you have a question about the HT-25 and is the answer not in the manual?
Questions and answers