Table of Contents
Advertisement
Quick Links
Operation
Operation
Operation
Operation
Operation
Wiremap color code reference
Wiremap color code reference
Operation
Operation
Wiremap color code reference
Wiremap color code reference
Wiremap color code reference
Operation
Wiremap color code reference
Wiremap color code reference
© 2022 Softing IT Networks GmbH
CableMaster 210
Quick Reference Guide
v1.0422
itnetworks.softing.com
© 2022 Softing IT Networks GmbH
CableMaster 210
Quick Reference Guide
v1.0422
itnetworks.softing.com
© 2022 Softing IT Networks GmbH
© 2022 Softing IT Networks GmbH
CableMaster 210
CableMaster 210
© 2022 Softing IT Networks GmbH
Quick Reference Guide
Quick Reference Guide
© 2022 Softing IT Networks GmbH
CableMaster 210
v1.0422
v1.0422
CableMaster 210
© 2022 Softing IT Networks GmbH
Quick Reference Guide
itnetworks.softing.com
itnetworks.softing.com
© 2022 Softing IT Networks GmbH
Quick Reference Guide
CableMaster 210
v1.0422
© 2022 Softing IT Networks GmbH
CableMaster 210
v1.0422
Quick Reference Guide
itnetworks.softing.com
CableMaster 210
Quick Reference Guide
itnetworks.softing.com
v1.0422
Quick Reference Guide
v1.0422
itnetworks.softing.com
v1.0422
CableMaster 210 Quick Reference Guide - Kurzanleitung - Guide de démarrage rapide - Guía rápida - Guida rapida -
itnetworks.softing.com
itnetworks.softing.com
CableMaster 210 Quick Reference Guide - Kurzanleitung - Guide de démarrage rap
CableMaster 210 Quick Reference Guide - Kurzanleitung - Guide de démarrage
CableMaster 210 Quick Reference Guide - Kurzanleitung - Guide de démarrage rapide - G
CableMaster 210 Quick Reference Guide - Kurzanleitung - Guide de démarrage
CableMaster 210 Quick Reference Guide - Kurzanleitung - Guide de démarrage
CableMaster 210 Quick Reference Guide - Kurzanleitung - Guide de démarrage
CableMaster 210 Quick Start Guide
CableMaster 210 Quick Reference Guide - Kurzanleitung - Guide de démarrage
5
Internal remote - removable
6
Tone generator - button
The internal remote can be used both in the
device and externally.
7
Battery cover
To remove the remote from the device, pull the
remote down and out of the main device.
Switching on
The internal remote bears the identifier #1.
Press and hold any key briefly.
If you briefly press and hold the key (3), the wiring
mode is activated immediately.
EN
EN
If you briefly press and hold the key (6), the tone
6
Tone generator - button
generator is activated immediately.
EN
EN
7
Battery cover
1
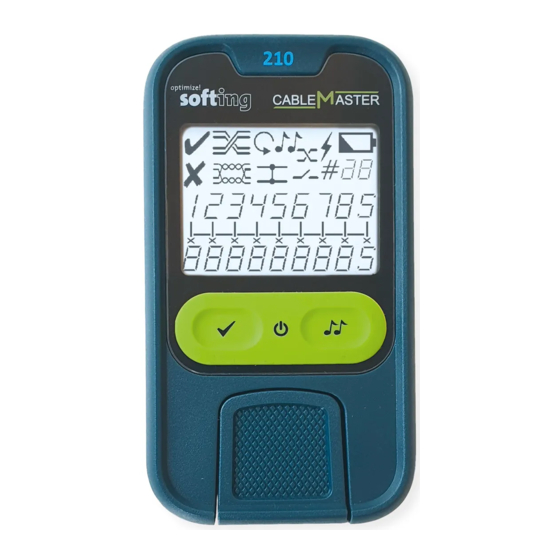
RJ45 test port
1
RJ45 test port
EN
EN
1
RJ45 test port
Switching on
EN
2
Backlit screen
2
Backlit screen
1
RJ45 test port
Press and hold any key briefly.
Switching off
1
RJ45 test port
2
Backlit screen
If you briefly press and hold the key (3), the wiring
3
Test button
3
1
Test button
RJ45 test port
The device switches off automatically.
2
Backlit screen
1
mode is activated immediately.
RJ45 test port
If you keep the key (4) pressed for a long time, the
2
Backlit screen
If you briefly press and hold the key (6), the tone
3
Test button
4
On/Off button
4
2
device switches off.
Backlit screen
On/Off button
3
Test button
generator is activated immediately.
2
Backlit screen
3
Test button
4
On/Off button
3
Test button
4
On/Off button
5
Internal remote - removable
5
Internal remote - removable
3
Test button
Single test
The internal remote can be used both in the
4
On/Off button
The internal remote can be used both in the
5
Internal remote - removable
Press and hold the key (3) briefly to start a wiring
4
On/Off button
device and externally.
device and externally.
4
On/Off button
5
Internal remote - removable
The internal remote can be used both in the
test.
To remove the remote from the device, pull the
Switching off
To remove the remote from the device, pull the
The internal remote can be used both in the
5
Internal remote - removable
device and externally.
remote down and out of the main device.
remote down and out of the main device.
The device switches off automatically.
5
Internal remote - removable
device and externally.
The internal remote can be used both in the
To remove the remote from the device, pull the
5
Internal remote - removable
The internal remote bears the identifier #1.
The internal remote bears the identifier #1.
If you keep the key (4) pressed for a long time, the
The internal remote can be used both in the
To remove the remote from the device, pull the
device and externally.
remote down and out of the main device.
Continuous test
The internal remote can be used both in the
device switches off.
device and externally.
remote down and out of the main device.
To remove the remote from the device, pull the
The internal remote bears the identifier #1.
If you keep the key (3) pressed for a long time, the
device and externally.
To remove the remote from the device, pull the
The internal remote bears the identifier #1.
remote down and out of the main device.
continuous test mode is activated. In this mode,
To remove the remote from the device, pull the
remote down and out of the main device.
The internal remote bears the identifier #1.
wiring tests are performed continuously until the
remote down and out of the main device.
6
Tone generator - button
6
Single test
Tone generator - button
The internal remote bears the identifier #1.
mode is terminated.
The internal remote bears the identifier #1.
Press and hold the key (3) briefly to start a wiring
6
Tone generator - button
7
Battery cover
7
test.
Battery cover
6
Tone generator - button
6
Tone generator - button
7
Battery cover
Activate backlight
Switching on
6
Tone generator - button
Switching on
7
Battery cover
6
Tone generator - button
Press and hold the key (4) briefly when the
Press and hold any key briefly.
Continuous test
Press and hold any key briefly.
7
Battery cover
instrument is switched on.
Switching on
If you briefly press and hold the key (3), the wiring
If you keep the key (3) pressed for a long time, the
If you briefly press and hold the key (3), the wiring
7
Battery cover
Switching on
Press and hold any key briefly.
7
Battery cover
mode is activated immediately.
continuous test mode is activated. In this mode,
mode is activated immediately.
Press and hold any key briefly.
Switching on
If you briefly press and hold the key (3), the wiring
Tone generator
If you briefly press and hold the key (6), the tone
wiring tests are performed continuously until the
If you briefly press and hold the key (6), the tone
Switching on
If you briefly press and hold the key (3), the wiring
Press and hold any key briefly.
mode is activated immediately.
Press and hold the key (6) briefly to activate the
Switching on
generator is activated immediately.
mode is terminated.
generator is activated immediately.
Press and hold any key briefly.
mode is activated immediately.
If you briefly press and hold the key (3), the wiring
If you briefly press and hold the key (6), the tone
tone generator. Pressing the key (6) several times
Press and hold any key briefly.
If you briefly press and hold the key (3), the wiring
If you briefly press and hold the key (6), the tone
mode is activated immediately.
generator is activated immediately.
will cycle through the operating modes of the
If you briefly press and hold the key (3), the wiring
mode is activated immediately.
generator is activated immediately.
If you briefly press and hold the key (6), the tone
tone generator.
mode is activated immediately.
Activate backlight
If you briefly press and hold the key (6), the tone
generator is activated immediately.
The tone emitted by the unit can be received with
If you briefly press and hold the key (6), the tone
Press and hold the key (4) briefly when the
generator is activated immediately.
compatible receivers such as CP15.
generator is activated immediately.
Switching off
instrument is switched on.
Switching off
It is possible to select different tone sequences
The device switches off automatically.
The device switches off automatically.
and wire or pair combinations.
Switching off
If you keep the key (4) pressed for a long time, the
If you keep the key (4) pressed for a long time, the
Tone generator
Switching off
The device switches off automatically.
device switches off.
Press and hold the key (6) briefly to activate the
device switches off.
The device switches off automatically.
Switching off
If you keep the key (4) pressed for a long time, the
tone generator. Pressing the key (6) several times
Switching off
If you keep the key (4) pressed for a long time, the
The device switches off automatically.
device switches off.
To change the batteries, open the battery
Switching off
will cycle through the operating modes of the
The device switches off automatically.
device switches off.
If you keep the key (4) pressed for a long time, the
compartment (7) and replace the two AAA
The device switches off automatically.
Single test
tone generator.
Single test
If you keep the key (4) pressed for a long time, the
device switches off.
batteries. Use only 1.5V alkaline batteries.
If you keep the key (4) pressed for a long time, the
Press and hold the key (3) briefly to start a wiring
The tone emitted by the unit can be received with
Press and hold the key (3) briefly to start a wiring
device switches off.
Single test
device switches off.
test.
compatible receivers such as CP15.
test.
Single test
Press and hold the key (3) briefly to start a wiring
It is possible to select different tone sequences
Press and hold the key (3) briefly to start a wiring
Single test
test.
and wire or pair combinations.
Single test
test.
Press and hold the key (3) briefly to start a wiring
Single test
Continuous test
Continuous test
Press and hold the key (3) briefly to start a wiring
test.
Press and hold the key (3) briefly to start a wiring
If you keep the key (3) pressed for a long time, the
If you keep the key (3) pressed for a long time, the
test.
Continuous test
test.
continuous test mode is activated. In this mode,
To change the batteries, open the battery
continuous test mode is activated. In this mode,
Continuous test
If you keep the key (3) pressed for a long time, the
wiring tests are performed continuously until the
compartment (7) and replace the two AAA
wiring tests are performed continuously until the
If you keep the key (3) pressed for a long time, the
Continuous test
continuous test mode is activated. In this mode,
mode is terminated.
batteries. Use only 1.5V alkaline batteries.
mode is terminated.
Continuous test
continuous test mode is activated. In this mode,
If you keep the key (3) pressed for a long time, the
wiring tests are performed continuously until the
Continuous test
If you keep the key (3) pressed for a long time, the
wiring tests are performed continuously until the
continuous test mode is activated. In this mode,
mode is terminated.
If you keep the key (3) pressed for a long time, the
continuous test mode is activated. In this mode,
mode is terminated.
wiring tests are performed continuously until the
continuous test mode is activated. In this mode,
Activate backlight
Activate backlight
wiring tests are performed continuously until the
mode is terminated.
wiring tests are performed continuously until the
Press and hold the key (4) briefly when the
Press and hold the key (4) briefly when the
mode is terminated.
Activate backlight
mode is terminated.
instrument is switched on.
instrument is switched on.
Activate backlight
Press and hold the key (4) briefly when the
Press and hold the key (4) briefly when the
Activate backlight
instrument is switched on.
Tone generator
Tone generator
Activate backlight
instrument is switched on.
Press and hold the key (4) briefly when the
Activate backlight
Press and hold the key (6) briefly to activate the
Press and hold the key (6) briefly to activate the
Press and hold the key (4) briefly when the
instrument is switched on.
Tone generator
Press and hold the key (4) briefly when the
tone generator. Pressing the key (6) several times
tone generator. Pressing the key (6) several times
instrument is switched on.
Tone generator
Press and hold the key (6) briefly to activate the
instrument is switched on.
will cycle through the operating modes of the
will cycle through the operating modes of the
Press and hold the key (6) briefly to activate the
Tone generator
tone generator. Pressing the key (6) several times
tone generator.
tone generator.
Tone generator
tone generator. Pressing the key (6) several times
Press and hold the key (6) briefly to activate the
will cycle through the operating modes of the
Tone generator
The tone emitted by the unit can be received with
The tone emitted by the unit can be received with
Press and hold the key (6) briefly to activate the
will cycle through the operating modes of the
tone generator. Pressing the key (6) several times
tone generator.
Press and hold the key (6) briefly to activate the
compatible receivers such as CP15.
compatible receivers such as CP15.
tone generator. Pressing the key (6) several times
tone generator.
will cycle through the operating modes of the
The tone emitted by the unit can be received with
tone generator. Pressing the key (6) several times
It is possible to select different tone sequences
It is possible to select different tone sequences
will cycle through the operating modes of the
The tone emitted by the unit can be received with
tone generator.
compatible receivers such as CP15.
will cycle through the operating modes of the
and wire or pair combinations.
and wire or pair combinations.
tone generator.
compatible receivers such as CP15.
The tone emitted by the unit can be received with
It is possible to select different tone sequences
tone generator.
The tone emitted by the unit can be received with
It is possible to select different tone sequences
compatible receivers such as CP15.
and wire or pair combinations.
The tone emitted by the unit can be received with
compatible receivers such as CP15.
and wire or pair combinations.
It is possible to select different tone sequences
compatible receivers such as CP15.
To change the batteries, open the battery
To change the batteries, open the battery
It is possible to select different tone sequences
and wire or pair combinations.
It is possible to select different tone sequences
compartment (7) and replace the two AAA
compartment (7) and replace the two AAA
and wire or pair combinations.
To change the batteries, open the battery
and wire or pair combinations.
batteries. Use only 1.5V alkaline batteries.
batteries. Use only 1.5V alkaline batteries.
To change the batteries, open the battery
compartment (7) and replace the two AAA
compartment (7) and replace the two AAA
To change the batteries, open the battery
batteries. Use only 1.5V alkaline batteries.
To change the batteries, open the battery
batteries. Use only 1.5V alkaline batteries.
compartment (7) and replace the two AAA
To change the batteries, open the battery
compartment (7) and replace the two AAA
batteries. Use only 1.5V alkaline batteries.
compartment (7) and replace the two AAA
batteries. Use only 1.5V alkaline batteries.
batteries. Use only 1.5V alkaline batteries.
Internes
Tongen
Das inter
auch exte
Batterie
Um das R
ziehen Si
Einscha
Hauptger
Halten
Das inter
Halten
der Ver
DE
DE
Halten
Tongene
sofort d
EN
DE
DE
Batteried
RJ45-Te
RJ45
DE
DE
RJ45-Testanschlu
Einschalt
DE
Hinterg
Hint
RJ45
Halten Si
Aussch
RJ
Hintergrundbele
Halten Si
Test-Ta
RJ45
Test
Das Ger
Hint
der Verdr
RJ45
Halten
Hi
Halten Si
Test-Taste
Ein/Aus
sich das
Ein/
Hint
Test
sofort de
Hint
Te
Ein/Aus-Taste
Test
Ein/
Interne
Inte
Test
Einzelte
Das inte
Ein
Das
Internes Remote
Halten
Ein/
auch ex
auch
Ein/
Inte
Das interne Remo
das Ger
Um das
Ausschal
Um
Das
Int
auch extern verw
ziehen S
zieh
Das Gerä
Inte
auch
Da
Um das Remote a
Inte
Hauptg
Hau
Halten Si
Das
Um
au
ziehen Sie das Re
Dauerte
Das
Das inte
sich das G
Das
auch
zieh
Um
Hauptgerät herau
Halten
auch
Um
Hau
zie
Das interne Remo
Dauerte
Um
zieh
Das
Ha
werden
zieh
Tongen
Einzeltes
Ton
Hau
Da
durchge
Hau
Halten Si
Das
Tongenerator - T
Das
Batterie
das Gerä
Batt
Ton
To
Batteriedeckel
Hinterg
Einscha
Eins
Ton
Batt
Ton
Halten
Halten
Dauertes
Halt
Ba
Gerät e
Einschalten
Halten
Halten Si
Halt
Batt
Eins
Halten Sie eine b
Batt
der Ver
Dauertes
der
Halt
Ein
Halten Sie die Ta
Tongen
Halten
werden k
Halt
Eins
Halt
Ha
der Verdrahtung
Halten
Eins
sofort d
durchgef
sofo
Halt
der
Ha
Halten Sie die Ta
Tongen
Halt
Halt
Halt
de
sofort der Tongen
der Tas
Halt
der
sofo
Ha
Tongen
der
Hintergru
Halt
so
Der vom
Halt
Halten Si
sofo
kompat
sofo
Aussch
Gerät ein
Aus
empfan
Das Ger
Das
Möglich
Ausschalten
Halten
Halt
Tongene
Aus
und Dra
Das Gerät schalte
sich das
Halten Si
sich
Das
Au
Halten Sie die Ta
Tongener
Aus
Halt
Da
sich das Gerät au
Zum We
Aus
der Taste
Das
sich
Ha
öffnen u
Das
Einzelte
Tongener
Einz
Halt
sic
Nur 1,5
Halt
Halten
Der vom
Halt
sich
Einzeltest
sich
das Ger
kompatib
das
Einz
Halten Sie die Ta
empfang
Halt
Ein
das Gerät einen V
Möglich i
Einz
das
Ha
Einz
Dauerte
und Drah
Dau
Halt
da
Halt
Halten
Halt
das
Dauertest
das
Dauerte
Zum Wec
Dau
Dau
Halten Sie die Ta
werden
öffnen un
wer
Halt
Da
Dauertest-Modus
durchge
Nur 1,5 V
durc
Dau
Dau
Ha
werden kontinuie
Dau
Halt
wer
Da
durchgeführt, bis
Halt
Dau
durc
we
Dau
Hinterg
Hint
wer
du
wer
Halten
Halt
durc
Hintergrundbele
durc
Gerät e
Ger
Hint
Halten Sie die Ta
Halt
Hi
Gerät eingeschal
Tongen
Ton
Hint
Ger
Ha
Hint
Halten
Halt
Halt
Ge
Tongenerator
Halt
Tongen
Ton
Ger
Ton
Halten Sie die Ta
Ger
der Tas
der
Halt
To
Tongenerator zu
Tongen
Ton
Ton
Ton
Ha
der Taste (6) wec
Ton
Der vom
Der
Halt
der
To
Tongenerators.
Halt
kompat
kom
Ton
Ton
de
Der vom Gerät au
Ton
empfan
emp
der
Der
To
kompatiblen Emp
der
Möglich
Mög
Ton
kom
De
empfangen werd
Ton
und Dra
und
Der
emp
ko
Möglich ist die Au
Der
kom
Mög
em
und Draht- bzw. P
kom
Zum We
Zum
emp
und
Mö
emp
öffnen u
öffn
Mög
un
Zum Wechseln de
Mög
Nur 1,5
Nur
und
Zum
öffnen und die be
und
öffn
Zu
Nur 1,5 V Alkalin
Zum
Nur
öff
Zum
öffn
Nu
öffn
Nur
Nur
2
Advertisement
Table of Contents

Related Manuals for Softing CABLE MASTER 210


Summary of Contents for Softing CABLE MASTER 210
- Page 1 Tongener Switching off If you keep the key (4) pressed for a long time, the Halt © 2022 Softing IT Networks GmbH The device switches off automatically. device switches off. To change the batteries, open the battery sich das Gerät au...
- Page 2 Das Gerät nie an spannungsführende spécif instrument specifications. Gerätespezifikationen. Contact only service centers authorized by Softing. Never connect the instrument to live wiring of Never connect the instrument to live wiring of Das Gerät nie an spannungsführende Das Gerät nie an spannungsführende...
- Page 3 The device switches off automatically. Switching off Ausschalten Das Gerät schaltet sich automatisch ab. L'ap © 2022 Softing IT Networks GmbH The device switches off automatically. device switches off. To change the batteries, open the battery sich das Gerät au...
- Page 4 No cone No cone instrument specifications. Gerätespezifikationen. Contact only service centers authorized by Softing. Never connect the instrument to live wiring of Never connect the instrument to live wiring of Das Gerät nie an spannungsführende Das Gerät nie an spannungsführende...
- Page 5 Das Ge The device switches off automatically. Das Gerät schaltet sich automatisch ab. L'appareil s'éteint automatiquement. El apa © 2022 Softing IT Networks GmbH The device switches off automatically. Switching off Ausschalten device switches off. To change the batteries, open the battery...
- Page 6 No conecte nunca la unidad a un cableado con superio instrument specifications. Gerätespezifikationen. Contact only service centers authorized by Softing. Never connect the instrument to live wiring of Never connect the instrument to live wiring of Das Gerät nie an spannungsführende Das Gerät nie an spannungsführende...
Need help?
Do you have a question about the CABLE MASTER 210 and is the answer not in the manual?
Questions and answers