
Related Manuals for Softing Wire Xpert WX Series


Summary of Contents for Softing Wire Xpert WX Series
- Page 1 User Manual Copper Certification Testing User Manual – Copper Certification, WireXpert v7.2, build #459 WireXpert4500_Copper_IT_EN_U_201607_104 http://itnetworks.softing.com Copyrights 2016 Softing Singapore Pte Ltd...
- Page 2 WireXpert - User Manual WX Series, (WX4500, WX500)
- Page 3 Softing shall not be liable for errors or for incidental or consequential damages in connection with the furnishing, use, or performance of this document or of any information contained herein.
- Page 4 WireXpert - User Manual If the device is used in a manner not specified by the manufacturer, the device protection may be impaired. Always use dry cloth to clean the device. Do not use ethyl alcohol or any other volatile liquid to clean the device.
- Page 5 WireXpert - User Manual...
-
Page 6: Table Of Contents
WireXpert - User Manual Contents Chapter 1: Getting Started ....................7 Unpacking the box (WX4500-FA/WX500-FA) ..................7 Key differences between WX4500 and WX500 ..................8 For Users of WireXpert Software 6.x and Earlier ..................9 WireXpert Overview ..........................10 Dual Control System (DCS) ........................11 WireXpert Adapters .......................... -
Page 7: Chapter 1: Getting Started
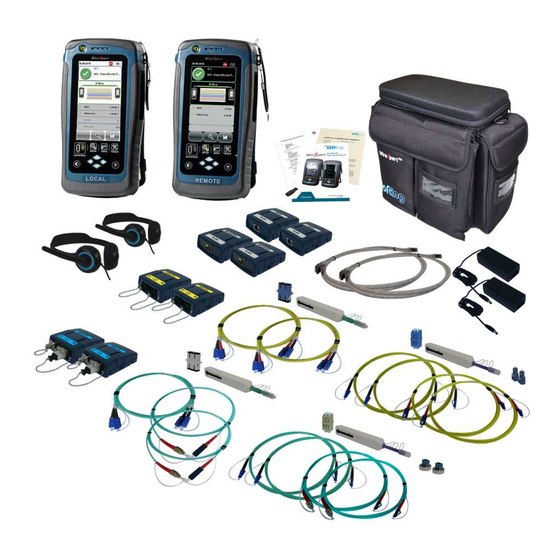
WireXpert - User Manual Chapter 1: Getting Started Unpacking the box (WX4500-FA/WX500-FA) WireXpert WX4500 or Hard case Calibration Certificate WireXpert WX500 (WX_AC_SOFTCASE) & USB Flash Drive (Local and Remote) Power Adapters - Input: 100-240VAC/0.8A Talk-set headphones LCD Protective Cover Output: 12VDC/3.0A (WX_AC_TALKSET1) (WX_LCD_COVER) (WX_AC_PWRAD) -
Page 8: Key Differences Between Wx4500 And Wx500
WireXpert - User Manual Key differences between WX4500 and WX500 Feature WX4500 WX500 Frequency of measurement 2500 MHz 500 MHz Accuracy Specification Level 2G Level IIIe Fiber Testing option Class FA/CAT 8 options Patch Cord Test adapters... -
Page 9: For Users Of Wirexpert Software 6.X And Earlier
WireXpert - User Manual For Users of WireXpert Software 6.x and Earlier The software on WireXpert since version 7.x features notable changes on the interface. These improvements have been made emphasizing on loading time, responsiveness and stability. The main functions from the previous version remain unchanged. The new interface is clean and simple, providing quick settings selection and distinct identification between the Local and Remote units. -
Page 10: Wirexpert Overview
WireXpert - User Manual WireXpert Overview Power ON/OFF button Touch sensitive color LCD screen USB device port Audio port USB host connector for flash drive RJ-45 Ethernet port for remote control Power supply port (12V) One-Touch access buttons Brightness control button Navigation scroll buttons Context sensitive Help button Probe interface connector... -
Page 11: Dual Control System (Dcs)
WireXpert - User Manual RJ-45 Ethernet port Enables communication between two sets of WireXpert for Alien Crosstalk testing. Power Supply port Performs charging of device when connected to power adapter shipped with WireXpert. (WX_AC_PWRAD) One-touch access buttons Main functional buttons AUTOTEST, SETUP, DATA and TOOLS for WireXpert. -
Page 12: Wirexpert Adapters
WireXpert - User Manual WireXpert Adapters All test adapters are designed to fit onto every WireXpert units. The device automatically detects adapters when connected and prompts to change in the matching interface depending on the type of adapter. Via SETUP > “Quick Setup”, the matching limit can be selected automatically to the type of adapter. -
Page 13: Memory
WireXpert - User Manual There are two primary considerations regarding the test method: • Whether the user patch cords are included in the cabling run during the test. > If so, channel test configuration is required. > If not, link test configuration is required. •... - Page 14 WireXpert - User Manual Do not set reference or operate WireXpert while the battery is hot immediately after charging. Make sure that the WireXpert is always operated within the allowed temperature range from 0-40 C. If a significant increase or decrease of the temperature is discovered, repeat the set reference procedure to remain the instrument’s accuracy.
-
Page 15: Power Supply
WireXpert - User Manual Power Supply • Removable/rechargeable Li-Ion batteries provide more than 8 hours of continuous operation. • AC power: 100~240V AC plugs directly into the battery. Alternatively, the batteries can be recharged using an external charging kit that can be ordered separately (WX_AC_CHARGER). -
Page 16: Chapter 2: Configuring Wirexpert
WireXpert - User Manual Chapter 2: Configuring WireXpert WireXpert User Interface Touch Screen Layout The Graphical User Interface (GUI) in version 7.0’s firmware has been updated with a more responsive system and quick-access menus. WireXpert boots up to the SETUP screen. It is categorised into 5 groups: 1. -
Page 17: The One Touch Access Buttons
Note: Marginal Pass/Fail is enabled by default. Press the “SETUP” button >Test Settings > Test Options > Lab > Marginal Pass/Fail to change the presentation of the test result to clear “PASS” or “FAIL” results. Uncertainty of the tester is then not taken into account. Contact Softing for more information. - Page 18 WireXpert - User Manual An “AUTOTEST” will fail in the event of missing connection between the Local and Remote units, wrong settings configured or if setting reference are required. WireXpert will perform an initial wire map test before testing other parameters. Disable wire map test at Test Settings >...
- Page 19 WireXpert - User Manual Test Settings Test Settings provides results oriented configurations necessary to perform an AUTOTEST. Test Limit Choose from a list of standards to determine the performance criteria in a given category or class. Three of the most commonly used limits will be listed in the “Recent Limit” list. Press the SETUP button >...
- Page 20 WireXpert - User Manual Cable Choose from a list of cable manufacturer for more specific test parameters. If unsure of manufacturer, choose “Generic UTP” or “Generic Shielded”, or “Customized Cable” to create custom cable. Press the SETUP button > Test Settings > Cable Manufacturer to choose from a list of cable manufacturers.
- Page 21 WireXpert - User Manual Connector Press the SETUP button > Test Settings > Connector Manufacturer to choose from a list of connector manufacturers. If unsure of manufacturer, choose “Generic UTP” or “Generic Shielded”, or “Customised Connector” to create custom connector. Click “Add”...
- Page 22 WireXpert - User Manual Advanced Test Options Advanced Test Options determines how the test will be conducted and results will be displayed. General o Locator – If enabled, WireXpert will display NEXT and Return Loss (RL) fault information in result. Disabled by default. AUTOTEST o Cable Pairing Type –...
- Page 23 WireXpert - User Manual Site To add a site, 1. Press the SETUP button > Project Settings > Site to begin adding a new site. 2. Click the “Add” button to add a new site. 3. Enter a Site Name. Site Name is a required field. Test results and label source will be saved under the created Site.
- Page 24 WireXpert - User Manual Operator To add a site, 1. Press the SETUP button > Project Settings > Operator to begin adding an operator. 2. Click the “Add” button to add a new operator. 3. Enter Operator Name. 4. Press “OK” to save site and proceed. By default, WireXpert creates an “UNSPECIFIED”...
- Page 25 WireXpert - User Manual Template Label None Manual input of label names is required for every saving of result. Simple Label Provides simple numeric increments to a prefix. To configure the simple label scheme: 1. Enter desired Prefix (e.g. Office, Company X) The prefix will remain unchanged by every result.
- Page 26 WireXpert - User Manual The default “1A-A1” generally refers to “Floor + Tel Room – Panel + Port”. TIA-606-A Class 2 (Single Building Horizontal/Single Building Backbone Cable) TIA-606-A Class 2 standard labelling scheme mainly used to support labelling of infrastructure with one or more telecommunication spaces in a single building.
- Page 27 WireXpert - User Manual TIA-606-A Class 3 (Campus Backbone Cable) TIA-606-A Class3 standard labelling scheme mainly used to support labelling for multiple buildings in a single site. The default “A-1A/A-1A-” generally refers to “(A)Building 1 Name - (1)Tel Room 1 Floor + (A)Tel Room 1 Name / (A)Building 2 Name –...
- Page 28 WireXpert - User Manual List Based Testing List based testing allows creation of label list in the eXport software on PC and then bring the list to WireXpert. It further allows easy selection of labels from the list to help technician select the cables to be tested quickly.
- Page 29 WireXpert - User Manual Refer User Manual – eXport for more information on generating list based labels. 9. Press the AUTOTEST button to display the loaded cable list. 10. Select label from list to begin AUTOTEST 11. WireXpert will automatically save a PASS result and return to the list, or allows you to save or conduct a re-test for a FAIL result manually.
- Page 30 WireXpert - User Manual Sleep and Auto Power-off Interval For Sleep Interval, Press the SETUP button > System Settings > Settings 1 > Sleep Interval to select the idle duration before WireXpert enters the sleep (power saving) mode. For Auto Power-off Interval, Press the SETUP button >...
- Page 31 WireXpert - User Manual Date and Time Press the SETUP button > System Settings > Settings 2 > “Date & Time to configure date, time and display format. Date settings Time settings Language Press the SETUP button > System Settings 2 > Language to select preferred display language. Storage Press the SETUP button >...
- Page 32 WireXpert - User Manual Read USB flash drive Battery Press the SETUP button > System Settings > Settings 2 > Battery to view battery level. Battery levels of Local and Remote will be displayed if units are connected Restore Factory Settings Press the SETUP button >...
- Page 33 WireXpert - User Manual Restoring WireXpert to default settings is an irreversible action. All user defined settings and stored test results will be erased and cannot be recovered. Touch Screen Calibration Press the SETUP button > System Settings > Settings 2 > Touch Screen Calibration to re-adjust mechanical alignments of the touch screen.
- Page 34 WireXpert - User Manual To ensure accurate test results, it is recommended to have WireXpert units calibrated every year. Contact vendor for more information. DATA The “DATA” button provides archive and data management ability to saved sites and test results. Saved test results can be renamed or deleted in this option. View results Manage results Note: Deleting a site will also delete its containing test results.
-
Page 35: Wirexpert Firmware
Reset Probe – Resets Perm. About – Displays worldwide determine the NVP of the Link adapter usage count once contact information Softing. cable using the length value a new link cord is in place programmed by the user Note: 30 meters (100 feet) cable... - Page 36 Cat6A. WX500 runs on the same hardware and firmware as WX4500, but is calibrated to test only up to 500MHz. For a list of available adapters, please visit http://itnetworks.softing.com/ Data Management WireXpert data management software, eXport, enables management of saved results such as finding, renaming, deleting, printing and creating custom labels.
- Page 37 WireXpert - User Manual If the Upgrade prompt did not appear, press SETUP button > System Settings 2 > Storage and click the USB button to launch the prompt manually Upgrade prompt Test results and custom data in the device will be permanently removed during firmware upgrade.
-
Page 38: Chapter 3: Setting Reference
WireXpert - User Manual Chapter 3: Setting Reference It is necessary to perform a set reference measurement if the Local and Remote units are being paired for the first time. If there is a mismatch in firmware versions or a set reference has not been performed, AUTOTEST will be denied, until these conditions are corrected. -
Page 39: Chapter 4: Configuring An Autotest
WireXpert - User Manual Chapter 4: Configuring an AUTOTEST After configuring the system settings, follow these steps to set up an AUTOTEST 1. Press the SETUP button > Project Settings – Create or select a Site Site – Create or select an Operator Operator –... - Page 40 WireXpert - User Manual Please ensure you have the following components before conducting the test; • WireXpert, Local & Remote units (WX4500) Permanent Link Testing • 2 x Permanent Link Adapter (WX_AD_6APL2) • 2 x Patch Cord (WX_AC_6ALCORD2) Channel Testing •...
-
Page 41: Testing Guide For Permanent Link Testing
WireXpert - User Manual Testing Guide for Permanent Link Testing Permanent Link (PL) test is comprised of the connection from a patch panel to a telecommunication outlet (horizontal cabling) using Permanent Link test adapters at each end of the link under test. 1. -
Page 42: Testing Guide For Channel Testing
WireXpert - User Manual Testing Guide for Channel Testing Channel (Ch) test is comprised of the connection from an active device (egg. Router) in a data rack, a telecommunication outlet (horizontal cabling) and the connecting patch cords at both ends using Channel test adapters at each end of the link under test. The recommended length for the patch cord from the patch panel and the outlet is 5m. -
Page 43: Chapter 5: Performing An Autotest
WireXpert - User Manual Chapter 5: Performing an AUTOTEST Press the AUTOTEST button once settings and limits have been selected. WireXpert will use the last configuration or factory settings to perform the AUTOTEST if new settings are not configured. WireXpert will display summarized result with PASS or FAIL once is completed. - Page 44 WireXpert - User Manual Wire map Insertion Loss Return Loss Attentuation to Crosstalk Attentuation to Crosstalk Near-end Crosstalk Ratio, Far-end Ratio, Near-end (ISO only)
-
Page 45: Next And Rl Fault Locating
WireXpert - User Manual Power-sum ACRF Power-sum ACRN (ISO only) Power-sum NEXT Manage plots Resistance Length & Delay NEXT and RL Fault Locating If the Locator option is enabled in the Test Settings > Test Options, WireXpert will display extremely critical troubleshooting information in the form of a Time Domain Reflection plot for NEXT and Return Loss. - Page 46 WireXpert - User Manual View individual plot by selecting/deselecting cable pairs. Each two pairs of cables that have been tested for crosstalk are represented by different colour in the plot. Return Loss (RL) is the measurement (in dB) of the amount of signal that is reflected back toward the transmitter.
-
Page 47: Managing Test Result(S)
WireXpert - User Manual Managing test result(s) Test results can be manually saved by pressing the “Save” button after an AUTOTEST completed. When prompted, enter label name and click “OK” to save. The “Save” icon will disappear once saving is completed. Pass test results will be automatically saved with reference to the selected Label Source (SETUP >... -
Page 48: Exporting Test Results Into Export Pc Software
WireXpert - User Manual To delete a saved result, 1. Press the “DATA” button. 2. Select “Copper” or “Fiber” and press the “View” button. 3. Press the “Manage” button. 4. Select result(s) and press the “Delete” to delete result(s). To rename a saved result, 1. - Page 49 WireXpert - User Manual 6. Launch eXport software. 7. Go to File > Create New Project to create new project space. 8. Go to Import > USB Flash Drive and select the flash drive. Click “Import”. 9. Select database and click “Import Selected” to import or click “Import All” for all databases.
- Page 50 WireXpert - User Manual...
- Page 51 WireXpert - User Manual...
- Page 52 WireXpert - User Manual Direct connection via USB cable 1. Connect WireXpert to your PC using a mini USB cable. 2. Launch eXport software. 3. Go to File > Create New Project to create new project space. 4. Go to Import > Device. 5.
- Page 53 WireXpert - User Manual...
- Page 54 WireXpert - User Manual Refer User Manual – eXport for more information on how to use the software.
-
Page 55: Appendix A: Icons Glossary
WireXpert - User Manual Appendix A: Icons Glossary Add – Adds a site, operator or Retest – Performs an Back – Returns to previous customised cable, connector AUTOTEST on selected result screen. Unsaved options will to the database. on List-Based Testing. be discarded. - Page 56 WireXpert - User Manual Fibermap – Displays mapping Select all – Selects all data on Next pair – View next pair of of fiber being tested. screen. plots of the current result. MPO chart, grid – Toggles Scope live, test – Toggles Set Reference –...
-
Page 57: Technical Support
WireXpert - User Manual Technical Support Worldwide Offices Softing’s global presence ensures our customers receives sales and technical support anywhere around the world. For more information : http://itnetworks.softing.com North America Softing Inc. 7209 Chapman Highway Knoxville, TN 37920 Phone: +1 865 251 5250 E-mail: info@softing.us...
Need help?
Do you have a question about the Wire Xpert WX Series and is the answer not in the manual?
Questions and answers