Table of Contents
Advertisement
Quick Links
Advertisement
Table of Contents

Related Manuals for Softing NetXpert XG2


Summary of Contents for Softing NetXpert XG2
- Page 1 MANUAL Version 1.7: March 29, 2021 itnetworks.softing.com...
-
Page 2: Table Of Contents
Standard NetXpert XG2 ............................7 NetXpert XG2plus ..............................7 OPERATION ................................7 On/Off ..................................7 Automatic shutdown...............................8 Touchscreen ................................8 Icons ..................................9 NetXpert XG2 Active Remote device .........................10 REGISTER DEVICE ................................11 SYSTEM SETTINGS .................................12 Wi-Fi ..................................15 Language ..................................17 Energy ..................................18 More Options ..............................19 itnetworks.softing.com/xgfirmware ........................21 CABLE TEST ...................................25... - Page 3 FREQUENTLY A S K E D Q U E S T I O N S .........................62 Q Why does the NetXpert XG2 show the cable length in red and report that the cable test has failed? ....62 Q What is a TST file?..............................62 Q How do I get a firmware update for my NetXpert XG2? ..................62...
-
Page 4: Introduction
It is possible to qualify the fiber optic cables with the NetXpert XG2 Plus Kit as well. The main parameter for qualifying the fiber optic cables is BERT. As with the copper test, packets are sent at defined data rates to qualify fiber optic cables. -
Page 5: Safety Instructions
I N TR O D U C TI O N SAFETY INSTRUCTIONS To ensure safe operation of the NetXpert XG2, please carefully follow the instructions and observe the warning information in this manual. Failure to do so may damage the tester and cause serious injury or even death. -
Page 6: Device Structure
I N TR O D U C TI O N DEVICE STRUCTURE Main device Active Remote On/Off button Display Vents Micro USB port RJ45 test and measurement port Connection RJ45 test and for charger measurement port USB port Reset Button Status LEDs Connection for charger SFP + ports itnetworks.softing.com/XG... -
Page 7: Scope Of Delivery
Figure 2 - NetXpert XG2plus with two main devices for fiber qualification and one active remote for copper qualification OPERATION NetXpert XG2 main device On/Off • The NetXpert XG2 is turned on by pressing the On/Off button. The button indicates the operating status using light signals: GREEN LIGHT GREEN LIGHT... -
Page 8: Automatic Shutdown
• Holding down the On/Off button switches off the NetXpert XG2. Automatic shutdown The NetXpert XG2 automatically goes to sleep to conserve battery power if there is no input or activity on the device - see chapter Energy for automatic shutdown of the display and the device. -
Page 9: Icons
Shows the strength of the WLAN connection The battery indicator shows the level of the battery This icon in the battery display indicates that the NetXpert XG2 is charged via an external power supply By clicking on this, icon you can reach the cable test screen... -
Page 10: Netxpert Xg2 Active Remote Device
• Pressing the Status button displays the charge level of the Active Remote battery and the last test result. • Pressing the Test button starts a qualification test from the Active Remote. Figure 5 – NetXpert XG2 Copper Remote Unit itnetworks.softing.com/XG... -
Page 11: Register Device
Wi-Fi settings screen to select an access point and establish an internet connection. Tapping on send button will send the information to Softing Server and activate reporting feature automatically. User will then receive e-mails with MySofting login credentials. More information on the product like latest firmware, release notes, manuals can be found on https://itnetworks.softing.com/my-softing/. -
Page 12: System Settings
It is sufficient to set the preferred combination once and NetXpert XG2 will remember it when running either passive cable test or an active network test. - Page 13 {after this selection, the device boots into a special mode} • "WiFi", connection to the network is established via WLAN. See next page WiFi Scan for settings This window provides additional device information for incorporation into an active network: • MAC address • IPv6 link local address itnetworks.softing.com/XG...
- Page 14 IP Settings Figure 9 - IP specifications (DHCP) In the NetXpert XG2's IP Setup, network tests can be configured so a DHCP or a fixed IP address can be used. The setting can also be made so that a DNS assigned by a DHCP server or a fixed DNS IP address is used.
-
Page 15: Wi-Fi
Figure 12 - Selection of the WiFi network and connection {entering the password} To join a WiFi network, highlight an SSID, select “Select SSID” and enter the password (if required). Select the show password box to display the password being entered. itnetworks.softing.com/XG... - Page 16 *NetXpert XG Secure Edition comes with internal Wi-Fi feature disabled. In that case, if required, an external Wi-Fi USB stick can be purchased as an optional accessory and inserted into the unit. The status of used medium for Wi-Fi connection, will be shown at the top of the screen. itnetworks.softing.com/XG...
-
Page 17: Language
Set the current time and date. You can also set whether the time should be displayed in 12- or 24-hour format and the date in the usual formats. This date will be applied to the test protocols and should match the actual test date. itnetworks.softing.com/XG... -
Page 18: Energy
To do so, move the brightness slider to the left/right or change the time until standby and auto switch-off when not in use. Reactivation from standby is then possible at any time using the On/Off button or by tapping the screen of the NetXpert XG2. itnetworks.softing.com/XG... -
Page 19: More Options
Figure 17 - Setting the units and cabling standards In the Standards menu screen, you can choose whether to display the length in meters or feet. The NetXpert XG2 supports the two cabling standards. Select TIA568A or TIA568B. This affects the representations of the cabling image. - Page 20 The logo will be printed on your reports as a company logo as it is displayed here. Please note the possible formats and sizes. Reporting feature is not part of standard set of features at the delivery. However, it can be activated registering the product on main screen. itnetworks.softing.com/XG...
-
Page 21: Itnetworks.softing.com/Xgfirmware
To install an update, visit the URL above and download the firmware file. Save the firmware file to a USB stick and connect it to the NetXpert XG2. From this menu screen, you can then select and install the update file. Follow the instructions on the screen of the device. - Page 22 Figure 20 - Hardware status The hardware menu screen provides information about the installed hardware in the device, including the board revision and the serial number of the device. In addition, internal temperatures and battery charge level are displayed. itnetworks.softing.com/XG...
- Page 23 About Us Figure 21 - Softing contact information The About Us menu screen lists the worldwide contact information of Softing IT Networks in case you need product support or have other requests. In addition, the EULA {End User License Agreement}, which appears when you first start the device, can be viewed again here.
- Page 24 To perform a license upgrade, you only need a corresponding number of so-called step-up licenses. It does not matter which license your NetXpert XG2 currently has. The purchase of a "step-up" license extends the functionality of the device by one step up.
-
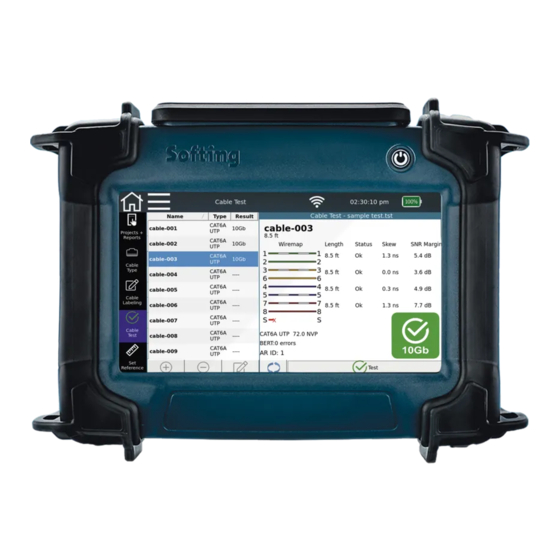
Page 25: Cable Test
After completion of the tests, the remote unit can be switched back to the "main unit" mode by pressing the "Home" button. Figure 23 – Home screen Cu mode Figure 24 – Home screen FO mode itnetworks.softing.com/XG... - Page 26 On the right side is the test result of the selected cable on the left. A qualification test can be started directly via the Test button. itnetworks.softing.com/XG...
- Page 27 Repeat test. No new test is created, the existing one is overwritten. Microscope Viewing and inserting microscope images of the fiber optic ends at OF measurements. Loss & Length Can be included in the test or not for FO measurements. itnetworks.softing.com/XG...
- Page 28 Load Project lets the user load an already saved project in the NetXpert XG2. Internal documentation creation is controlled in the lower part of the screen. The device always stores its test results in its own TST format.
- Page 29 Ethernet speed used for testing. Please note that, depending on the model of the device, fewer options may be available here. If the range is not sufficient for the requirements to be tested, your NetXpert XG2 can be upgraded at any time via a firmware license.
- Page 30 A copy will be added to the bottom of the list. Select the created copy, adjust the name and edit the parameters described above. • Use Apply Type Changes to confirm the entries and Set Current Type for this project. itnetworks.softing.com/XG...
- Page 31 If the end of the list is reached during subsequent testing and you start another test run, the device adds a cable names according to the defined scheme. Individual cable names or tests can be deleted via the button. itnetworks.softing.com/XG...
- Page 32 • The addition and deletion of cable names is also possible here using the buttons. Individual cable names can be changed using the function. itnetworks.softing.com/XG...
- Page 33 However, the color turns yellow to alert the user to potential faults in the cable, in case of a too long cable or too high attenuation in the link. • Enter the microscope menu by pressing the Microscope button. Do not forget to plug in the microscope prior to entering the mosaic screen. itnetworks.softing.com/XG...
- Page 34 Setup menu on the left side. Figure 34 – Mosaik menu • The Mosaic menu gives an overview of the connector end faces and their evaluation. Press one of the four fields to perform a microscope test of the corresponding fiber end. itnetworks.softing.com/XG...
- Page 35 • It is necessary that the focus bar display on the left side is above 50%, otherwise an error message will appear. By turning the focus wheel on the microscope, you change the focus. itnetworks.softing.com/XG...
- Page 36 Live screen. • Press the Back button to return to the test screen and continue the test. Figure 37 – Result view of a failed microscope test of a connector end face itnetworks.softing.com/XG...
-
Page 37: Set Reference
Select Set Reference to calibrate the patch cable length or NetXpert XG2 connector capacitance (pF), which will later be subtracted from cable test length measurements. The referencing procedure should be repeated when changing patch cables. -
Page 38: Set Reference Fiber
GIF's and explain the procedure. Each time the test setup changes, it is necessary to set a new reference. When new SFPs are detected or a new cable type is selected, the user is prompted to set a reference. itnetworks.softing.com/XG... - Page 39 1. Clean fiber connector ends of patch cords and test them using a microscope. 2. Connect two patch cords using a coupler and insert them in main and remote unit. 3. Tap on “set reference” on the main unit and “remote” on the remote unit. itnetworks.softing.com/XG...
-
Page 40: Network Tests
NETWORK TESTS The NetXpert XG2 not only offers the ability to test passive cabling, but also checks active networks for function and locates the errors. It is suitable for use in commissioning an active network and simple diagnostics. Network Tests mode, the NetXpert XG2 supports copper, fiber, and WiFi in both IPv4 and IPv6 environments. -
Page 41: Link Status
Here is an overview of the connected network. The connection to the switch/router is established either via DHCP or static IP. While the NetXpert XG2 is establishing a connection, the connection link icon flashes in the top menu bar. If a connection is made, the link icon stops flashing and the link status details are displayed. -
Page 42: Discovery
The NetXpert XG2 sends Ethernet telegrams to the network. • Passive mode: The NetXpert XG2 only "listens" to the network and displays all broadcasting devices. However, less detailed information about the discovered devices may be available. - Page 43 Start Test. The list of found stations can also be saved directly in PDF and CSV format. Figure 46 - Network detection {list display with duplicate IP address} itnetworks.softing.com/XG...
- Page 44 Both internal addresses and external domain names can be entered. Ping destinations can be edited via Edit deleted from the list via Remove. The list of the ping results can also be saved directly in PDF and CSV format. itnetworks.softing.com/XG...
-
Page 45: Traceroute
Three data packets are sent and the corresponding response times are listed. The destination to which the route should be determined can be entered or changed using the Edit Target button. The list of the hops can also be saved directly in PDF and CSV format. itnetworks.softing.com/XG... -
Page 46: Lldp/Cdp
N E T W O R K TE S T S LLDP/CDP LLDP CDP The NetXpert XG2 is capable of detecting and evaluating LLDP {Link Layer Discovery Protocol} and CDP {Cisco Discovery Protocol} telegrams. Figure 49 - LLDP and CDP information Active components such as routers or managed switches may send LLDP or CDP broadcasts at regular intervals. -
Page 47: Vlan
IEEE 8O2.1q} and display the available VLAN information. Figure 50 - VLAN detection The NetXpert XG2 is able to recognize broadcasted VLANs. Using a monitoring port on a managed switch is recommended. Depending on the configuration of the switch, it may happen that broadcast packets are not marked with VLAN IDs and thus no detection can take place. -
Page 48: Tools
Different tools are available in copper and fiber optic mode, which can be used for quick tests, targeted troubleshooting or cable localization, for example. Copper: Wiremap & Margin Port Discovery Individual BERT test Tone Generator Link Light Fiber Optic: Individual BERT test Microscope Live Light Link Light itnetworks.softing.com/XG... -
Page 49: Wiremap & Margin (Copper)
Select Continuous Testing so the Test button does not have to be pressed before every run. The NetXpert XG2 will automatically perform cable tests at very short intervals. This facilitates troubleshooting and simple and quick testing of multiple cables. The cable construction is freely selectable in advance, there is a differentiation between shielded and unshielded, straight or crossed, 4-pair or 2-pair versions. -
Page 50: Port Discovery (Copper)
PoE status on the switch port used. Figure 52 - Port detection The NetXpert XG2 displays the Ethernet speed of the current connection and the other advertised speeds of the port. The device performs a PoE evaluation on the port, which can also be performed... -
Page 51: Bert Test (Copper)
Set the desired speed and the duration of the test. Select the test icon to begin the test. When the test is finished, the NetXpert XG2 will display a Green pass icon and the packet count. If errors were detected, the NetXpert will fail the test and display... - Page 52 Tone Generator (Copper) The tone generator helps locate cables by providing an audible tone using tone probe/inductive receiver {e.g., CableProbe 15 from Softing IT Networks}. Figure 54 - Tone Generator Select on which pairs of wires the tone should be output. The individual pairs can be signaled either selectively, or all pairs at the same time.
- Page 53 N E T W O R K TE S T S Link Light (Copper) To identify which port the NetXpert XG2 is connected to on a switch, the NetXpert XG2 can flash the link LED on the switch port. Figure 55 - Link Light Flashing The connected switch port is detected by a slowly flashing Link LED {O.5Hz}.
-
Page 54: Individual Bert Test (Fiber Optic)
Set the desired speed and the duration of the test. Select the test icon to begin the test. When the test is finished, the NetXpert XG2 will display a Green pass icon and the packet count. If errors were detected, the NetXpert will fail the test and display the quantity of dropped packets. -
Page 55: Microscope (Fiber Optic)
Results can be saved either with a pass/fail evaluation using the Test button or as an image without evaluation after pressing the Freeze button. Comments can be added to each image, which then appear in the report. Figure 58 – Mikroscope report itnetworks.softing.com/XG... -
Page 56: Livelight (Fiber Optic)
The limit value and the test duration can be set before the test starts. Individual fiber connections (Fiber 1/Fiber 2) can be tested by selecting the cable to be tested under the Fiber View option. Figure 60 – LiveLight Measurement started itnetworks.softing.com/XG... - Page 57 The test data can be saved as a CSV reports. To do so, press the CSV button on the right side, which will save the report in the File Manager. Press the back button to return to the LiveLight test screen. itnetworks.softing.com/XG...
- Page 58 Link Light (Fiber Optic) To identify which port the NetXpert XG2 is connected to on a switch, the NetXpert XG2 can flash the Link LED on the switch port. Figure 62 - Link Light Flashing The connected switch port is detected by a slowly flashing Link LED {O.5Hz}.
-
Page 59: File Management
You can use the filter icons to hide individual file types to improve the overview. You will find different file types on the NetXpert XG2. The original test data has the "*.tst" extension and cannot be changed or read externally. Test reports are saved in PDF format (detailed PDF and summary PDF). -
Page 60: Maintenance
This increases the accuracy of the charge status display in the long term. The battery of the NetXpert XG2 cannot be serviced by the operator. In the event you need to remove the battery, loosen the screws on the back of the NetXpert XG2 and disconnect the cables from the battery. -
Page 61: Specifications
Housing Impact-resistant plastic with rubber coating Dimensions • 245 x 177 x 73mm (main device) • 130 x 177 x 55mm (Active Remote) Weight • 1.2kg (main device) • 0.6kg (Active Remote) Safety compliance Warranty 1 year itnetworks.softing.com/XG... -
Page 62: Frequently Asked Questions
FREQUENTLY ASKED QUESTIONS Q Why does the NetXpert XG2 show the cable length in red and report that the cable test has failed? The NetXpert XG2 tests for compliance with IEEE 802.3 connection specifications. If the cable is longer than 328ft/100m, the NetXpert XG2 does not perform an Ethernet Speed Certification and declares the test to be faulty. -
Page 63: Q Does The Netxpert Recognize Xg Poe (Power Over Ethernet)
The signal to noise ratio is determined by measuring the signal generated by the far end (active remote/switch). The far end device transmits Ethernet signals, which the NetXpert XG2 uses to measure the quality of the Ethernet signals. If the signal jitter is outside the Ethernet spectrum, it affects the quality of the signal, which is identified as SNR dB measurement. -
Page 64: Customer Service
CUSTOMER SERVICE For technical information, see itnetworks.softing.com If you would like to contact our customer service, send an e-mail to support.itnetworks@softing.com itnetworks.softing.com/XG... -
Page 65: Warranty Statement
Subject to changes and errors. All rights reserved. Softing the Softing logo are trademarks of Softing AG. NetXpert and the NetXpert Logo are trademarks of Softing IT Networks GmbH. All other cited trademarks, product and company names or logos are the sole property of their respective owners. - Page 66 +1 865 251 5252 sales@softing.us ASIA PACIFIC Singapore Softing Singapore Pte. Ltd. Singapore +65 6569 6O19 asia-sales.itnetworks@softing.com China Softing Shanghai Shanghai +86 21 61O63O31 china-sales.itnetworks@softing.com For technical information and support, please contact the Softing office in your country. itnetworks.softing.com/contact https://itnetworks.softing.com itnetworks.softing.com/XG...
Need help?
Do you have a question about the NetXpert XG2 and is the answer not in the manual?
Questions and answers