Advertisement
Quick Links
1
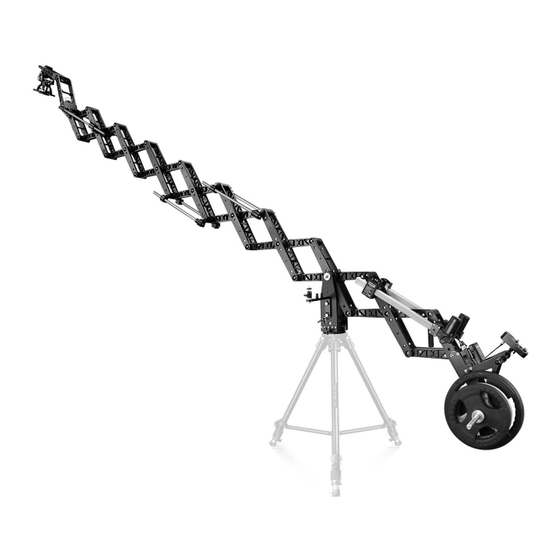
SJ30 Powermatic Scissor 17ft Telescopic Video
Camera Jib Crane (JB-SCSR-30)
A s s e m b l y M a n u a l
What's In The Box
Please inspect the contents of your shipped package to ensure you have received everything that is listed
below.
Camera Mount Plate
Counter Weight Rod
Sway Mitchell
Dampening Head
SJ30 Powermatic Scissor Jib
2 x Guide Rods
2 x Weight
Handle
Closers
Remote Holding Bar
Monitor Arm
4 x Guide Rods
All rights reserved.
No part of this document may be reproduced, stored in a retrieval system, or transmitted by any form or by any means,
electronic, mechanical, photo-copying, recording, or otherwise, except as may be expressly permitted by the applicable copyright
statutes or in writing by the Publisher.
Advertisement

Related Manuals for PROAIM Powermatic Scissor SJ30


Summary of Contents for PROAIM Powermatic Scissor SJ30
- Page 1 SJ30 Powermatic Scissor 17ft Telescopic Video Camera Jib Crane (JB-SCSR-30) A s s e m b l y M a n u a l What’s In The Box Please inspect the contents of your shipped package to ensure you have received everything that is listed below.
- Page 2 Ronin Controller Bracket Weight bar HDMI Male to BNC Wire Male Wire Clamp for Controller Remote Spiral Cable Speed Controller 4 x Bush’s 15V AC Adapter D-Tap wire Mitchell Ronin 4x Allen Screws 4 x Allen Screws Mount 2 x Screws for Monitor (Size: 8 x 20”) (Size: 8 x 25”) arm (Size: 3/8”, 1/4”)
-
Page 3: Safety Hints
Safety Hints ATTENTION: PLEASE READ THIS BEFORE USING THE CRANE TO PREVENT DAMAGE! Assembly Caution: attentive when assembling Dolly, Tripod & Crane to prevent equipment damage. Avoid assembly under the influence of alcohol or drugs. Watch Your Hands: Operate cautiously to avoid pinching hands or fingers between arms. Ensure secure connection of all Crane sections. - Page 4 INDEX Sr. No Particulars Page No. Powermatic Scissor Jib Setup Speed Controller LCD Monitor Arm Setup 9-10 Mitchell Dampening Head Setup 10-11 Final setup...
- Page 5 Powermatic Scissor Jib Setup Loosen and remove the Castle Ring of the Scissor Jib. Place Scissor Jib on top of the Jib Stand. After securely mounting the Scissor Jib on the Jib Stand, re-insert the Castle Ring from the bottom and tighten it using the Mitchell key.
- Page 6 After inserting the Counter Weight rod, re-tighten its knob and remove the weight closer from the rod. Now, insert weights your requirement and secure them with the weight closer. Insert the remote holding bar into the hole provided on the Weight bar.
- Page 7 Follow the same process to attach the remaining Rods. Now, remove the bolt of the Rod from the other side using the 5mm Allen key and insert the rod in the jib bracket. Insert the bolt and secure the Guide Rod using the 5mm Allen Key.
-
Page 8: Speed Controller
Speed Controller Slide the Speed Controller clamp onto the speed controller. Determine the positioning of the clamp and tighten it in position to secure it. Speed Controller Damping Adjustment As the name suggests, the speed dial lets you The damping adjustment dial lets you control control the speed intensity of the jib the level of damping and facilitates smooth,... - Page 9 Connect the Jib Controller cable on the 6-pin cable (Remote Out) of the Battery Plate. Connect the motor Driver Cable1 to the 3-pin Cable (Motor1 Out) (left) and Driver Cable 2 to the 3-pin Cable (Motor2 out) (right) of the battery plate. ...
- Page 10 To power your LCD, insert its wire’s first port in the motor and the second port to the back side of the LCD. Mitchell Dampening Head Setup Remove the Castle Ring from the Sway Mitchell Dampening Head. Attach the Sway Mitchell Dampening Head to the Camera Mount Plate, attach the castle ring and tighten the it using the Castle Nut...
- Page 11 Slide the Gimbal (Not Included) onto the Mitchell Ronin Mount. Lock the assembly with the locking lever provided on the Gimbal (Not Included). YOUR PROAIM SJ30 POWERMATIC SCISSOR CAMERA JIB ALL DRESSED UP AND READY TO GO! (SHOWN WITH OPTIONAL ACCESSORIES)
- Page 12 Warranty: We offer one year warranty on our products from the date of purchase. Within this period of time, we will repair it without charge for labor or parts. Warranty doesn’t cover transportation costs nor does it cover a product subjected to misuse or accidental damage. Warranty repairs are subjected to inspec- tion and evaluation by us.
Need help?
Do you have a question about the Powermatic Scissor SJ30 and is the answer not in the manual?
Questions and answers