Table of Contents
Advertisement
Quick Links
Advertisement
Table of Contents

Related Manuals for ICP DAS USA ALX-9000 Series


Summary of Contents for ICP DAS USA ALX-9000 Series
- Page 1 ALX-9000 Series User Manual V1.0.0 Feb. 2024 ALX-9191/ALX-9391/ALX-9791...
- Page 2 Warranty All products manufactured by ICP DAS are under warranty regarding defective materials for a period of one year, beginning from the date of delivery to the original purchaser. Warning ICP DAS assumes no liability for any damage resulting from the use of this product.
-
Page 3: Table Of Contents
Contents Contents ............................... 3 1. Introduction ............................ 5 1.1. Features ..........................6 1.2. Specifications ........................10 1.3. Overview ..........................12 1.4. Dimensions ......................... 19 2. Getting Started ..........................21 2.1. Mounting the ALX-9000 ...................... 22 2.2. Installing the RJ-45 waterproof connector assembly ............26 2.3. - Page 4 3.1.17. Linux Command “passwd” ..................60 3.1.18. Linux Command “reboot” ..................61 3.2. i-Talk Utility ......................... 62 3.3. ALX-9000 SDK ........................66 4. Your First ALX-9000 Program ......................68 4.1. Your First ALX-9000 Program with C Language ..............69 4.1.1. Find Demo “helloworld.c” in SDK ................70 4.1.2.
-
Page 5: Introduction
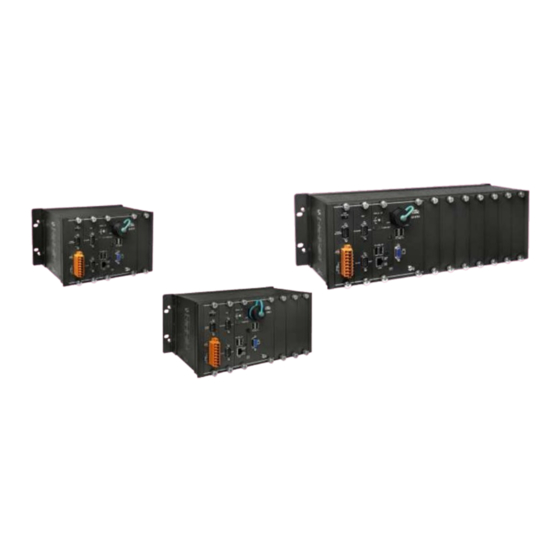
1. Introduction This chapter provides an overview of the ALX-9000 and its components, introducing basic concepts to users familiar with the ALX-9000. The ALX-9000 are Linux-based PACs that combine computing, I/O, and operator interface into a single unit, and provide the perfect solution for data acquisition and control in an individual PAC. -
Page 6: Features
1.1. Features The ALX-9000 offers the most comprehensive configuration and remote system upgrade solutions to meet specific application requirements. The following list shows the hardware and software features designed to simplify installation, configuration and application. Powerful CPU Module E3950 (1.6~2.0 GHz, 4C4T) for ALX-9x91 Built-in VGA and HDMI Port A built-in VGA and HDMI port can be directly connected to a regular display. - Page 7 Besides the local I/O slots, ALX-9000 also provides several RS-232/RS-485/USB ports and two Ethernet ports to connect with serial/USB I/O and Ethernet I/O devices. Dual Ethernet Ports ALX-9000 provides two Gigabit Ethernet ports. The two Ethernet ports can be used to implement redundant Ethernet communication and separate Ethernet communication (one for a global Internet, one for private Ethernet).
- Page 8 Rugged RJ-45 connector LAN1 The ALX-9000 is equipped with a rugged and dustproof RJ-45 connector on the LAN1 port that can protect against both liquid and dust contaminants in harsh industrial environments, as well as protection against vibration and shock. LAN2 Screw-lockable RJ-45 connector on the LAN2 port and there are screw holes (spacing 20mm) on both sides of the RJ45 connector, you can lock the RJ45 cable connector with...
- Page 9 -25°C to +60°C for the ALX-9x91 series. Improved storage disk performance On the ALX-9000 series, CFast cards are used as a replacement for the CompactFlash (CF) cards used in the LX-9000 series. This is because they support the SATA III interface, achieving faster write/read speeds.
-
Page 10: Specifications
1.2. Specifications The table below summarizes the specifications of ALX-9x91 series. Models ALX-9191 ALX-9391 ALX-9791 System Software Ubuntu 20.04 with kernel 5.4.161-rt67 Embedded SFTP server, Web server, SSH Service SDK Provided Standard LinPAC SDK for Linux by GNU C language Multilanguage English, Russian, Korean, Japanese, Simplified Chinese, Traditional Chinese Support... - Page 11 ttySA0 Internal communication with the I-97K series modules in slots RS-232/485 (RxD, TxD and GND for RS-232; Data+, Data- for RS-485); 3000 V Console isolated ttyS0 RS-485 (Data+, Data-); 3000 V isolated RS-232/485 (RxD, TxD, CTS, RTS and GND for RS-232; Data+, Data- for ttyS1 RS-485);...
-
Page 12: Overview
1.3. Overview The ALX-9000 Series modules are equipped with several interfaces and peripherals that can be integrated with external systems. Here is an overview of the components and its descriptions. ALX-9191 ALX-9391 ALX-9000 (Linux based PAC) User Manual version 1.0.0 Page: 12 Copyright ©... - Page 13 ALX-9791 The details of these items are as follows: Redundant Power (PWR1 and PWR2) The ALX-9000 has a terminal with 8-wire; there are 4-wire for redundant power inputs, the details of the redundant power are shown to the side. ALX-9000 (Linux based PAC) User Manual version 1.0.0 Page: 13 Copyright ©...
- Page 14 LED Indicators LED Indicator Label State (Color) Meaning Programmable LED Indicators L1 and L2 Programmable LED indicators System LED indicator Orange Programmable LED indicators PWR LED Indicator Green Power is on Green The Link is active Link/Act LAN1 LED indicator Blinking Network activity Yellow...
- Page 15 Communication Ports ● CFast Socket with a CFast Card Inside The ALX-9000- comes with a CFast card inside the CFast socket. The CFast card can be used to restore the ALX-9000 system and expand the memory up. ● LAN Ports, LAN1 and LAN2 The ALX-9000 has two Ethernet ports that can be used to connect the router to the Internet or to other devices.
- Page 16 ● HDMI Port The ALX-9000 has a HDMI port that can be used with a variety of supported HDMI resolutions, and the output resolution covers, 4096 x 2160. ● ttySA0, Expansion I/O Slot The ALX-9000 has 1/3/7 I/O slots that can be used to integrate high performance parallel I/O modules (I-9K Series) or serial I/O modules (I-97K series).
- Page 17 ● ttyS0 (2-wire RS-485) Note: 16C550 compatible Port Type: Terminals Baud Rate: 115200, 57600, 38400, 19200, 9600, 4800, 2400, 1200 bps Data Bits: 5, 6, 7, 8 Parity: None, Even, Odd, Mark (Always 1), Space (Always 0) Stop Bits: 1, 2 FIFO: 128 bytes ●...
- Page 18 Tips & Warnings The table below shows the data bit and their corresponding stop bit for Console, ttyS0, ttyS1 and ttyS34. Word Length Number of Stop Bits 5, 6, 7, 8 6, 7, 8 Frame Ground Point The frame ground point is a small piece of metal that can be used to terminate the shield. ALX-9000 (Linux based PAC) User Manual version 1.0.0 Page: 18...
-
Page 19: Dimensions
1.4. Dimensions The diagrams below provide the dimensions of the ALX-9000 to use in defining your enclosure specifications. Remember to leave room for potential expansion if you are using other components in your system. The height dimension is the same for all ALX-9000. The width depending on your choose of I/O expansion slots. - Page 20 ALX-9391 ALX-9791 ALX-9000 (Linux based PAC) User Manual version 1.0.0 Page: 20 Copyright © 2024 ICP DAS Co., Ltd. All Rights Reserved. E-mail: service@icpdas.com...
-
Page 21: Getting Started
2. Getting Started This chapter provides a guided tour of the ALX-9000 installation and configuration that describes the steps needed to download, install, configure, and run the basic procedures for user working with the ALX-9000 for the first time. Before starting any task, please check the package contents. If any of the following package contents are missing or damaged, contact your dealer, distributor. -
Page 22: Mounting The Alx-9000
2.1. Mounting the ALX-9000 The ALX-9000 can be mounted either directly to a wall/panel, or onto a stainless 35mm DIN rail. Wall/Panel mounting Step 1: Install the four mounting screws into the 4 keyhole mounting holes Step 2: Fasten the screws securely Tips &... - Page 23 Step 3: Connect the ground lead to the frame ground point Tips & Warnings A good common ground reference (earth ground) is essential for proper operation of the ALX-9000. One side of all control circuits, power circuits and the ground lead must be properly connected to earth ground by either installing a ground rod in close proximity to the enclosure or by connecting to the incoming power system ground.
- Page 24 Step 2: Clip the device onto a stainless DIN rail Tips & Warnings For DIN rail mounting, it is strongly recommended that only a stainless steel DIN rail be used to support the weight of LX-9000 system, providing stability and preventing ALX-9000 from leaning ALX-9000 (Linux based PAC) User Manual version 1.0.0...
- Page 25 Step 3: Connect the ground lead to the frame ground point Tips & Warnings A good common ground reference (earth ground) is essential for proper operation of the ALX-9000. One side of all control circuits, power circuits and the ground lead must be properly connected to earth ground by either installing a ground rod in close proximity to the enclosure or by connecting to the incoming power system ground.
-
Page 26: Installing The Rj-45 Waterproof Connector Assembly
2.2. Installing the RJ-45 waterproof connector assembly The ALX-9000 is equipped with an RJ-45 waterproof connector to protect the connection in vibrate environment. The RJ-45 waterproof connector is optional for use with LAN1 port. If you do not need the RJ-45 waterproof connector, you can remove the cap and just plug in a regular Ethernet cable. - Page 27 Step 3: Wrap the (E) panel gasket around the (D) clamping ring Step 4: Wrap the (C) cable gland base around the (D) clamping ring Step 5: Insert the (B) rubber sealing insert into the (D) clamping ring ALX-9000 (Linux based PAC) User Manual version 1.0.0 Page: 27 Copyright ©...
- Page 28 Step 6: Push the (E) sealing nut forward and Hand-tighten it to seal the assembly Step 7: Insert the RJ-45 cable into the RJ-45 connector Step 8: Push the RJ-45 waterproof connector assembly forward ALX-9000 (Linux based PAC) User Manual version 1.0.0 Page: 28 Copyright ©...
- Page 29 Step 9: Insert the Ethernet cable and screw the RJ-45 waterproof into the receptacle The Ethernet cable is secured tightly in the connector. ALX-9000 (Linux based PAC) User Manual version 1.0.0 Page: 29 Copyright © 2024 ICP DAS Co., Ltd. All Rights Reserved. E-mail: service@icpdas.com...
-
Page 30: Deploying A Basic Alx-9000 System
2.3. Deploying a Basic ALX-9000 System The AX-9000 provides a variety of communication interface to suit a range of application. Here is a simple application for using the ALX-9000. Step 1: Connect the positive terminal (+) of the power supply to the terminal PWR1/2 and the negative terminal (-) of the power supply to the P.GND Tips &... - Page 31 Step 4: Connect to PC or the laptop to the LAN port via an Ethernet switch Tips & Warnings The metal part of the cord end terminal on the wire can be direct wired to the terminal. Remove the wiring from the terminal block Use the screwdriver to push the black clip in ii.
-
Page 32: Inserting The I/O Modules
2.4. Inserting the I/O Modules ALX-9000 has 1/3/7 I/O expansion slots to support I-9K and I-97K series I/O modules. ALX-9000 also has 1/3 e-Bus I/O slots to support e-9K series I/O expansion modules. Before choosing the right I/O modules, you first need to know the I/O expansion capacities in order to choose the best expansion module for achieving maximal efficiency. - Page 33 Step 2: Wiring connection The metal part of the cord end terminal on the wire can be direct wired to the terminal of ALX-9000. 1. Use screwdriver to push 2. Remove the wiring from the black clip in. the terminal block Keep on pushing Remove the wire Tips &...
-
Page 34: Console Port Connection
2.5. Console Port Connection ALX-9000 supports remote connection through the "Console" port without the need for the internet. Users can connect to ALX-9000 by following the steps below: Step 1: Users can connect to ALX-9000 by selecting software (such as Putty or others) through the "Console"... -
Page 35: Lan1/Lan2 Network Configuration
2.6. LAN1/LAN2 Network Configuration If the user successfully logs into ALX-9000 through the Console port, the user can use the "ifconfig" command to obtain the IP address for LAN1/LAN2. ALX-9000 (Linux based PAC) User Manual version 1.0.0 Page: 35 Copyright © 2024 ICP DAS Co., Ltd. All Rights Reserved. E-mail: service@icpdas.com... -
Page 36: Set Static Ip
2.6.1. Set Static IP The LAN1/LAN2 of factory setting use DHCP. If user wants to set the static IP address, user can refer to below steps: Step 1: Using the Linux command “vim” to modify the file “/etc/netplan/ 01-network-manager-all.yaml”. Step2: Set up a static IP, similar to the configuration for eth1 Step3: MAC address should not be changed casually as it is needed for fixing the network interface name. -
Page 37: Configuring Network Bonding
2.6.2. Configuring network bonding A network bond is a method to combine or aggregate physical and virtual network interfaces to provide a logical interface with higher throughput or redundancy. In a bond, the kernel handles all operations exclusively. You can create bonds on different types of devices, such as Ethernet devices or VLANs. - Page 38 Step4: If the user doesn't know the IP, they can log in through the console port to retrieve it. Static IP: Step 1: Using the Linux command “vim” to modify the file “/etc/netplan/ 01-network-manager-all.yaml”. Step2: Set up a static IP as shown in the diagram below. ALX-9000 (Linux based PAC) User Manual version 1.0.0 Page: 38...
- Page 39 Step3: After user save the file and use “netplan apply” command to restart internet interface, Users can use new network configurations on ALX-9000. ALX-9000 (Linux based PAC) User Manual version 1.0.0 Page: 39 Copyright © 2024 ICP DAS Co., Ltd. All Rights Reserved. E-mail: service@icpdas.com...
-
Page 40: Recovering Factory Os From Cfast Card To Flash
2.7. Recovering factory OS from CFast Card to Flash If users want to restore the factory operating system on ALX-9000, they can follow the steps below to restore the Linux operating system from the Flash: Step 1: Boot up ALX-9000 with CFast card OS. Ensure that the system boots from CFast OS (/dev/sda). Use the `ls` command to confirm that the "OS-install"... -
Page 41: Update Cfast Card Recover File Version
2.8. Update CFast card recover file version User can follow below steps to update recover file to recent version. 1. Boot up with CFast card and download recover file by below link. https://www.icpdas.com/tw/download/show.php?num=9028&model=ALX-9191 Please download “ALX-9000 OS image” option. 2. Delete old recover folder (“OS-install”) and unzip downloaded file (OS-install-ALX_9000-1.0.0). 3. -
Page 42: Instructions For Alx-9000
3. Instructions for ALX-9000 This chapter provides a brief introduction of the ALX-9000 service tools and its benefits. There are several tools and utilities built-in and designed for use with ALX-9000. Some of these are pre-installed on ALX-9000 and can work directly on ALX-9000, and some of these are supporting tools and can help you to manage the ALX-9000 remotely on a PC. -
Page 43: Basic Linux Command
3.1. Basic Linux Command In ALX-9000, you can use basic Linux commands to configure the Linux operating system or obtain system information. ALX-9000 (Linux based PAC) User Manual version 1.0.0 Page: 43 Copyright © 2024 ICP DAS Co., Ltd. All Rights Reserved. E-mail: service@icpdas.com... -
Page 44: Linux Command "Ls
3.1.1. Linux Command “ls” ls: list the file information -> (like dir in DOS) Parameter: (1) -l:list detailed information of file root@icpdas:/# ls -l total 100 drwxr-xr-x root root 4096 Mar 21 03:56 bin drwxr-xr-x root root 4096 Apr 8 08:41 boot drwxrwxr-x root root 4096 Jan 5 09:02 cdrom... -
Page 45: Linux Command "Cd
3.1.2. Linux Command “cd” cd directory: Change directory -> (like cd in DOS) Parameter: (1) ..:move to the upper directory root@icpdas:/tmp# cd .. root@icpdas:/# (2) ~:move back to the root directory root@icpdas:/# cd ~ root@icpdas:~# (3) /:divided sign root@icpdas:~# cd /tmp root@icpdas:/tmp# ALX-9000 (Linux based PAC) User Manual version 1.0.0... -
Page 46: Linux Command "Mkdir
3.1.3. Linux Command “mkdir” mkdir: create the subdirectory -> (like md in DOS) mkdir –parameter subdirectory root@icpdas:/tmp# mkdir mytest root@icpdas:/tmp# ls mytest mytest root@icpdas:/tmp# ALX-9000 (Linux based PAC) User Manual version 1.0.0 Page: 46 Copyright © 2024 ICP DAS Co., Ltd. All Rights Reserved. E-mail: service@icpdas.com... -
Page 47: Linux Command "Rm
3.1.4. Linux Command “rm” rm: delete file or directory -> (like del or deltree in DOS) rm -parameter file (or directory) Parameter: (1) i: it will show the warning message when deleting root@icpdas:/tmp# rm -i test.log rm: remove regular file 'test.log'? y root@icpdas:/tmp# (2) r: delete directory despite that it isn’t empty root@icpdas:/tmp#... -
Page 48: Linux Command "Cp
3.1.5. Linux Command “cp” cp: copy file -> (like copy in DOS) cp –parameter source destination root@icpdas:/tmp# cp /root/test.log /tmp/test.log root@icpdas:/tmp# ls test.log test.log root@icpdas:/tmp# ALX-9000 (Linux based PAC) User Manual version 1.0.0 Page: 48 Copyright © 2024 ICP DAS Co., Ltd. All Rights Reserved. E-mail: service@icpdas.com... -
Page 49: Linux Command "Mv
3.1.6. Linux Command “mv” mv: move or rename file or directory -> (like move or ren in DOS) mv -parameter source file (or directory) destination file (or directory) root@icpdas:/tmp# mv /root/test.log /tmp/mytest.log root@icpdas:/tmp# ls mytest.log mytest.log root@icpdas:/tmp# ALX-9000 (Linux based PAC) User Manual version 1.0.0 Page: 49 Copyright ©... -
Page 50: Linux Command "Pwd
3.1.7. Linux Command “pwd” pwd: show the current path root@icpdas:/tmp# /tmp root@icpdas:/tmp# ALX-9000 (Linux based PAC) User Manual version 1.0.0 Page: 50 Copyright © 2024 ICP DAS Co., Ltd. All Rights Reserved. E-mail: service@icpdas.com... -
Page 51: Linux Command "Chmod
3.1.8. Linux Command “chmod” chmod: change authority of file chmod ??? file -> ??? means owner: group: all users For example: 7 5 4 -> 111(read, write, execute) 101(read, write, execute) 100(read, write, execute) The first number 7: owner can read and write and execute files The second number 5: group can only read and execute files The third number 4: all users can only read files root@icpdas:/tmp#... -
Page 52: Linux Command "Uname
3.1.9. Linux Command “uname” uname: show the version of Linux kernel root@icpdas:/tmp# uname -a Linux icpdas 5.4.161-rt67 #12 SMP PREEMPT_RT Wed Feb 22 10:54:16 CST 2023 x86_64 x86_64 x86_64 GNU/Linux root@icpdas:/tmp# ALX-9000 (Linux based PAC) User Manual version 1.0.0 Page: 52 Copyright ©... -
Page 53: Linux Command "Ps
3.1.10. Linux Command “ps” ps: show the procedures that execute now root@icpdas:/tmp# ps -a PID TTY STAT TIME COMMAND 2751 ttySX2 00:00:00 bash 30734 pts/0 00:00:00 ps root@icpdas:/# ALX-9000 (Linux based PAC) User Manual version 1.0.0 Page: 53 Copyright © 2024 ICP DAS Co., Ltd. All Rights Reserved. E-mail: service@icpdas.com... -
Page 54: Linux Command "Date
3.1.11. Linux Command “date” date: show date and time root@icpdas:/tmp# date Fri 2 Feb 2024 04:39:11 PM CST root@icpdas:/tmp# ALX-9000 (Linux based PAC) User Manual version 1.0.0 Page: 54 Copyright © 2024 ICP DAS Co., Ltd. All Rights Reserved. E-mail: service@icpdas.com... -
Page 55: Linux Command "Netstat
3.1.12. Linux Command “netstat” netstat: show the state of network Parameter [-a]: list all states root@icpdas:/tmp# netstat -a Active Internet connections (servers and established) Proto Recv-Q Send-Q Local Address Foreign Address State 0 localhost:domain 0.0.0.0:* LISTEN 0 0.0.0.0:ssh 0.0.0.0:* LISTEN 0 localhost:ipp 0.0.0.0:* LISTEN... -
Page 56: Linux Command
3.1.13. Linux Command “ifconfig” ifconfig: show the ip and network mask (like ipconfig in DOS) root@icpdas:/tmp# ifconfig eth0: flags=4163<UP,BROADCAST,RUNNING,MULTICAST> mtu 1500 inet 192.168.2.186 netmask 255.255.255.0 broadcast 192.168.2.255 inet6 fe80::290:fbff:fe74:dad3 prefixlen 64 scopeid 0x20<link> ether 00:90:fb:74:da:d3 txqueuelen 1000 (Ethernet) RX packets 14609 bytes 1430664 (1.4 MB) RX errors 0 dropped 1756 overruns 0 frame 0 TX packets 702 bytes 104533 (104.5 KB) TX errors 0 dropped 0 overruns 0 carrier 0 collisions 0... -
Page 57: Linux Command "Wget
3.1.14. Linux Command “wget” wget: get the file from the web link. root@icpdas:# wget https://www.icpdas.com/en/download/file.php?num=19223 --2024-02-2 17:04:56-- https://www.icpdas.com/en/download/file.php?num=19223 Resolving www.icpdas.com (www.icpdas.com)... 50.87.226.148 Connecting to www.icpdas.com (www.icpdas.com)|50.87.226.148|:443... connected. HTTP request sent, awaiting response... 302 Moved Temporarily Location: https://www.icpdas.com/web/product/download/pac/linux/lx-9000/software/sdk/linpac_x86_sd k.tgz [following] --2024-02-2 17:04:57-- https://www.icpdas.com/web/product/download/pac/linux/lx-9000/software/sdk/linpac_x86_sd k.tgz Reusing existing connection to www.icpdas.com:443. -
Page 58: Linux Command "Ping
3.1.15. Linux Command “ping” ping: check to see if the host in the network is alive ping IPAddress (Example: ping 192.168.0.1) root@icpdas:/tmp# ping www.google.com PING www.google.com (142.251.43.4) 56(84) bytes of data. 64 bytes from tsa03s08-in-f4.1e100.net (142.251.43.4): icmp_seq=1 ttl=57 time=7.70 ms 64 bytes from tsa03s08-in-f4.1e100.net (142.251.43.4): icmp_seq=2 ttl=57 time=7.76 ms 64 bytes from tsa03s08-in-f4.1e100.net (142.251.43.4): icmp_seq=3 ttl=57 time=8.13 ms 64 bytes from tsa03s08-in-f4.1e100.net (142.251.43.4): icmp_seq=4 ttl=57 time=7.85 ms... -
Page 59: Linux Command "Clear
3.1.16. Linux Command “clear” clear: clear the screen root@icpdas:/tmp# ping www.google.com PING www.google.com (142.251.43.4) 56(84) bytes of data. 64 bytes from tsa03s08-in-f4.1e100.net (142.251.43.4): icmp_seq=1 ttl=57 time=7.70 ms 64 bytes from tsa03s08-in-f4.1e100.net (142.251.43.4): icmp_seq=2 ttl=57 time=7.76 ms 64 bytes from tsa03s08-in-f4.1e100.net (142.251.43.4): icmp_seq=3 ttl=57 time=8.13 ms 64 bytes from tsa03s08-in-f4.1e100.net (142.251.43.4): icmp_seq=4 ttl=57 time=7.85 ms 64 bytes from tsa03s08-in-f4.1e100.net (142.251.43.4): icmp_seq=5 ttl=57 time=7.63 ms 64 bytes from tsa03s08-in-f4.1e100.net (142.251.43.4): icmp_seq=6 ttl=57 time=8.03 ms... -
Page 60: Linux Command "Passwd
3.1.17. Linux Command “passwd” passwd: change the password passwd ??? -> ??? means the users that you want to change password root@icpdas:/tmp# passwd root Enter new UNIX password: Retype new UNIX password: passwd: password updated successfully root@icpdas:/tmp# ALX-9000 (Linux based PAC) User Manual version 1.0.0 Page: 60 Copyright ©... -
Page 61: Linux Command "Reboot
3.1.18. Linux Command “reboot” reboot: reboot the LinPAC root@icpdas:~# reboot ALX-9000 (Linux based PAC) User Manual version 1.0.0 Page: 61 Copyright © 2024 ICP DAS Co., Ltd. All Rights Reserved. E-mail: service@icpdas.com... -
Page 62: I-Talk Utility
3.2. i-Talk Utility The i-Talk utility can make the convenient for users to access the modules and hardware in the ALX-9000. Instruction Function Description getlist List all module name in the ALX-9000 setdo Set digital output value to I9k module setao Set analog output value to I9k module getdi... - Page 63 1、2 and 3 of the LinPAC separately. Instruction Demo Command: getlist getlist getlist Description: List all module names in the ALX-9000 Series. Command: setdo [slot] [data] setdo setdo 3 3 Description: Set i-9054P channel 1 and 2 on. Command: setao [slot] [channel] [data] ...
- Page 64 setexdo 2 1 55 (2) setexdo [slot] [comport] [data] [baudrate] [address] setexdo 0 3 55 9600 2 Description: (1)Set the dec digital output value to the module at slot 2 at COM1. (2)Set the dec digital output value to the module at slot 0 at COM3.
- Page 65 Command: read_sn read_sn read_sn Description: Show the serial number. Command: rotary_id rotary_id rotary_id Description: Read rotary switch ID of ALX-9000 Command: Description: Print a menu to set all led indicator Command: led_single [led] [status] led_single led_single 0 1 Description: Set “Run”...
-
Page 66: Alx-9000 Sdk
3.3. ALX-9000 SDK ALX-9000 SDK consists of the following major items. LinPAC SDK library files LinPAC SDK include files Demo files From https://www.icpdas.com/en/download/file.php?num=19223, you can download the latest version of ALX-9000 SDK. And then follows the below steps in order to get the development toolkit which has been provided by ICP DAS for the easy application of the ALX-9000 embedded controller platform. - Page 67 (2) To type “tar zxf linpac_x86_sdk.tgz” to decompress tar file and type “make” to compile demo code. root@icpdas:~# tar zxf linpac_x86_sdk.tgz root@icpdas:~# ls linpac_x86_sdk linpac_x86_sdk root@icpdas:~# cd linpac_x86_sdk/ root@icpdas:~/linpac_x86_sdk# make Once user decompresses the SDK file, user can find the files for the library and demo in the following paths.
-
Page 68: Your First Alx-9000 Program
4. Your First ALX-9000 Program This chapter provides a guided tour that describes the steps needed to set-up a development environment, download, install, configure for user programming with the ALX-9000. The default ALX-9000 support below development tools: Default Development Tools Linux OS is a mature embedded operating system which supports rapid development. -
Page 69: Your First Alx-9000 Program With C Language
In this section, we will introduce how to compile the helloworld.c to helloworld and executes this file on the ALX-9000 Series. In this example, no ICP DAS modules are used. To create a demo program with C that includes the following main steps: 1. -
Page 70: Find Demo "Helloworld.c" In Sdk
4.1.1. Find Demo “helloworld.c” in SDK The x86 LinPAC SDK had added the demo “helloworld.c”. User can follow below steps to find the demo in SDK. 1. Download SDK Please get SDK with link “https://www.icpdas.com/en/download/file.php?num=19223” 2. Find the demo in SDK Using command “cd”... -
Page 71: Compile/Execute Demo "Helloworld
4.1.2. Compile/Execute Demo “helloworld” User can refer to below steps to compile and execute demo “helloworld”. 1. Add script to SDK Makefile User can refer to the SDK Makefile (LinPAC_X86_SDK/examples/lx-8k_9k/common/Makefile) that we had added the script for demo “helloworld.c”. 2. Type “make helloworld” command to compile demo “helloworld.c” 3. -
Page 72: Execute Demo At Boot Time
4.1.3. Execute Demo at Boot Time User can refer to below steps to auto-execute demo “helloworld” at boot time in ALX-9000. 1. Create script file in “/etc/init.d” User can use “vim” command to create the script file in “/etc/init.d” and add below script language to the file. - Page 73 3. Create soft link to link /lib/systemd/system/helloworld.service root@icpdas:~# ln -s /lib/systemd/system/helloworld.service helloworld.service 4. After these setting , the ALX-9000 will execute binary “helloworld” at boot time root@icpdas:~# cat /tmp/test.log Hi ~ Welcome to LinPAC SDK root@icpdas:~# ALX-9000 (Linux based PAC) User Manual version 1.0.0 Page: 73 Copyright ©...
-
Page 74: Application For Alx-9000
5. Application for ALX-9000 In this chapter, ICP DAS provides extra module supported and instructions to enhance LX-8000/9000 functionality and affinity. ALX-9000 (Linux based PAC) User Manual version 1.0.0 Page: 74 Copyright © 2024 ICP DAS Co., Ltd. All Rights Reserved. E-mail: service@icpdas.com... -
Page 75: Advanced Package Tool
5.1. Advanced Package Tool “apt-get” command is a management system for software packages on the Linux OS of LX-9000. To install a package run the following commands: apt-get update apt-get install <package> To search available package run the following commands: apt-cache search <package name>... -
Page 76: Sftp (Secure File Transfer Program)
5.2. SFTP (secure file transfer program) The ALX-9000 series had supported SFTP(or SCP), user can transfer the file from Windows(or Linux). For examples, using Windows Program “WinSCP” to access the device over network, please follow below steps: 1. Choosing the “SFTP” or “SCP” protocol and type IP address, default ID (root) and password (icpdas) to login 2. -
Page 77: Xfce
XFCE is a lightweight desktop environment for UNIX-like operating systems. It aims to be fast and low on system resources, while still being visually appealing and user friendly. The ALX-9000 series support the XFCE package, after user type “root” and password “icpdas” to login, the local terminal would execute the XFCE Desktop. -
Page 78: Additional Support
6. Additional Support In this chapter, ICP DAS provides extra module supported and instructions to enhance ALX-9000 functionality and affinity. ALX-9000 (Linux based PAC) User Manual version 1.0.0 Page: 78 Copyright © 2024 ICP DAS Co., Ltd. All Rights Reserved. E-mail: service@icpdas.com... -
Page 79: N-Port Modules Support
6.1. N-Port Modules Support N-port communication modules provide two or four serial ports and can be inserted into the slot of an ALX-9000 embedded controller. In this way, additional serial ports can be used on the ALX-9000 embedded controller. The ALX-9000 embedded controller is a multi-tasking unit, meaning that all the serial ports can be controlled simultaneously. -
Page 80: Alx-9000 Internet Service
7. ALX-9000 Internet Service internet service provided by ICP DAS will be satisfied and it includes Technical Support, Driver Update, OS_Image, LinPAC_SDK User’s Manual Download etc. Users can refer to the following web site to get more information: 1. ICP DAS Web Site : http://www.icpdas.com/ 2. -
Page 81: Appendix
Appendix A. I-9K Modules and I-97K Modules This chapter provides a brief overview of the different between I-9K series modules and I-97K series modules. There are two types of I/O modules provided for supporting ALX-9000. One is high communication speed I-9K series modules with parallel interface; the other is I-97K series modules with serial interface. - Page 82 B. e-9K Modules e-9K series modules are provided for combining a variety of I/O functions within the AXP-9000 and ALX-9000 programmable automation controllers (PAC). e-9k series is based on a high-speed bus interface (e-Bus) with speeds up to 2GB/s (e-Bus x4) and 500MB/s(e-Bus x1), and also supports DMA (Direct memory access) data transfer without the need for a central Processing unit intervention.
-
Page 83: Revision History
C. Revision History This chapter provides revision history information to this document. The table below shows the revision history. Revision Date Description V1.0.0 Mar. 2024 Initial issue ALX-9000 (Linux based PAC) User Manual version 1.0.0 Page: 83 Copyright © 2024 ICP DAS Co., Ltd. All Rights Reserved. E-mail: service@icpdas.com...
Need help?
Do you have a question about the ALX-9000 Series and is the answer not in the manual?
Questions and answers