Table of Contents
Advertisement
Quick Links
Advertisement
Table of Contents

Related Manuals for Seers Medical ST7700


Summary of Contents for Seers Medical ST7700
- Page 1 Instructions for Use Shower Trolley 03-1009-IFU-EN | ISSUE 1...
- Page 2 WARNING To avoid injury, always read this Instructions for Use and accompanied documents before using the product. Mandatory to read the Instructions for Use...
- Page 3 This Instructions for Use document applies to the following products: Shower Trolley ST7700, ST7800...
- Page 4 INDEX 1. General Information – Intended Use, Warnings & Cautions 2. How to Use Wheel System - Large Mobile Wheel Design Adjusting the Height of the Shower Trolley Battery Operated Models (ST7800) Charging Unit Side Supports Rails Bumper Removal 3. Cleaning Instructions 4.
-
Page 5: General Information
1. General Information CONGRATULATIONS on the purchase of your new SEERS MEDICAL product. If these operating instructions are adhered to, the product will provide many years of safe use. If these operating instructions are not followed, your warranty could be invalid! Always keep these Instructions for Use available for reference. - Page 6 WARNINGS! Warnings identify potential hazards which if not followed correctly, could result in serious injury, or possibly death! • Ensure electric products are not used in the presence of flammable gasses such as an anaesthetic agent. • DO NOT EXCEED the Maximum Safe Working Load of the product. •...
-
Page 7: How To Use
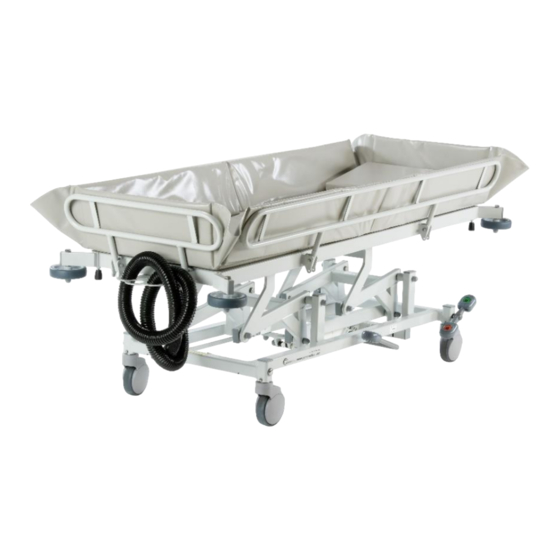
2. How To Use Wheel System - Large Mobile Wheel Design Wheel Lever Wheel Lever Wheel Lever RED Down Horizontal GREEN Down Castors locked Castors unlocked Directional Steering castor engaged at rear of shower trolley... - Page 8 Adjusting the Height of the Shower Trolley Hydraulic Elevation (ST7700) To elevate the shower trolley, push the pedal downwards with your foot. Repeat until correct height is achieved. To lower shower trolley, raise the pedal upwards, by putting your toe underneath the lever, lifting the lever upwards until the shower trolley reaches the desired height.
- Page 9 Battery Operation -BAT (ST7800) Hand Switch Raising the Shower Trolley • To elevate the shower trolley, push the UP button on the hand or foot switch. • Once the desired height is achieved, release the button. • On releasing the button, the shower trolley is locked at the desired position.
- Page 10 c. Battery Operated Models (ST7800) Battery Fitting and Removal 1. To fit the battery, simply offer it up to the mounting bracket, aligning with the connection point at the control box end. 2. Once aligned simply click the battery into the bracket until secure.
-
Page 11: Charging Unit
d. Charging Unit • The trolley is supplied with a separate charger which can be wall mounted by fixing the plate to a wall if desired. • The battery status is indicated on the handset. Charge when required. • Do not use the mains charger in an environment where it could get wet! Further information with regards to the battery charging/performance is included at the end of this User Manual. - Page 12 e. Side Supports Rails WARNING! Children must not play with the shower trolley at any time. Adequately supervise children in the proximity of the shower trolley. Ensure the Side Support Rails are Fully Engaged into Socket, prior to use. To Raise the side support rail, simply lift and rotate 180 degrees, and then engage fully into socket.
-
Page 13: Bumper Removal
f. Bumper Removal If necessary, to narrow the width of the trolley (for narrow doorways) the bumpers can be removed from the ends of the trolley. Simply loosen the thumb knob on the underside near the bumper, until loose enough to slide the bumper out of the steel frame. -
Page 14: Cleaning Instructions
Cleaning Instructions WARNING! Disconnect the shower trolley from the mains power supply prior to carrying out any cleaning or decontaminating. DO NOT SATURATE PRODUCT! IF THE PRODUCT GETS SATURATED DURING CLEANING, THIS COULD ACCELERATE CORROSION, REDUCING PRODUCTS LENGTH OF SERVICE. General Cleaning To get rid of any dust or marks on the surface the Faux Leather MUST be wiped DAILY with a moist soft cotton cloth. - Page 15 Ink, Ball point pen, Denim, hard stains Rub the stain by means of gentle circular movements with tissue dampened with 96°alcohol and water (1:1) After this rub the surface with gentle circular movement with tissue paper to dry it. Butter, oil, grease stains Wipe excess butter, oil or grease off the surface with a clean 100% Cotton white dry cloth.
- Page 16 If DECONTAMINATING the shower trolley then repeat steps above using a dilute Hypochlorite & warm water mixture (mixed at 10,000ppm) instead of warm water and soap. It is crucial that any staining is treated as soon as possible but never later than 24 hours.
-
Page 17: Maintenance
4. Maintenance WARNING! Disconnect the product from the mains power supply prior to carrying out any maintenance. All electrical maintenance should be performed by a suitably qualified person. BLUE or BROWN wires must not be connected to any earth terminal. Actions to be done by clinician Daily Weekly... - Page 18 Actions to be done by qualified personnel Once a year • Carry out a full test of all electrical product positioning functions (height, etc.) Examine the power supply cord and mains plug; if damaged, • replace the complete assembly; do not use a rewireable plug. •...
- Page 19 5. Warranty and Product Lifetime SEERS MEDICAL Limited standard terms and conditions apply to this device. A copy of this is available upon request. This contains full details of warranty terms and does not affect your statutory rights. For any further information on this product, regarding spares, warranty,...
-
Page 20: Troubleshooting
6. Troubleshooting Fault Possible Cause Solution Electrical Mains cable has become Locate control box and see whether functions not disconnected, either from the power light is illuminated and that working correctly the wall socket or the the lead is connected at both ends. control box Fuse blown in mains plug Locate control box and see whether... - Page 21 Shower trolley is not on Level shower trolley by adjusting the raise or lower level floor adjustable foot if fitted. 7. Technical Data - Shower Trolleys Index / Model ST7700 ST7800 Configuration Elevation Control Hydraulic Battery Operated Wheel System Large Mobile Wheel Design Min.
-
Page 22: Environmental Protection
Electrical Technical Data Linak Control Box 100 - 240V, 50/60Hz Output 120W Standby power 0.5W Duty Cycle 10% max, 2 min ON / 18 min OFF Mains Plug Fuse Rt (UK) 5.0A x 1- IP RATING IPX 6 washable Electrical Classification Double Insulated (IEC 60601-1) Electrical Classification... - Page 23 Symbols Safe working load Double Insulated (Class II) Alternating current (a.c.) Manufacturer Total weight of the Manufacturing date equipment including its safe working load Complies with the European Caution/Warning Regulatory affair Serial number Refer to instructions For Use Type B applied part. Model number Waste Electrical and Electronic Equipment...
- Page 24 8. Battery Information, Handling & Performance Valve-Regulated Lead Acid (VRLA) Batteries How to handle LINAK rechargeable sealed lead acid batteries to obtain the longest possible life. Battery Construction In a VRLA battery, a pressure relif valve will be activated when the battery starts building up hydrogen gas pressure which is generally a result of recharging.
- Page 25 ambient temperature and other factors. The higher the discharge rate, the lower the capacity. Charging Theoretically, it takes about 6 to 9 hours to reach 80% of the battery capacity level if the battery capacity is approx.. 0% SoC. It is recommended that the batteries are discharged as little as possible to optimise battery life.
- Page 26 Maintenance of batteries Prior to first use of LINAK batteries, please make sure that they are being charged at least 24 hours and longer if possible in order to reach proper function and prolong the lifetime of the batteries. WARNING! Please observe the following maintenance, replacement, and disposal requirements to ensure a safe and reliable operation.
- Page 27 the cover are to be fastened with approx. 1 Nm. If the seal is damaged it must be replaced by a new silicone string (LINAK article no. 0008004 for a roll of 100 meters). Disposal The batteries which are lead-acid batteries, can be returned to LINAK or disposed in the same way as car batteries.
- Page 28 UNITED KINGDOM t: +44 (0)1728 861590 f: +44 (0)1728 861868 e: info@seersmedical.com w: www.seersmedical.com © SEERS MEDICAL Limited 2023 Advena Limited. Tower Business Centre, 2 Flr. Tower Street, Swatar, BKR 4013 Malta. mark on this product demonstrates conformity with MDR...
Need help?
Do you have a question about the ST7700 and is the answer not in the manual?
Questions and answers