
Related Manuals for JTS RX-966KB


Summary of Contents for JTS RX-966KB
- Page 1 Instruction Manual RX-966KB / TX-966K / PT-966B 36MHz Dual Channel Wide Bandwidth Wireless System PROFESSIONAL CO., LTD www.jts.com.tw 59508-070-03...
-
Page 2: Table Of Contents
5. Connection 6. Operation 7. Recommendation 8. Important Notice Thank you for choosing the JTS wireless system. In order to obtain the best efficiency from the system, you are recommended to take a few minutes to read this instruction manual carefully. -
Page 3: Important Caution
1. Important Caution 3. Specification • 3-1 UHF PLL Dual Channel Diversity Receiver // RX-966KB Always make all connections before plugging the unit into an AC power outlet. • Do not leave the device in a place neither with high temperature nor high humidity. -
Page 4: Uhf Pll Body-Pack Transmitter // Pt-966B
3-3 UHF PLL Body-Pack Transmitter // PT-966B Headset Microphone Frequency Preparation.... PLL Synthesized Control Model No....... CM-214i CM-214Ui CM-214ULi Carrier Frequency Range..502~960 MHz Connector....... 801C4 4P Mini XLR 801C3 (3P Mini XLR) RF Outputs........Low , High (4P Mini XLR) 801C4 (4P Mini XLR) Stability.......... -
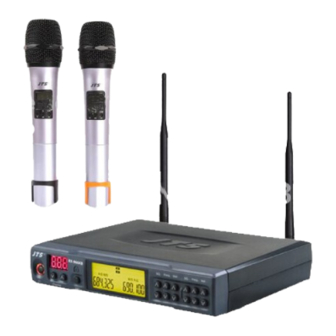
Page 5: Part Identification & Accessories
4. Parts Identification & Accessories Ear-hook Microphone 4-1 UHF PLL Dual Channel Diversity Receiver // US-966KB Front Panel Model No....... CM-801/CM-804i CM-8015/CM-825i Power Switch Connector......801C4 (4P Mini XLR) 801C4 (4P Mini XLR) Lock on/off Option Connector... 801C3 (3P Mini XLR) 801C3 (3P Mini XLR) Volume Contol 801CS (3.5 stereo plug) - Page 6 LCD Panel of the Receiver : RF Level: display the strength of radio signal Rear Panel : AF Level: display the strength of audio signal : Low battery indicator: display the low battery status of its transmitter Antenna Balanced 6.3mm jack Output: for connection to the balanced input, e.g. of a mixer or an : Channel A on Right side;...
-
Page 7: Uhf Pll Handheld Transmitter // Tx-966K
4-2 UHF PLL Handheld Transmitter // RX-966KB 4-3 UHF PLL Body-Pack Transmitter // PT-966B LCD Display LCD Display Power Switch Battery Tray Power On/Off: Press button for 3 seconds to turn On/Off the power. Set button: set the configuration of bodypack transmitter ▲:Up button: select the settings of transmitter... -
Page 8: Accessories
4-4 Accessories Headset Microphone // CM-214i / CM-214Ui / CM-214ULi / CM-235i / CX-504 AC/DC adaptor Switching Power Supply(100V~240V , 50~60Hz) Gooseneck AC IN: AC100~240V/50~60Hz Adjustable headband DC OUT: DC12V/0.5A Headband AF output cable (with Φ6.3 plug at both ends) 4 Pin Mini XLR Screwdriver Windscreen... -
Page 9: Connection
5. Connection 5-1 Receiver // Ear-hook Microphone // CM-801 CM-804i CM-8015 CM-825i Boom (1) Connect to the subsequent unit (e.g. mixer, or amplifier) Adjustable Headband Connect one end of a proper AF cable to the AF Output or AF Output mixed , then Adjustable ear hook plug another end to the “MIC IN”... -
Page 10: Operation
2. Set the preset channels for receiver Press the Channel Select ▲, ▼ keys to select RX-966KB preset channels; a total of 241 sets are available. A preset channel is displayed by the LED while the corresponded frequency is displayed on LCD . Keeping▲ or▼ pressed down can change the channels faster. (Fig.2) - Page 11 6-2 Setting the RX-966KB Handheld transmitter / PT-966B Body-Pack transmitter 2-2 When setting your desired frequency while a preset channel is displayed on screen: 1. Turn on / off the power (1) Press down SET key for 2 seconds. (1) Handheld transmitter (2) The 3 digits on the left of the LCD begin to blink;...
- Page 12 3. Using preset channels: 4. Adjusting microphone sensitivity # When using preset channels, make settings as 3-1 and 3-2. (1) Press down the SET key for 2 seconds. 3-1 When a channel is displayed on LCD (2) The 3 digits on the left of the LCD begin to blink; press SET key four times to enter the sensitiv- (1) Press down the SET key for 2 seconds.
-
Page 13: Recommendation
(1) In order to achieve the optimum reception condition and also extend the operating distance, (1) JTS offers wireless systems in a selection of bands that conform to the different government please leave a “open space” between the receiver and transmitter.
Need help?
Do you have a question about the RX-966KB and is the answer not in the manual?
Questions and answers