Table of Contents
Advertisement
SL7 Starlite Treadmill
Owner's Manual SL7
CAUTION:
1. Weight on this product should not exceed 264lbs / 120kgs.
2. Exercise of a strenuous nature, as is customarily done on this equipment, should not be
undertaken without first consulting a physician. No specific health claims are made or implied
as they relate to the equipment.
3. Measurements made by the equipment are believed to be accurate, but only the
measurements of your physician should be relied upon.
IMPORTANT: Read all instructions carefully before using this product. Retain this product
owner's manual for future reference.
• Warranty
• Assembly
• Parts
TOOLS REQUIRED
FOR ASSEMBLY:
Adjustable Wrench
Advertisement
Table of Contents

Subscribe to Our Youtube Channel
Related Manuals for Orbit STARLITE SL7


Summary of Contents for Orbit STARLITE SL7
- Page 1 SL7 Starlite Treadmill • Warranty • Assembly • Parts TOOLS REQUIRED FOR ASSEMBLY: Adjustable Wrench Owner’s Manual SL7 CAUTION: 1. Weight on this product should not exceed 264lbs / 120kgs. 2. Exercise of a strenuous nature, as is customarily done on this equipment, should not be undertaken without first consulting a physician.
-
Page 2: Table Of Contents
Contents I. IMPORTANT PRECAUTIONS........(1) II. MAIN TECHNICAL FEATURES ………...……..…….(4) III. ASSEMBLY…………...…………………………….....(5) IV. WORKOUT GUIDELINES ……………...…….....(8) V. TREADMILL OPERATION………….…....…..(8) VI. MAINTENANCE………………………………...……..(12) VII. RECYCLING INFORMATION…………...….....(15) VIII. COMMON ERRORS ……………………..……….…..(15) IX. EXPLODED VIEW and PARTS LIST....(17) -
Page 3: Important Precautions
I. IMPORTANT PRECAUTIONS 140 cm 120 kg USER WEIGHT THE SECURITY KEY HAS A MAGNET WHICH MUST BE PUT IN THE DISPLAY. AT THE END OF THE LACE THERE IS A CLAMP WHICH SHOULD BE ATTACHED TO THE CLOTHES. THE TREADMILL WILL START WORKING ONLY IF THE KEY IS PLACED IN THE DISPLAY. THIS IS ESSENTIAL. A CORRECT LUBRICATION OF THE TREADMILL WITH SILICON OIL OR TEFLON IS REALLY IMPORTANT. THIS LUBRICATION MUST BE PERFORMED REGULARLY DEPENDING ON EACH PERSON, EVEN BEFORE ITS FIRST USE. - Page 4 3 - Use the equipment as explained in the instruction manual. 4 - Keep the equipment in an enclosed area, away from dust or humidity. Don’t store it in a garage, indoor backyard or near the water. Humidity, dust and water could lead to a malfunction of the equipment, annulling its guarantee. 5 - Place the unit on a flat surface. If the surface is uneven, the proper functioning could be affected. Some models include levelers or levelling threads behind the legs, helping the levelling. Please read the manual to verify if your unit is provided with one of them. 6 - The unit must be placed in a ventilated area. Don’t use it in places with sprays or with oxygen dispenser. The air you breath may be affected and cause an accident. 7 - Keep children younger than 12 years old and pets away from the equipment. Keep a safe distance from machine. 8 - Check in the manual for the maximum weight your equipment can support. An excessive weight could lead to a malfunction in the operating system, which won’t be covered by the guarantee. 9 - Wear suitable clothes and shoes. Do not use loose clothes that may get hooked. 10 - If your equipment is working through a power supply: make sure that the power cord and plug are in good conditions. Carry out the connection only when the circuit has ground connection, otherwise it could cause damages on the equipment or in the property which the guarantee won’t cover. Power cords must be away from hot surfaces.
- Page 5 Repeat this action on a regular basis. 20 - Two people will be needed in order to take the unit from the package. Otherwise, the damages caused in this moment won't be covered by the guarantee. 21 - Don't let any object fall into the grooves. 22 - If the unit works through a power cord: unplug always the power cord before cleaning it, after the workout and before performing any maintenance duty. 23 - This unit is designed for a domestic purpose and in an interior place, not for business environment or outside. 24 - Do a workout with stretches before and after the sessions, you will avoid injuries. 25 - Drink water before, during and after the workout. 26 - If you start feeling pain or dizziness while training: STOP IMMEDIATELY. 27 - YOU MUST PRESERVE THE ORIGINAL PACKAGING WITH ITS PROTECTIONS, MANUAL AND COMPONENTS DURING THE GUARANTEE PERIOD. 28 - The accessories can be different to the other models. 29 - This electronic product can't be thrown under any circumstances into the municipal rubbish bins. With the aim of preserving the environment, this product must be recycled according to the applicable law of your country. Please contact your town council to know more about this procedure. 30 - Should you need technical assistance or advise with the installation of pieces, you can get in touch with us. YOU MUST KEEP THE PURCHASE RECEIPT IN ORDER TO HAVE ACCESS TO THIS SERVICE KEEP THESE ADVISES FOR FUTURE REFERENCES...
-
Page 6: Main Technical Features
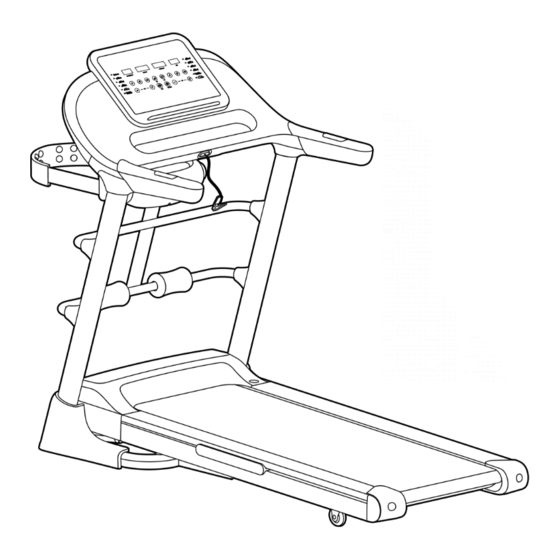
II. MAIN TECHNICAL FEATURES LED SCREEN SECURITY KEY MASSAGER* HANDRAIL (Multi-Function Only) MOTOR COVER UPRIGHT TUBE LUBRICATION HOLE RUNNING BELT SIDE COVER SIDE RAIL END CAP Input Voltage 220V±10% Frequency 50/60 HZ Running Area 1210 X 470mm Time, Speed, Distance, Calorie, Bluetooth APP, Function Bluetooth Speakers Speed Range... -
Page 7: Assembly
III. ASSEMBLY NOTICE: ASSEMBLY REQUIRES TWO PERSONS Name Q'ty 1.Main Frame 1set 2.Massager* 1set 2 pcs 3.U Bar 4. Multi-Function Frame* 1 pc Fittings Qnty Fittings Qnty M 10x50 screw M8x16 screw M10 Nut ‚ ⑩ M8 Nut M8 flat washer ƒ... - Page 8 STEP 1 1. Carry out the machine from the package by two persons and place it lightly on flat floor, and put other fittings beside the machine. 2. Insert the left upright tube into base frame, fasten it with 1pc M8*45 screw and 1pc M8 flat washer, 1pc M10*50 screw, 1pc M10 flat washer and 1pc M10 nut, 1pc M8*16 screw and 1pc M8 curve washer, then tighten all the screws. 3. Please repeat the same steps on the right side. STEP 2 Connect the signal wire at right upright tube, then insert the console into both upright tubes (pay attention not to break signal wire), put 4pcs M8*16 screws and flat washers and tighten them.
- Page 9 STEP 3 (*Multi-Function Version Only) 1. Lock the 2pcs U-shape pipes to both upright tubes, fasten them with 4pcs M8*40 screws and flat washers and nuts and tighten them. 2. Put the multi-function frame to U-shape pipes, fasten it with 2pcs M8*65 screws and flat washers and nuts and tighten them. 3. Disassemble the 3pcs M8*14 screws under massager by multi wrench, and put massager onto the top of function frame and tighten the screws. STEP 4 1. Put the side covers at the base frame as shown below. 2. Put the safety key on the console then can start to use machine.
-
Page 10: Workout Guidelines
IV. WORKOUT GUIDELINES BEWARE: Before starting to use this or any exercise programs, consult your doctor. This is especially important for people older than 35 years old, or for people with health problems. If your equipment is provided with a pulse sensor, you must keep in mind this isn’t a medical instrument. Several factors can vary the accuracy of the heart rate interpretations. - Page 11 COMPUTER LED DISPLAY INCLINE QUICK KEYS SPEED QUICK KEYS INCLINE + SPEED + INCLINE - SPEED - MODE STOP START PROG MANUAL...
- Page 12 MODE PROGRAM...
- Page 13 TIME SETTING TIME / 20= EACH SECTION OPERATION TIME SECTION PROGRAM SPEED INCLINE SPEED INCLINE SPEED INCLINE SPEED INCLINE SPEED INCLINE SPEED INCLINE SPEED INCLINE SPEED INCLINE SPEED INCLINE SPEED INCLINE SPEED INCLINE SPEED INCLINE BLUETOOTH SPEAKER...
- Page 14 CONSTITUTION TEST 01 M 02 F 10------99 Height 100----240 Weight 20-----160 ≤19 Underweight =(20---25) Normal Weight =(25---29) Overweight ≥30 Obesity APP G BLUETOOTH APP SPAX OR ZWIFT...
-
Page 15: Maintenance
MAINTENANCE This product must be earthed. If the power cord is damaged, it must be replaced with a manufacturer recommended power cord. DO NOT TANGLE THE POWER CORD REGULAR MAINTENANCE OF THE TREADMILL • STORAGE: Keep your equipment in an enclosed place, away from dust or humidity. Don’t store it neither in a garage or in an indoor backyard, or near the water. Humidity, dust and water could damage it and have an effect on its functioning • ELECTRIC CABLE: Make sure that the cable and plug are in perfect conditions. Electric cables must be away from hot surfaces • SCREWS AND CONNECTING CABLES: Supervise and tighten the screws on a regular basis, because due to the vibration the screws and nuts tend to loosen. LUBRICATION: Correct lubrication of the treadmill with silicon oil or Teflon is really important. This lubrication must be performed regularly depending on its use even before the first use. The step to lubricate the running board is as follows: (see the above figure) a) Run the treadmill at highest speed. b) Put the silicon oil in hole at right side of motor cover. • After running for a period of time, the treadmill must be configured with special cymene silicone oil for lubrication. - Page 16 lubrication is to improve the lifespan of your treadmill. • ALIGN AND TIGHTEN THE BELT OF THE TREADMILL • ALIGN THE BELT: Due to its use, the belt can move off center. If the belt has moved to the left, start treadmill and increase the speed to 3MPH. Use the 6mm Wrench to turn the fixed left bolt clockwise or turn the fixed right bolt counterclockwise. Don’t tighten the belt too much in order to be able to walk. Repeat this procedure until the belt is properly aligned. If deviate to the left, then If deviate to the right, then adjust the screw on the left side adjust the screw on the right side 如果跑带左偏, 则顺时针调节左 如果跑带右偏, 则顺时针调节右...
-
Page 17: Recycling Information
• CLEANING: Don't use soap, detergent or abrasive products. A damp cloth is enough. • LEVELING: If your unit is provided with leveling wheels, please adjust them in order to avoid vibrations and therefore malfunctions. • KEEP THESE MAINTENANCE ADVISES FOR FUTURE REFERENCES VII. RECYCLING INFORMATION This electronic product must not be disposed of in municipal waste. To preserve the environment, this product must be recycled after its useful life as required by law. VIII. - Page 18 Over current protection Turn off power and restart Check motor has smell or not, change it if has. Check PCB has smell or not, change it if has. Over load protection Turn off power and restart Adjust driving position, or add Check motor has smell or not, change it if has.
-
Page 19: Exploded View And Parts List
IX. EXPLODED VIEW and PARTS LIST... - Page 20 Item Description Fixed Foot Pad Screw M8*40(15) Gasket Transportation Wheel Base Frame Side Cover R Screw M8*45(15) Screw M10*50(15) Plastic Clip Gasket Side Cover L Screw M8*16 Tile Gasket Upright L Power Cord Buckle Upright R U-Tube Sheath Foam U-bar Pipe Plug Muti-Function Frame Screw...
- Page 21 Item Description Computer Cover 4inch LCD Panel Sticker 4inch LCD Upper Motor Cover Lubrication Pipe Plug Upper Side Stripe Running Belt Running Board Screw M8*30 Screw ST4*12 Side Stripe Buckle Screw M8*30 Locating Stud φ4 Spring Washer Brushless Motor Fixed Sheet Brushless Motor Rubber Sleeve R Brushless Motor Brushless Motor Rubber Sleeve L...
Need help?
Do you have a question about the STARLITE SL7 and is the answer not in the manual?
Questions and answers