Table of Contents
Advertisement
Quick Links
Advertisement
Table of Contents

Related Manuals for Orbit STARSTRIDER SS 242


Summary of Contents for Orbit STARSTRIDER SS 242
-
Page 2: Table Of Contents
CONTENT CONTENT CONTENT ----------------------------------------------------------------------------------------------------------------------------1 IMPORTANT SAFETY PRECAUTIONS ----------------------------------------------------------------------------------2 ASSEMBLY INSTRUCTIONS ------------------------------------------------------------------------------------------------4 FOLDING & UNFOLDING INSTRUCTIONS --------------------------------------------------------------------------8 GROUNDING METHODS -----------------------------------------------------------------------------------------------------9 OPERATION GUIDE ----------------------------------------------------------------------------------------------------------10 GETTING STARTED GUIDE ------------------------------------------------------------------------------------------------14 WARM-UP EXERCISE -------------------------------------------------------------------------------------------------------15 SAFETY EXERCISE ----------------------------------------------------------------------------------------------------------16 MAINTENANCE INSTRUCTION ---------------------------------------------------------------------------------------17 BELT ADJUSTMENT ----------------------------------------------------------------------------------------------------------18 EXPLODED DRAWING ------------------------------------------------------------------------------------------------------19 PARTS LIST ----------------------------------------------------------------------------------------------------------------------20... -
Page 3: Important Safety Precautions
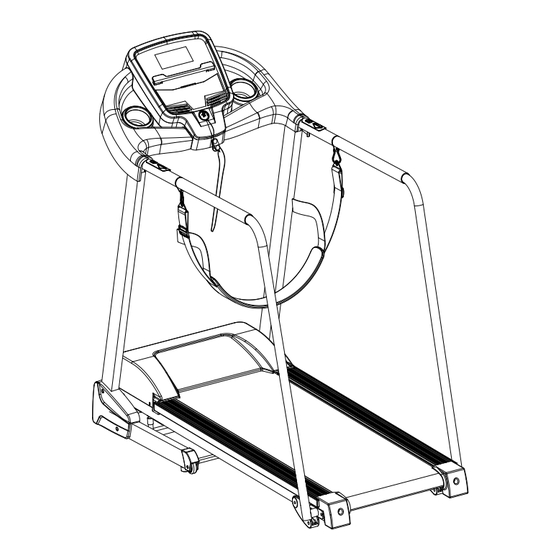
IMPORTANT SAFETY PRECAUTIONS IMPORTANT SAFETY PRECAUTIONS WARNING: Before starting any exercise program, consult with your physician or health professional , especially the person who is above 35 years old people or has some health problems before. We take no responsibility for any troubles or hurts due to above reasons. Don't power on until you finish assembly the treadmill and covering the protected top of motor. - Page 4 PRODUCT OVERVIEW Console Quick speed buttons Safety key Handrail Belt Upright Motor cover Running belt Side rail Side cover Base frame End cap Main frame Manual incline...
-
Page 5: Assembly Instructions
ASSEMBLY INSTRUCTIONS WHEN YOU OPEN THE CARTON, YOU WILL FIND THE BELOW SPARE PARTS: Main frame 1 set D17 Washer M8 8pcs Round bolt C13 Safety key 1pc M8*15 4pcs D3 Allen wrench T5 D1 Screw driver 1 pc B11L Left side cover 1 Round bolt M8*45 4 pcs... - Page 6 STEP 1: According to the following steps to lift up the computer bracket. Be careful not press the line when folding. STEP 2: Secure bottom frame with Round head hex bolt M8*45 (D16), Round head hex bolt M8*15 (D13), and the Washer M8 (D17). Then secure console frame with Round head hex bolt M8*15 (D13)and Washer M8 (D17).
- Page 7 STEP 3: Lock the Left / Right side cover (B11l/R) with Cross head bolt ST4.2*19 washer (D48) . B11R B11L STEP 4: Take off the Put Belt safety hook (A29) into Left / Right handrail Handrail plug (B4). (A30/A31). Install the Left / Right handrail (A30/A31) to handrail bracket (A4) with Cross bolt M6*16 (D81).
- Page 8 STEP 5: Lock the Safety buckle (A32) with Belt safety hook (A29) and hang up the Belt (B84). Then put on the safety key (C13). STEP 6: To check if the running belt runs correctly, placing treadmill in folding position and tightening all the bolts.
-
Page 9: Folding & Unfolding Instructions
FOLDING & UNFOLDING INSTRUCTIONS Step 1: To fold the treadmill, firstly back to the initial status and stop the treadmill. Switch off the power, and then lift the rear part of the treadmill and push it up until you hear the “Click” sound from the cylinder. Step 2: To unfold, push the rear part of the treadmill. -
Page 10: Grounding Methods
GROUNDING METHODS This product must be grounded. If it should malfunction or breakdown, grounding provides a path of least resistance for electric current to reduce the risk of electric shock. This product is equipped with a cord having an equipment-grounding conductor and a grounding plug. The plug must be plugged into an appropriate outlet that is properly installed and grounded in accordance with all local codes and ordinances. -
Page 11: Operation Guide
OPERATION GUIDE 1.1. WINDOW DISPLAY ・ 1.2 START Normal start after 5 seconds countdown 1.3 PROGRAM 3 countdown function, 12 pre-set programs, 1 body fat program 1.4 SAFETY LOCK FUNCTION The window shows"---" when take away the safety lock and the treadmill will stop quickly with "didi" alarm noise. - Page 12 1.5.3 “MODE” BUTTON When the treadmill is not running, press this button to choose countdown modes:”H-1”,”H-2”,”H-3”. H-1” is the time countdown mode, and “H-2” is the distance countdown mode, “H-3” is the calorie countdown mode; press the “SPEED+/-” button to adjust the data. After that, press the “START”...
- Page 13 1.7 PULSE FUNCTION When the treadmill is running, hold the hand pulse about 5 seconds, it will display pulse data. The pulse data range is 50-200 times/ minute. It has heart-shaped graphics when testing pulse. This data is only for reference, can not be as medical data. 1.8 PROGRAM EXERCISE CHART TIME INTERVAL SET TIME / 10 = EVERY GRADE TIME...
- Page 14 1.11 BODY TESTER(FAT) At the beginning state, press “ PROGRAM” continually to enter “FAT“ body fat test,window display “FAT”. Press “MODE” to enter (F1 SEX, F2 AGE, F3 HEIGHT, F4 WEIGHT). Press “SPEED+”, “SPEED-” to set. After setting, the computer will display F5 and grasp the hand pulse, the window will display your body quality index.
-
Page 15: Getting Started Guide
GETTING STARTED GUIDE PREPARE If you are around 35 years old, or have health problem, even this is your first time to do fitness exercise, please consult doctor or professional before use it. Before do exercise, please stand on the side to learn how to operate, such as start, stop and speed adjustment. -
Page 16: Warm-Up Exercise
WARM-UP EXERCISE Please consult professional staff before do exercise. He can help recommendation exercise rate/intension and time according to your age and health condition. When running, if you feel chest tightness or chest pain, irregular Heartbeats, short of breath, dizziness or other unwell, please stop immediately! And consult professional before you want continually to do exercise. -
Page 17: Safety Exercise
SAFETY EXERCISE It is better to do some warm-up exercise. Warm the muscle easy stretch, so use 5-10 mins to warm-up. Then stop and according below method to do stretch exercise for five times, and each foot do 10 seconds or more every time. After running, do those stretch exercises again 1. -
Page 18: Maintenance Instruction
MAINTENANCE INSTRUCTION WARNING:Please make sure pull out the treadmill's power plug before cleaning or maintaining the product. CLEANSING:General cleaning or the unit will greatly prolong the treadmill's life. Keep treadmill clean by dusting regularly. Be sure to clean the exposed part of the deck on either side of the walking belt and also the side rails. -
Page 19: Belt Adjustment
BELT ADJUSTMENT Place treadmill on a level surface. Make treadmill run at approximately 6-8 km/h, observe the running belt deviate condition. If the belt has drifted to the right, unplug the safety lock and power switch, and turn the right adjusting bolt 1/4 turn clockwise, then insert the power switch and safety lock, make the treadmill running, observe the running belt deviate... -
Page 20: Exploded Drawing
EXPLODED DRAWING... -
Page 21: Parts List
PARTS LIST A. Welding parts Description Description Main frame Motor bracket Base frame Belt safety hook Left upright tube Left handrail Right upright tube Right handrail Handrail bracket Safety buckle B. Plastic parts Description Description Console set Motor bottom cover B1-1 Overlay Side rails... - Page 22 Motor belt Single cord (Black) 300 Power switch Controller Quick button on left handlebar D. Hardware parts Description Description Screw driver Hex round head bolt M6*60 Allen wrench T5 Hex round head bolt M8*20 Round hex bolt M10*50 Hex round head bolt M8*80 Round hex bolt M8*15 Cross head bolt M6X25, washer...
-
Page 23: Error Code And Significance
ERROR CODE AND SIGNIFICANCE Fault Code Fault Description Fault Processing The controller is not working and going into fault. Themachine can not run, the computer shows fault code “E1”, and the buzzle will Communication abnormal: The ring three times. control computer abnormal communication after Possible Reasons: Communication obstructed between controller...
Need help?
Do you have a question about the STARSTRIDER SS 242 and is the answer not in the manual?
Questions and answers