Table of Contents
Advertisement
Quick Links
Advertisement
Table of Contents

Related Manuals for Orbit StarTrack ST36T


Summary of Contents for Orbit StarTrack ST36T
- Page 1 ST36T ST36T ST36T 140kgs...
-
Page 2: Safety Precautions
SAFETY PRECAUTIONS WARNING: Before starting any exercise program, consult with your physician or health professional, especially the person who is above 35 years old people or has some health problems before. We take no responsibility for any troubles or hurts due to above reasons. Don't power on until you finish assembly the treadmill and covering the protected top of motor. -
Page 3: Product Description
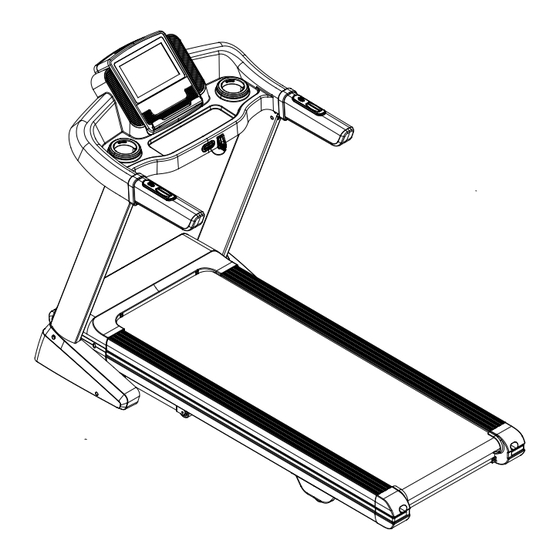
DIMENSION Power Circuit:220V~AC Use in temperature:0-40℃ Real Speed:0.8-20KM/H Incline:15 sections of motor incline Max user weight :140kg Distance range:0.00-99.9km Calories:0-9999 Kcal Time range:00:00-99:59(min) Heart rate range:50-200 bpm Running face:510*1500mm Set up size:1910 x 855 x 1680mm Folding size:1160 x 855 x 1680mm PRODUCT DESCRIPTION Console Monitor Water Bottle... - Page 4 TOOL KITS Picture Part Description D146 Socket Head Cap ScrewM10X50 2pcs D105 Button Head Cap ScrewM10X20 6pcs Button Head Cap Screw M8x15mm 4pcs Flat Washer M10 6pcs Flat Washer M8 4pcs Cross Recessed Pan Head Triangular D181 4pcs Self-Tapping Screw M4X16 Phillips Rounded Washer...
-
Page 5: Assembly Instruction
ASSEMBLY INSTRUCTION When you open the carton, you will find below spare parts: 1 Main Frame: 1SET B11L Left Side Cover: 1PC B11R Right Side Cover: 1PC C13 Safety Key: 1 PC C15 Power Cable: 1 PC A82Adjustment Wheel:2PCS B125: Adjustment Wheel Cover: 2PCS STEP 1 Move out the treadmill unit from the packaging box, and place it on the flat ground or floor. - Page 6 D167 D146 D167 D146 STEP 3 Rotate the whole set of Handlebar (A4) and push it down hardly in order to tighten screws in positions. Hold the Handlebar (A4) still and then secure itonto the Left/ Right Uprights (A3L/A3R) by using: 4 pcs of Button Head Cap Screw M10x20mm (D105) and 4 pcs of Flat Washer M10 (D21).
- Page 7 STEP 4 Lift the running deck up and push it up slightly until you hear a "click" sound from cylinder. First, lock the Adjustment Wheel (A82) onto Main Frame (A1) by using 4 pcs of Button Head Cap Screw, M8X15mm (D13) and Flat Washer M8 (D23). Then, use 4 pcs of Phillips Pan Head Triangular Self-Tapping Locking Screw, M4X16mm (D181) to lock the Adjustment Wheel Cover (B125) onto Main Frame (A1).
- Page 8 STEP 6 Plug in the Power Cable (C15) and Safety Key (C13). STEP 7 After installation, press start button and adjust speed to 3km/h or below.Then check the running belt to see if it runs smoothly. The tightness level of running belt is decided based on the situation of slippery and deviation (Please refer to “MAINTENANCE INSTRUCTIONS “).
- Page 9 FOLDING INSTRCUTIONS Before folding the treadmill, please make sure you turn off the power and the incline level resumes to 0. Lift up the machine with force and pull up until you hear a “CLICK” sound from safety casing locking the cylinder. After folding the treadmill, you’re able to move it forward to backward.
- Page 10 UNFOLDING INSTRCUTIONS Push the bottom of running board slightly, and kick the safety spacer with your foot at the middle of the cylinder. Push down the bottom of running board. When the treadmill starts descending, move your foot away from the cylinder.
-
Page 11: Computer Instructions
COMPUTER INSTRUCTIONS 1.1 WINDOW DISPLAY 1.2 BUTTON PLATFORM FUNCTION 1.2.1 START When you press the START button, the program will start operating. If you press START at the WARM UP mode, it will skip the WARM UP and enter the WORK OUT directly. - Page 12 1.2.3 MODE - Only valid when in the workout page. - User can switch between INCLINE PROFILE and SPEED PROFILE by pressing MODE button. 1.2.4 QUICK SPEED Press the speed quick button to quickly adjust speed to 5km/h, 10km/h, or 15km/h when the treadmill is running.
-
Page 13: Quick Speed
If user presses START at PAUSE mode, the console will restart and operate with current program. 1.3.4 SPEED +/- Press +/- button to accelerate the speed by 0.1 km/h. CONSOLE SCREEN BUTTON FUNCTION 1.4.1 QUICK INCLINE Press +/- button to increase or decrease the incline by 1 level. Press expand option list button and quickly adjust the incline to level 1, level 3, level 6, level 9, level 12or level 15 when the treadmill is running. -
Page 14: Idle Mode
Android System Guideline Connect your mobile to the facility's Wi-Fi network. Scan the left QR code or search 'ANPLUS Screen Mirroring' app in Play Store and download. Open, select the 'Device-XXX', then press 'Start Mirroring'. QR Code for APP Downloading: HDMI 1.4.3.3 Press HDMI... - Page 15 only by pressing any button. Fake Sleep Mode only turns off the console display, and the console will wake up by touching the screen or pressing any button. Sleep Mode ON Sleep Mode OFF Without any operation within 30 minutes Without any operation within 30 minutes Display ...
-
Page 16: Workout Summary Mode
then check your workout summary. Program with cool down mode: Hill, Random Incline, Speed, HIIT, Custom, Gerkin. Default Speed: 03:00-02:00 40% of the final speed of the program 02:00-01:00 30% of the final speed of the program 01:00-00:00 20% of the final speed of the program 1.5.7 WORKOUT SUMMARY MODE While the GOAL achieved or you finish the exercise, the exercise ends and enter workout summary mode. - Page 17 Unit: MINUTE:SECOND Display Data Range: 00:00 ~ 99:59 Pull-down the button and user could switch to different data display: ELAPSED TIME, TARGET TIME, REMAINING TIME If user sets up the goal time before start exercising: The data presents the remaining time. TIME When user achieves the goal time, the exercise ends.
-
Page 18: Basic Setting
Unit: MPH/KM Display Data Range: 0.8~20.0 km/h SPEED Initial Speed: 0.6MPH/ 1.0KM Shows the actual current speed. 1.7 BASIC SETTING 1.7.1 CONNECTING SETTING WiFi 1.7.1.1 Turn on the WiFi function and search for the WiFi name. Please go back to the HOME page after the connection is made, then the console will starting connecting to WiFi. -
Page 19: App Update
Date & Time 1.7.2.3 User can choose to display time in 24-hour clock or 12-hour clock. Screen Brightness 1.7.2.4 Adjust the screen brightness by using the bar. Volume 1.7.2.5 Adjust the volume by using the bar. Child Lock 1.7.2.6 In case kids inadvertently active the machine, the default setting of child lock is on. If no operation at IDLE mode for 10 minutes, the console shows “CONSOLE LOCKED”, treadmill will not working until unlocking the console. - Page 20 1.8 PROGRAM FUNCTION DESCRIPTION 1.8.1 QUICK START Press QUICK START button when at IDLE mode or before you choose any other program. 1.8.2 CLASSICS There are 3 programs in CLASSICS: Goal, Hill and Random incline. GOAL 1.8.2.1 User can set their own goal for time. distance and calories. The default time is 20 minutes if user doesn’t set the goal for time before starting.
- Page 21 1.8.3 INTERVAL There are 3 programs in INTERVAL: Speed, HIIT and Custom. SPEED 1.8.3.1 User can set up the ideal time and max speed. The default time is 20 minutes and the default max speed is 2.0 mph, if user doesn’t set the goal for time before starting.
-
Page 22: User Program
1.10 USER PROGRAM There are 2 options in USER PROGRAM: User and Guest. After login, press CUSTOM button to preset each section of speed and incline, and preset the time and max speed afterwards. The default time is 20 minutes and the default incline is 10 level, if user doesn’t set the goal for time before starting. -
Page 23: Fitness Test
seconds. If actual heart rate > TRH+25 even the speed is already decrease to the lowest over 15 seconds, the console will jump a warning window. If actual heart rate > TRH+25 even the speed is already decrease to the lowest over 30 seconds, the program will end and enter to summary mode. - Page 24 1.13.2 AIR FORCE The total distance is 2.4 km (1.5 mile). 1.13.3 ARMY The total distance is 3.2 km (2.0 mile). 1.13.4 COAST GUARD The total distance is 2.4 km (1.5 mile). 1.13.5 PEB The total distance is 2.4 km (1.5 mile). 1.13.6 MARINE CORPS The total distance is 4.8 km (3.0 mile).
- Page 25 1.13.8.2 WORKOUT MODE Target heart rate: (220-Age)*85% If no heart rate is detected over 1 minute, the test will end and go to summary mode. Once user presses STOP or PAUSE button, the program will end and go into workout summary mode.
-
Page 26: Error Message
1.14 ERROR MESSAGE Error Code Problems Solutions Please unplug and plug in the power cord again. Over-loading Protection Please try restart the treadmill and lubricate the running board first. Check if motor has burned smell. If so, change a motor. Check if lower control board has burned smell. - Page 27 Check if the console is broken. Turn off the machine for over 2 minutes and then restart. Other Error Change a new controller. 1.15 OTHERS 1.15.1.1 USB CHARGING Plug in your USB cable to the treadmill’s USB charging port and connect your phone to start charging.
-
Page 28: Safety Exercise
GETTING STARTED GUIDE PREPARE If you are around 35 years old, or have health problem, even this is your first time to do fitness exercise, please consult doctor or professional before use it. Before do exercise, please stand on the side to learn how to operate, such as start, stop and speed adjustment. - Page 29 you often use treadmill, you can choose normal walk speed or jog speed. If you have no experience or can't make sure the best testing speed, you can reference belowstandard: Speed 0.8-3.0 km weak constitution people. Speed 3.0-4.5 km sedentary or not often exercise people. Speed 4.5-6.0 km walking quickly people.
-
Page 30: Warm-Up Exercise
WARM-UP EXERCISE It is better to do some warm-up exercise. Warm the muscle easy stretch, so use 5-10 mins to warm-up. Then stop and according below method to do stretch exercise for five times, and each foot do 10 seconds or more every time. After running, do those stretch exercises again 1. -
Page 31: Maintenance
MAINTENANCE WARNING: Please make sure pull out the treadmill's power plug before cleaning or maintaining the product. CLEANSING General cleaning or the unit will greatly prolong the treadmill's life. Keep treadmill clean by dusting regularly. Be sure to clean the exposed part of the deck on either side of the walking belt and also the side rails. -
Page 32: Belt Adjustment
BELT ADJUSTMENT Place treadmill on a level surface. Make treadmill run at approximately 6-8 km/h, observe the running belt deviate condition. If the belt has drifted to the right, unplug the safety lock and power switch, and turn the rightadjusting bolt 1/4 turn clockwise, then insert the power switch and safety lock, make the treadmillrunning, observe the running belt deviate condition. - Page 33 EXPLODED DRAWING...
-
Page 34: Parts List
PARTS LIST A. Welding Parts Description Description Main Frame Countersunk Washer Base Frame Compression Sleeve Left Upright Safety Key Pin Right Upright PU Support Bracket Handlebar Adjustment Wheel Bracket Incline Bracket Belt Guide Long Solid Side Rail Fixing Plate Short Solid Side Rail Fixing Plate Incline Axle Screw B. - Page 35 Water Bottle Holder Handlebar C. Electric and Drive Parts Description Description Running Belt Magnetic Ring Rear Roller Overload Protector Front Roller Long Single Cord (Blue) Running Deck Short Single Cord (Blown) Cylinder Short Single Cord (Blue) Drive Belt Single Ground Wire Power Switch Outlet Controller...
- Page 36 Button Head Cap Screw, Nylon Nut M10 D175 M8X35mm Phillips Pan Head Triangular Nylon Nut M6 D181 Self-Tapping Locking Screw, M4X16mm Socket Head Cap Screw, Nylon Nut M8 D184 M10X50mm (fully threaded) Flat Washer M10 D186 Upright Compression Spring Phillips Pan Head Self-Tapping Flat Washer M6 D211 Screw, ST3.0X16mm...
Need help?
Do you have a question about the StarTrack ST36T and is the answer not in the manual?
Questions and answers