Xerox CopyCentre C2128 Quick Reference Manual
Xerox copycentre c2128: reference guide
Hide thumbs
Also See for CopyCentre C2128:
- Evaluator manual (20 pages) ,
- Reference manual (4 pages) ,
- Supplementary manual (3 pages)
Table of Contents
Advertisement
Quick Links
Advertisement
Table of Contents
Troubleshooting

Related Manuals for Xerox CopyCentre C2128

Summary of Contents for Xerox CopyCentre C2128
-
Page 1: Quick Reference Guide
Quick Reference Guide 701P41734-e... - Page 2 Xerox , The Document Company , The stylized X publication are trademarks of XEROX CORPORATION. Other company brands and product names may be trademarks or registered trademarks of the respective companies and are also acknowledged. ® , and all Xerox product names and product numbers mentioned in this...
-
Page 3: Table Of Contents
Table of Contents 1 Welcome ... 1–1 Introduction..1–2 About this Guide... 1–2 Conventions ... 1–2 Additional Resources ... 1–4 Overview of Features at the Machine... 1–5 Overview of Features at the Workstation..1–7 Safety..1–8 Introduction ... 1–8 Safety Notes... - Page 4 Sending an E-mail..2–11 Printing from a PC..2–12 Printing with Internet Services..2–13 Logging On / Logging Off..2–14 Further Assistance..2–15 3 Copy ...3–1 Copy..3–2 Basic Copying..3–3 Output ... 3–4 2-Sided...
- Page 5 Resolution ... 4–7 Sides Scanned ... 4–8 Image Adjustment ... 4–9 Image Quality ... 4–10 Original Input... 4–11 Bound Originals... 4–12 Original Type... 4–13 Added Fax Features... 4–14 Fax Sending Features... 4–14 Fax Reports... 4–20 Mailboxes ... 4–21 Dial Directory Setup ... 4–22 Advanced Fax Features ...
- Page 6 Message Body ... 5–16 Authentication Mode..5–17 6 Network Scanning...6–1 Scan..6–2 Scanning Resources ... 6–2 Network Scanning... 6–3 Repositories ... 6–4 Template Overview ... 6–4 Template Destinations ... 6–5 Destination Details ... 6–5 Color Options ..6–6 Output Color...
- Page 7 10 Troubleshooting ...10–1 General ... 10–2 Fault Clearance..10–3 Paper jams ... 10–3 Document jams ... 10–3 Xerox Welcome and Support Center... 10–4 Locating the serial number... 10–4 Troubleshooting Tips..10–5 Power ... 10–5 Document Handler ... 10–5 Paper Handling ...
- Page 8 C2128/C2636/C3545 Q EROX ENTRE ENTRE UICK EFERENCE UIDE...
-
Page 9: Welcome
ELCOME Introduction..1-2 Overview of Features at the Machine..1-5 Overview of Features at the Workstation..1-7 Safety..1-8 Environmental Compliance..1-13 Regulatory Information...1-15 Illegal Copying..1-20 C2128/C2636/C3545 Q EROX ENTRE ENTRE UICK EFERENCE UIDE... -
Page 10: Introduction
NTRODUCTION Thank you for choosing the Xerox CopyCentre/WorkCentre Pro. Your CopyCentre/WorkCentre Pro is a digital device capable of being used for copying, faxing, printing and scanning. If your needs change, your machine can be upgraded with the appropriate optional software or hardware units. For further information contact your Xerox representative. -
Page 11: Italic Typeface
Orientation Orientation refers to the direction of images on the page. When the image is upright, the paper (or other media) can be one of two ways: Long Edge When observed from the front of the machine, paper or originals with the long edges Feed (LEF) / to the left and right of the paper tray or document handler. -
Page 12: Additional Resources
Hints Hints help users to perform a task. For example: HINT: This option is useful for saving toner (dry ink) consumption for images with a dark background and white text. Specification note Offers more in-depth specification information relating to the machine. For example: Tray 2 holds 520 sheets of 20 lb. -
Page 13: Overview Of Features At The Machine
VERVIEW OF EATURES AT THE Using the powerful CopyCentre/WorkCentre Pro features you can: Scan Once and Print Many When making copies the CopyCentre/WorkCentre Pro only has to scan a document once regardless of the number of copies needed. This reduces the risk of jams and damage to originals. - Page 14 Use the Mixed Size Originals feature to copy mixed size originals simultaneously. Produces copies on uniform size paper or mixed size paper. Be Environmentally Friendly This product complies with a variety of international standards for environmental protection and is compatible with most recycled paper. Scan Documents to Create Electronic Files (Optional) This optional feature allows you to create electronic files from your originals which can be:...
-
Page 15: Overview Of Features At The Workstation
VERVIEW OF EATURES AT THE If your CopyCentre/WorkCentre Pro is connected to a network you can use the following features. Contact your System Administrator to get connected. CentreWare Print Drivers The Print Driver extends the productivity power of the CopyCentre/WorkCentre Pro to your desktop. -
Page 16: Safety
AFETY Introduction Your Xerox product and supplies have been designed and tested to meet strict safety requirements. These include safety agency approval and compliance to established environmental standards. Please read the following instructions carefully before operating the product and refer to them as needed to ensure the continued safe operation of your product. -
Page 17: Safety Notes
Safety Notes WARNING: This product must be connected to a protective earthing circuit. This product is equipped with a 3-wire type plug, provided with a protective earthing pin. This plug will fit only into an earthed power outlet. This is a safety feature. -
Page 18: Electrical Safety
This equipment is to be used on a 120V, 15A branch circuit. If this machine needs to be moved to a different location, contact a Xerox service representative or your authorized local representative or service support organization. -
Page 19: Ozone Safety
Xerox installation procedure will ensure that the concentration levels meet safe limits. If you need additional information about ozone, please request the xerox publication Ozone by calling 1-800-828-6571 in the United States and Canada. In other markets, please contact your authorized local dealer or Service Provider. -
Page 20: Laser Safety
This product contains laser warning labels. These labels are intended for use by Xerox Service Representatives and are placed on or near panels or shields that require special tools for removal. Do not remove any of the panels. There are no operator serviceable areas inside these covers. -
Page 21: Environmental Compliance
NVIRONMENTAL OMPLIANCE C2128/C2636/C3545 Q 1-13 EROX ENTRE ENTRE UICK EFERENCE UIDE... -
Page 22: Environmental Choicem
Xerox operates a worldwide equipment takeback and reuse/recycle program. Contact your Xerox sales representative (1-800-ASK-XEROX) to determine whether this Xerox product is part of the program. For more information about Xerox environmental programs, visit www.xerox.com/environment. If you are managing the disposal of your Xerox Product, please note that the product contains lead and other materials whose disposal may be regulated due to environmental considerations. -
Page 23: Regulatory Information
Changes or modifications to this equipment not specifically approved by the Xerox Corporation may void the user’s authority to operate this equipment. WARNING:Shielded cables must be used with this equipment to maintain compliance with FCC regulations. -
Page 24: Us Regulatory Information For The Fax Kit Option
US Regulatory Information for the Fax Kit option Fax Send Header Requirements The Telephone Consumer Protection Act of 1991 makes it unlawful for any person to use a computer or other electronic device, including FAX machines, to send any message unless such message clearly contains in a margin at the top or bottom of each transmitted page or on the first page of the transmission, the date and time it is sent and an identification of the business or other entity, or other individual sending the message and the telephone number of the sending machine or such... - Page 25 Number US:XRXFB03BFAXKIT. The digits represented by 03 are the REN without a decimal point (e.g., 03 is a REN of 0.3). If this Xerox equipment causes harm to the telephone network, the telephone company will notify you in advance that temporary discontinuance of service may be required.
-
Page 26: Important Safety Instructions
Repairs to the machine should be made only by a Xerox representative or an authorized Xerox service agency. This applies at any time during or after the service warranty period. If unauthorized repair is performed, the remainder of the warranty period is null and void. -
Page 27: Canadian Regulatory Information For The Fax Kit Option
Canadian Regulatory Information for the Fax Kit option This product meets the applicable Industry Canada technical specifications. A label is affixed to the product that contains the Canadian approval # IC:482I-FAXKIT. If requested, the number must be provided to the telephone company. The Ringer Equivalence Number (REN) is an indication of the maximum number of devices allowed to be connected to a telephone interface. -
Page 28: Illegal Copying
LLEGAL OPYING United States Congress, by statute, has forbidden the copying of the following subjects under certain circumstances. Penalties of fine or imprisonment may be imposed on those guilty of making such copies. Obligations or Securities of the United States Government, such as: Certificates of Indebtedness Coupons from Bonds Silver Certificates... - Page 29 Copyrighted material (unless permission of the copyright owner has been obtained or the copying falls within the “fair use” or library reproduction provisions of the copyright law). Further information of these provisions may be obtained from the Copyright Office, Library of Congress, Washington, DC 20559 (circular R21) Certificates of Citizenship or Naturalization.
-
Page 30: Canada
Canada Parliament, by statute, has forbidden the reproduction of the following subjects under certain circumstances. Penalties of fine or imprisonment may be imposed on those guilty of making such reproductions. 1. Current bank notes or current paper money 2. Obligations or securities of a government or bank. 3. -
Page 31: Getting Started
ETTING TARTED Machine Overview...2-2 Control Panel Overview..2-3 Power On or Off..2-4 Loading Paper...2-5 Making Copies..2-6 Sending an Embedded Fax..2-7 Sending a Server Fax..2-8 Sending an Internet Fax...2-9 Scanning a Document...2-10 Sending an E-mail... 2-11 Printing from a PC...2-12 Printing with Internet Services... -
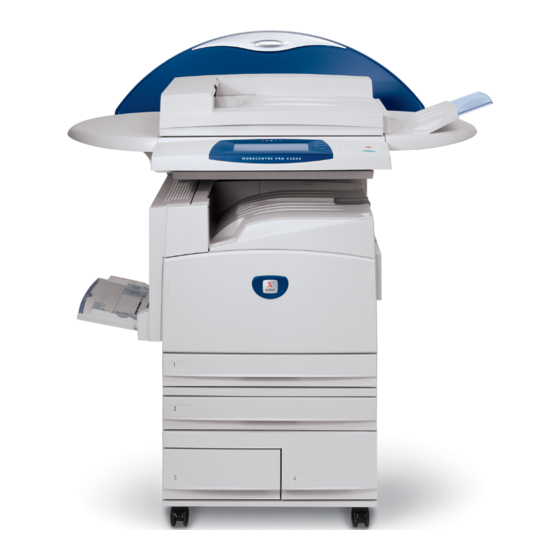
Page 32: Machine Overview
ACHINE VERVIEW Control Panel Touch Screen Bypass Tray (Folds up when not in use) NOTE: This is a photograph of a fully configured WorkCentre Pro with Office Finisher. The features available are dependent on your machine configuration. Document Handler Paper Trays EROX ENTRE ENTRE... -
Page 33: Control Panel Overview
ONTROL ANEL Accesses additional information. The Touch Screen Displays and selects all the available programming features, Changes text to an alternative plus fault clearance language. procedures and general machine information. Features Displays the job features on the screen. Job Status Displays job progress information. -
Page 34: Power On Or Off
OWER N OR To power ON: Press the ON/OFF switch. The entire powering up process takes less than 4 minutes. Hold the ON/OFF switch down for 5 seconds. The lights on the control panel will flash. It may be up to 30 seconds before you see any lights on the control panel or screens appear on the touch screen. -
Page 35: Loading Paper
OADING APER Open the required paper tray. NOTE: For the Tray 1 plus High Capacity Feeder Option, Paper Trays 1 and 2 are fully adjustable, while Paper Trays 3 and 4 are dedicated paper trays which hold 8.5" x 11" long edge feed paper only. For the Tray 1 plus 3-Tray Option, Paper Trays 1 to 4 are fully adjustable. -
Page 36: Making Copies
AKING OPIES Load the documents. NOTE: Documents are only scanned once. Access the Copy tab - if necessary select the Features button on the control panel. Select the required features on the touch screen. Press Start. Copy Features include... Color options Image quality adjustment Auto Reduce/Enlarge Copying mixed size originals... -
Page 37: Sending An Embedded Fax
ENDING AN MBEDDED Embedded Fax is an optional walk up fax feature on your machine. If the Basic Fax screen matches that displayed in step 2, then Embedded Fax is enabled. Please contact your System Administrator for further assistance. NOTE: Both Embedded and Server Fax can be installed on the WorkCentre Pro at the same time, however only one service can be enabled for use. -
Page 38: Sending A Server Fax
ENDING A ERVER Network Server Fax will be available if your machine is connected to the network, a supported third party supplied network server fax is available on the network, and the optional Network Server Fax Integration kit has been enabled and set up for use. -
Page 39: Sending An Internet Fax
ENDING AN NTERNET Internet Fax will be available if your machine is connected to the network and the optional Internet Fax kit has been enabled and set up for use. Load the documents. Select [Internet Fax]. NOTE: You may need to select [All Services] first. Select [To..], enter the recipient e-mail details and select [Save]. -
Page 40: Scanning A Document
CANNING A OCUMENT Network Scanning will be available if your machine is connected to the network and the optional Network Scanning kit has been enabled and set up for use. Load the documents. Select [Network Scanning]. NOTE: You may need to select [All Services] first. Select the template required. -
Page 41: Sending An E-Mail
ENDING AN MAIL E-mail will be available if your machine is connected to the network and the optional E-mail kit has been enabled and set up for use. Load the documents. Select [E-mail]. NOTE: You may need to select [All Services] first. Select [From], enter your e-mail details and select [Enter]. -
Page 42: Printing From Apc
RINTING FROM A If the WorkCentre Pro is connected to a network, documents can be printed directly from your PC via the CentreWare print driver supplied. Select [Print] in your application. Select the WorkCentre Pro as your printer. Select [Properties], make your selections and click [OK]. Click [OK] and then [Print]. -
Page 43: Printing With Internet Services
RINTING WITH NTERNET Internet Services uses the embedded Web User Interface which enables communication between the HTTP server and the machine. This option is available when the WorkCentre Pro is connected to a network. Open your Web Browser, then enter: http:// and the printer TCP/IP address. Touch the Enter key on your workstation keyboard. -
Page 44: Logging On / Logging Off
OGGING OGGING If the Internal Auditron or the optional Network Accounting has been enabled to track machine use, a valid User Number needs to be entered in order to access the machine functions. To Log on when the Internal Auditron has been enabled, enter a valid User Number (Password). -
Page 45: Further Assistance
CopyCentre/WorkCentre Pro CD Pack delivered with your CopyCentre/ WorkCentre Pro. Contact your System and/or Machine Administrator. Visit our Customer Web Site at www.xerox.com or contact the Xerox Welcome and Support Center quoting the machine serial number. Press the Machine Status button on the control panel. - Page 46 2-16 C2128/C2636/C3545 Q EROX ENTRE ENTRE UICK EFERENCE UIDE...
-
Page 47: Copy
Copy..3-2 Basic Copying..3-3 Color Options ..3-10 Image Adjustment..3-15 Output Format..3-22 Job Assembly..3-28 C2128/C2636/C3545 Q EROX ENTRE ENTRE UICK EFERENCE UIDE... -
Page 48: Copy
The Copy feature is standard on the CopyCentre/WorkCentre Pro. Access to the Copy features is gained using the Features button on the control panel. This chapter contains information about the options available within Copy. The tabs available for selecting the Copy features are: Copy Color Options Image Adjustment... -
Page 49: Basic Copying
ASIC OPYING The Copy tab is the default screen for the Features Pathway. Use the Copy tab to select the standard features for a copy job. Touch any of the top level buttons to select a feature. Multiple options can be selected for each copy job if required. -
Page 50: Output
Output Output is used to select the finishing requirements for the job. The options will depend on the finishing output device available. Options: Select Collated for output stacked in sets to match the sequence of the originals. OLLATED Select Uncollated for output sorted into stacks of individual pages. NCOLLATED The above output will be delivered in one of the following depending on the output tray:... -
Page 51: 2-Sided
2-Sided Up to 50 double-sided copies, ranging in size from 8.5” x 5.5” to 11” x 17”. can be made automatically from one or two-sided originals. Options: Use this option for originals that are printed on 1 side only and single-sided copies IDED are required. -
Page 52: Reduce/Enlarge
Reduce/Enlarge The Reduce / Enlarge option provides a variety of reduction and enlargement options. Originals placed on the Document Glass or sent to the machine electronically can be reduced or enlarged between 25% to 400%. Originals fed through the Document Handler can be reduced or enlarged between 25% to 200%. The preset Reduce/Enlarge options that appear on the Copy tab can be set in Tools mode. - Page 53 Use this option to adjust the height (Y) and the width (X) dimensions for reduction USTOM or enlargement of each dimension independently. Custom options are as follows: 100% X: Y: 25 - 400% EROX ENTRE ENTRE Produces an image on the copies the same size as the image on the original.
-
Page 54: Paper Supply
Paper Supply Use the Paper Supply options to select Auto Paper or a paper tray for the copy job. Transparencies can be fed from Tray 1 or the Bypass Tray. Options: All configurations of the CopyCentre/WorkCentre Pro include one standard Paper Tray (Tray 1). - Page 55 Tray 1 plus 3-Tray Option With this option selected the machine chooses the correct paper for the copy job based on the size of the originals being scanned. Use this option to select the paper loaded in Trays 1 to 4. RAYS In this configuration, Trays 1 to 4 each hold 520 sheets of 20 lb.
-
Page 56: Color Options
OLOR PTIONS The Color Options tab is used to select different color features for the finished output. Touch any of the top level buttons to select a feature. To view all the options for a feature, select the feature required. Multiple options can be selected for each copy job if required. -
Page 57: Output Color
Use the Output Color options to select the desired color settings for your copies. Options: This option enables the copier to determine if the document is black and white or ETECT color. If the document is black and white, the Black & White option is selected automatically. -
Page 58: Preset Color Options
Preset Color Options Use this feature to change color settings to produce various predetermined effects. Options: This option makes no changes to the image quality and produces copies with the ORMAL same quality and density of the original. This option uses the highest color saturation to produce rich, vivid output colors. IVELY This option produces a sharp, clear image on the copy. -
Page 59: Color Balance
Color Balance Use this feature to adjust the balance between colors and the overall amount of color on the output using the up and down scroll buttons for each color. Sharpness/Saturation Use this feature to adjust the amount of definition and overall richness of color on the copy. -
Page 60: Color Shift
Color Shift Use this feature to shift all of the copy colors toward the adjacent hue using the up and down scroll buttons. If you scroll toward Warm, the red colors shift toward the yellow hue, the green colors shift toward the cyan hue, and the blue colors shift toward the magenta hue. If you scroll toward Cool, the red colors shift toward the magenta hue, the blue colors shift toward the cyan hue, and the green colors shift toward the yellow hue. -
Page 61: Image Adjustment
MAGE DJUSTMENT The Image Adjustment tab provides copy features used for adjusting the appearance of the copy output. Touch any of the top level buttons to select a feature. To view all the options for a feature, select the feature required. Multiple options can be selected for each copy job if required. -
Page 62: Image Quality
Image Quality Use this feature to enhance the quality of your output. Options: Adjusts the lightness or darkness of the output. To darken the output, select the IGHTEN ARKEN down scroll button. To lighten the output, select the up scroll button. Prevents undesired marks or images that are printed on the back of an original from ACKGROUND appearing on the output copies. -
Page 63: Original Type
Original Type Use this feature to enhance the copy quality of the output based on the type of original being scanned. Options: Use this option for original documents that contain lithographs, or pictures and & T HOTO printed text. Use this option for original documents that contain photographs. HOTO Photo &... -
Page 64: Bound Originals
Use this option when copying original documents containing colored backgrounds, THER RIGINALS originals marked by highlighter pens, and documents printed on inkjet printers. Other Originals options are as follows: NKJET RIGINALS IGHLIGHTED RIGINALS Bound Originals This feature is used to copy pages from bound documents onto separate single- sided or double-sided pages. -
Page 65: Edge Erase
Options: The feature is switched off. Copies only the page on the left when looking at the open book, face up. Copies only the page on the right when looking at the open book, face up. IGHT Copies both pages of an open book, starting with the left page. EFT THEN RIGHT PAGE Copies both pages of an open book, starting with the right page. -
Page 66: Original Input
Original Input Use this option to program the size of the originals being scanned or enable the machine to recognize the size of the originals. Options: Use this option to allow the machine to recognize the size of the originals being fed through the document handler. -
Page 67: Image Shift
Image Shift This feature enables the position of the image on the page to be adjusted. Options: The image position is not adjusted. HIFT Use to automatically center the scanned image on the output paper. ENTER Use to create a binding edge for the document. The image can be adjusted up or ARGIN HIFT down on the page and/or shifted to the right or left. -
Page 68: Output Format
UTPUT ORMAT The Output Format tab is used to produce different options for the finished output. Touch any of the top level buttons to select a feature. To view all the options for a feature, select the feature required. Multiple options can be selected for each copy job if required. -
Page 69: Transparencies
Transparencies This feature allows the creation of a single set of transparencies with blank dividers. When dividers are selected a transparency set will always be single-sided on transparency stock with no stapling. Options: The feature is switched off. Use this option to place a blank sheet between each transparency. LANK IVIDERS If you select Blank Dividers, select the desired paper tray source for the... -
Page 70: Booklet Creation
Booklet Creation NOTE: The screen shown above may be slightly different depending on the finishing options installed on your machine. Use this feature to create multipage booklets from a sequential set of either single- sided or double-sided originals. The machine will reduce and correctly position each image to fit on the required page. -
Page 71: Page Layout
Page Layout This feature is used to create documents with multiple images. It is ideal for creating handouts, storyboards or documents used for archival purposes. NOTE: Originals must be loaded in the Document Handler when using this feature. Options: The feature is switched off. Use to print multiple different images on a single page. -
Page 72: Invert Image
Invert Image This feature enables Mirror Image or Negative Image copies to be produced. Options: Use this option to change the direction of the original image, creating a mirror of the IRROR MAGE original. This option is primarily used to change the position of a graphic. Use Negative Image to create copies that are the opposite of the original document. -
Page 73: Covers
Covers Use this feature to automatically add covers to your copied set using stock taken from a different tray than the copies. Options: The feature is switched off. OVERS Use this option to add a front cover to the copies. RONT Use this option to add a back cover to the copies. -
Page 74: Job Assembly
SSEMBLY The Job Assembly tab is used to combine multiple documents into a single job, produce a sample set of a job or for storing the programming of up to 1000 images. Touch any of the top level buttons to select a feature. To view all the options for a feature, select the feature required. -
Page 75: Build Job
Build Job Use this feature to build a job that requires different settings for each page. For example, if a set of documents consists of some pages with text and some with photos, the appropriate setting for each original can be applied and the job can still be completed as a single job. - Page 76 Options: The feature is switched off. Use to enable the Build Job feature. Offers options which can be selected when using Build Job. UILD ONTROLS Build Job Controls options are as follows: UILD AMPLE EGMENT ELETE EGMENT ANCEL AMPLE RINTING ELETE SEGMENTS 3-30...
-
Page 77: Sample Set
Sample Set This feature is used to review the output to ensure that it is exactly what is required prior to printing a large quantity. Options: The feature is switched off. Use to enable the Sample Set feature. One complete set of the job will be printed. To print the remainder of the job, press the Job Status button and select your job in the queue. -
Page 78: Stored Programming
Stored Programming Use this feature to program up to 10 commonly used programming sequences. For example, combinations of selections such as Edge Erase and Bound Originals. The machine stores only the programming features for the job, NOT the images. Each time a stored job is used the images must be scanned. To use this feature, use the up and down scroll buttons on the scrolling list to select the required storage location, then select a function button - Store or Recall Programming. -
Page 79: Fax
Fax ...4-2 Basic Faxing - Embedded Fax ...4-4 Image Adjustment ...4-9 Added Fax Features ...4-14 Basic Faxing - Server Fax...4-27 More Fax Features...4-32 Authentication Mode ...4-37 C2128/C2636/C3545 Q EROX ENTRE ENTRE UICK EFERENCE UIDE... -
Page 80: Fax
Fax is an optional feature which may not be available on your machine. There are two types of Fax service - Embedded Fax and Server Fax. Although both Fax services can be installed, only one fax service can be enabled. Your System Administrator will set up the default fax service. - Page 81 Available only on the WorkCentre Pro configuration. Once enabled on your ERVER machine, you will be able to transmit and receive hard copy faxes without a dedicated telephone line on the machine. Your images are sent from your machine to a Third Party fax server which forwards them on to the fax number you entered. This type of fax travels over normal telephone lines and will therefore be charged at telephone rates.
-
Page 82: Basic Faxing - Embedded Fax
ASIC AXING The Basic Faxing tab is the default Embedded Fax screen. Use the options available on this screen to enter the recipient telephone number and to select the standard features for your fax job. Access to the Basic Faxing features is gained using the Features button on the control panel. -
Page 83: Dialing Options
Dialing Options Use the Dialing Options to enter an individual fax number or a group of fax numbers already stored within the Send List. Special dialing characters can also be added to your fax number from here. There are two methods of entering a phone number - Manually using the keypad or by selecting a number already stored within the Send List. - Page 84 Dialing characters are special characters used for entering fax numbers. They are IALING entered as part of the telephone number: HARACTERS DTMF [*] EGIN DTMF [#] AIT FOR ULSE TO WITCH EADABILITY [()] TART AILBOX IGNALLING AUSE RIVATE ELIMITER ELECTION [<1>] DENTIFIER ELECTION...
-
Page 85: Resolution
Resolution The Resolution affects the appearance of the fax at the receiving fax terminal. A higher resolution produces better quality for photos. However, a lower resolution reduces communication time. Options: 200 x 100 dpi - Recommended for text documents. It requires less communication TANDARD time, but does not produce the best image quality for graphics and photos. - Page 86 Sides Scanned This is used to specify whether the originals are single-sided or double-sided. For 2-sided originals the orientation can also be programmed. Options: Use this option for originals that are printed on one side only. IDED Use this option for originals that are printed on both sides. IDED EROX ENTRE...
- Page 87 MAGE DJUSTMENT The Image Adjustment tab provides further features that can be applied to your fax job. Touch any of the top level buttons to select a feature. To view all the options for a feature, select the feature required. Multiple options can be selected for each fax job if required.
-
Page 88: Image Quality
Image Quality Use this feature to enhance the quality of the outgoing fax. Adjusts the lightness or darkness of the fax. To darken the fax, select the down scroll IGHTEN ARKEN button. To lighten the fax, select the up scroll button. This option automatically reduces or eliminates the dark background resulting from ACKGROUND colored paper or newspaper originals. -
Page 89: Original Input
Original Input This feature enables users to specify the size of the original document when scanning from the Document Glass or Document Handler. The machine uses this information to calculate the size of your original and the scanned image. Options: This is the default option. -
Page 90: Bound Originals
Bound Originals Use this option to program which page or pages of a bound document are to be scanned and faxed. This feature will not be available unless the fax destination number has been entered. The bound original is placed face down on the Document Glass with the spine of the book lined up with the marker on the rear edge of the glass. -
Page 91: Original Type
Original Type Use this option to enhance the quality of the fax based on the type of original being scanned. Original Type options are as follows: HOTO AND HOTO EROX ENTRE ENTRE This is the standard setting and can be used for most originals. -
Page 92: Fax Sending Features
DDED EATURES The Added Fax Features tab provides further fax features which can be used when transmitting faxes. Touch any of the top level buttons to select a feature. To view all the options for a feature, select the feature required. Multiple options can be selected for each fax job if required. -
Page 93: Transmission Options
Transmission Options Allows transmission information to be included with your fax job. Options: This report contains details about the fax together with a reduced copy of the RANSMISSION image from the first page. When sending a fax to multiple recipients, a Broadcast EPORT Report will be printed listing all of the recipients. - Page 94 Reduce/Split Use this option to choose how your faxed document is printed if your document paper size is larger than the receiving machines capability. Options: Reduces the faxed document to fit the paper size of the receiving fax machine. EDUCE TO FIT If this option is selected the receiving fax machine will either split the faxed PLIT ACROSS document into two equal parts, or print the majority of the image on to one page and...
-
Page 95: Cover Letter
Cover Letter Use this option to add a cover letter to your fax job. Users can add text in the “To”, “From” and “Comment” fields. NOTE: The Cover Letter title is added automatically. Options: Displays the recipient’s fax number or name. Select the keyboard button to amend the recipient’s name. - Page 96 Starting Rate Use this option to set the transmission speed of your fax job. Options: Used in areas of low quality communication, when experiencing telephone noise or 4800 ORCED when fax communications are susceptible to errors. Determines the communication mode to be used based on the maximum G3 (33.6 UPER capabilities of the remote machine.
-
Page 97: Delayed Send
Delayed Send Use Delayed Send to specify a time at which to send a fax. The time can be set between 15 minutes and 23 hours 59 minutes. This feature is very useful when transmitting faxes during off-peak hours or when sending to another country or time zone. -
Page 98: Fax Reports
Fax Reports This feature enables you to obtain hard copy information about the status of the fax feature on your machine. Options: Fax Reports options are as follows: CTIVITY EPORT IRECTORY EPORT ROUP IRECTORY EPORT PTIONS EPORT ENDING EPORT 4-20 Displays the last 50 fax activities completed on the machine. -
Page 99: Mailboxes
Mailboxes Enabled by your System Administrator, this option allows you to store documents in a mailbox. The mailbox can be located on the same machine you are using (local mailbox), or sent to a mailbox on a remote machine (remote mailbox). Documents held within the mailbox are recognized as stored for polling, printing or deleting by the user. -
Page 100: Dial Directory Setup
Dial Directory Setup Use this feature to store destination names and fax numbers in your machine. Entries stored here will be available for selection within the Send List feature on the Basic Faxing tab. Dialing Groups can also be set up, comprising of many individual entries. HINT: This feature saves time when sending faxes to frequently used destinations. -
Page 101: Advanced Fax Features
Advanced Fax Features Offers advanced features which enable you to transmit large, complex jobs; scan and store fax jobs for retrieval by another fax machine, or poll another fax machine. EROX ENTRE ENTRE C2128/C2636/C3545 Q UICK EFERENCE UIDE 4-23... - Page 102 Build Job Use this feature to fax a job that requires different settings for each page or a segment of pages. This feature is also useful if your fax job has more than 50 pages which exceeds the maximum capacity of the Document Handler. NOTE: The destination fax number must be entered prior to using Build Job.
- Page 103 Polling Polling enables you to store fax documents into the machine’s memory for retrieval by another remote fax machine, or poll a remote fax machine or mailbox Options: This option allows users to scan documents and store them. When remote TORE FOR machines poll the device, they are able to retrieve the scanned document(s).
-
Page 104: Comment Setup
Comment Setup This feature allows you to create, modify or delete comments that you want to appear on the fax Cover Letter. Up to 10 comments can be stored on the machine. To add or modify a comment select an empty entry from the comment list and select Edit. -
Page 105: Basic Faxing - Server Fax
ASIC AXING The Basic Faxing tab is the default Server Fax screen. Use the options available on this screen to enter the recipient telephone number and to select the standard features for a fax job. Access to the Basic Faxing features is gained using the Features button on the control panel. -
Page 106: Dialing Options
Dialing Options The Dialing Options area contains a window where the telephone number entered is displayed. Once it is displayed, it can be added to a list of destination telephone numbers, a special character can be added, or a list of up to 30 stored telephone numbers can be accessed. - Page 107 ASSWORD WITCH ULSE WITCH AIT FOR ETWORK ETECTION ID [+] OCAL HARACTER ID [ OCAL SPACE HARACTER The Phone List can store up to 30 fax numbers. Enter the fax number and select HONE Phone List. Select an empty number and then Enter Phone List, the number will be stored.
-
Page 108: Resolution
Resolution The Resolution affects the appearance of the fax at the receiving fax terminal. A higher resolution yields better quality for photos. A lower resolution reduces communication time. Options: 200 x 100 dpi - Recommend for text documents. It requires less communication TANDARD time, but does not produce the best image quality for graphics and photos. -
Page 109: Sides Scanned
Sides Scanned This is used to specify whether the originals are single-sided or double-sided. For 2-sided originals the orientation can also be programmed. Options: Use this option for originals that are printed on 1 side only. IDED Use this option for originals that are printed on both sides. IDED EROX ENTRE... -
Page 110: More Fax Features
EATURES The More Fax Features tab provides additional fax features which can be used with your fax job. Touch any of the top level buttons to select a feature. To view all the options for a feature, select the feature required. Multiple options can be selected for each fax job if required. -
Page 111: Image Quality
Image Quality Use this feature to enhance the quality of the outgoing fax. Options: Adjusts the lightness or darkness of the fax. To darken the fax, select the down scroll IGHTEN ARKEN button. To lighten the fax, select the up scroll button. This option automatically reduces or eliminates the dark background resulting from ACKGROUND colored paper or newspaper originals. -
Page 112: Original Type
Original Type Use this feature in addition to the settings selected using the Image Quality option, to further enhance the quality of your output. Use this option to enhance the quality of the fax based on the type of original being scanned. -
Page 113: Original Input
Original Input Use this option to programme the size of the originals being scanned or enable the machine to recognize the size of the originals automatically. Options: Use this option to enable the machine to recognize the size of the originals being fed through the Document Handler. -
Page 114: Delayed Send
Delayed Send Use Delayed Send to specify a time, within the next 24 hours, at which to send a fax. This feature can be used to transmit faxes during off-peak hours or is useful when sending to another country or time zone.The time to send is added to the job information sent to the fax server with the scanned image. -
Page 115: Authentication Mode
UTHENTICATION Authentication is a useful network security management tool - limiting, restricting and monitoring access to the network via the machine. Authentication can be set up by the System Administrator to restrict access to the features within Scan to E-mail, Network Scanning, Server Fax and Internet Fax. - Page 116 4-38 C2128/C2636/C3545 Q EROX ENTRE ENTRE UICK EFERENCE UIDE...
-
Page 117: Internet Fax
NTERNET Internet Fax..5-2 Color Options ..5-6 Image Adjustment..5-7 Output Format..5-13 Authentication Mode..5-17 C2128/C2636/C3545 Q EROX ENTRE ENTRE UICK EFERENCE UIDE... -
Page 118: Internet Fax
NTERNET The Internet Fax feature is optional on the WorkCentre Pro. This chapter contains information about the options available within Internet Fax. When enabled, Internet Fax will allow you to send your scanned images as an e-mail attachment to a specified recipient or recipients. This type of fax travels over the internet or intranet. -
Page 119: Send
Most feature screens include three buttons to confirm or cancel your choices. The Undo button resets the current screen to the default values that were displayed when the screen was opened. The Cancel button resets the screen and returns to the previous screen. The Save button saves the selections made and returns to the previous screen. -
Page 120: Entering An E-Mail Address For Internet Fax
Entering an E-mail Address for Internet Fax E-mail addresses can be entered in one of two ways - manually or via an address book. NOTE: When entering e-mail details you can change the keypad to show upper or lower case, accented characters or numbers by selecting any Back button. Manually If you already know the full SMTP e-mail address of your recipient, or if you know that the recipient is not in any of the configured address books, you can select the... - Page 121 Address Book Types Public Address Book The Public Address Book stores external company addresses on the machine. The address book contains a list of user names and their e-mail addresses. The file must be a CSV (Comma Separated Value) format for your machine to be able to read the file contents.
-
Page 122: Color Options
OLOR PTIONS The Color Options tab is used to select different color features for the scanned Internet Fax image. Touch any of the top level buttons to select a feature. To view all the options for a feature, select the feature required. Multiple options can be selected for each copy job if required. -
Page 123: Image Adjustment
MAGE DJUSTMENT The Image Adjustment tab is used to temporarily program features to enhance the appearance and style of the scanned Internet Fax image. Touch any of the top level buttons to select a feature. To view all the options for a feature, select the feature required. -
Page 124: Image Quality
Image Quality Use this feature to enhance the quality of your scanned originals. Options: This option provides controls to adjust the lightness or darkness of black and white IGHTEN ARKEN output. To darken the output, press the down scroll button. To lighten the output, press the up scroll button. -
Page 125: Original Type
Original Type Use this feature to enhance the quality of the output based on the type of original being scanned. Options: Use this option for original documents that contain lithographs, or pictures and & T HOTO printed text. Use this option for original documents that contain photographs. HOTO Use this option when copying text documents composed of fine line characters or other high contrast documents with bright, dense colors. -
Page 126: Sides Scanned
Sides Scanned This feature is used to specify whether the originals are single-sided or double- sided. For 2-sided originals the orientation can also be programmed. Options: Use this option for originals that are printed on 1 side only. IDED Use this option for originals that are printed on both sides. IDED Use this option for originals that are printed on both sides. -
Page 127: Resolution
Resolution Resolution affects the appearance of the scanned image. The higher the scanning resolution the better the image quality. Options: Produces the smallest image file size and is only recommended for use with simple text documents. TANDARD NOTE: 200x100 is disabled if the Document Format is PDF. Recommended for use with average quality text documents and line art. -
Page 128: Original Input
Original Input Use this option to program the size of the originals being scanned or program the machine to determine the size of the originals automatically. NOTE: It is recommended that the originals are of the same size. Using originals that are not of the same size may result in a reduced-size image being processed by the Fax recipient. -
Page 129: Output Format
UTPUT ORMAT Use this feature to temporarily change the settings required for the scanned image. Touch any of the top level buttons to select a feature. To view all the options for a feature, select the feature required. Multiple options can be selected for each fax job if required. -
Page 130: Document Format
Document Format Use the Document Format option when your job is to be sent with a different file format than that set as the default. Options: Multi-Page Tagged-Image File Format. One TIFF file containing several pages of ULTI PAGE scanned images. Image Only Portable Document Format. -
Page 131: Acknowledgment Report
Acknowledgment Report Use this feature to print a report containing the delivery status of your job. The report will include the number of successful, failed and unconfirmed recipients. Options: Use this option to print a status report after the job has been sent. NABLED Use this option to switch the feature off. -
Page 132: Message Body
Message Body Use this feature to edit the default e-mail message being transmitted with the job. The message body is the text contained within the e-mail and not the e-mail subject line. The message entered will only be available for the current job. NOTE: The default message is set up by your System Administrator. -
Page 133: Authentication Mode
UTHENTICATION Authentication is a useful network security management tool - limiting, restricting and monitoring access to the network via the machine. Authentication can be set up by the System Administrator to restrict access to the features within Scan to E-mail, Network Scanning and Internet Fax. - Page 134 5-18 C2128/C2636/C3545 Q EROX ENTRE ENTRE UICK EFERENCE UIDE...
- Page 135 ETWORK CANNING Scan..6-2 Network Scanning..6-4 Color Options..6-7 Image Adjustment..6-8 Output Format..6-15 Refresh Destinations...6-19 Authentication Mode..6-19 C2128/C2636/C3545 Q EROX ENTRE ENTRE UICK EFERENCE UIDE...
-
Page 136: Scan
The Network Scanning feature is optional on the WorkCentre Pro. It is not available on the CopyCentre. If the Network Scanning option has been enabled, an electronic file can be created from a hard copy original. The scanned document is converted to an electronic file and stored electronically. - Page 137 Resources Provided on the World Wide Web www.xerox.com www.centreware.com Contains CentreWare general information with links to EROX ENTRE ENTRE This is a source of general solution overview and options for upgrade. the latest drivers and utilities. C2128/C2636/C3545 Q UICK EFERENCE...
-
Page 138: Network Scanning
ETWORK CANNING Access to the Network Scanning features is gained using the Features button on the control panel. Depending on the options enabled and how your machine has been configured, you may have to select All Services in the top right-hand corner first. Use the Network Scanning tab on the touch screen to select the standard features for a scan to file job. -
Page 139: Repositories
Repositories Repositories are directories or filing locations set up on a server where your scanned files are held. Before you can use Network Scanning your System Administrator must set up the repositories available to your machine. The repositories are defined in the template and cannot be changed at the WorkCentre Pro. -
Page 140: Template Destinations
Template Destinations The Template Destination lists the templates stored on the machine. On installation it will contain the factory default template that is supplied with the WorkCentre Pro. The default template appears at the top of the list and is selected automatically. All other templates follow in alpha-numeric order. -
Page 141: Color Options
OLOR PTIONS The Color Options tab is used to select different color features for the scanned image. Touch any of the top level buttons to select a feature. To view all the options for a feature, select the feature required. Multiple options can be selected for each copy job if required. -
Page 142: Image Adjustment
MAGE DJUSTMENT The Image Adjustment tab is used to progam features relating to the scanned images. Touch any of the top level buttons to select a feature. To view all the options for a feature, select the feature required. Multiple options can be selected for each scan job if required. -
Page 143: Image Quality
Image Quality Use this feature to enhance the quality of your scanned originals. Options: Adjusts the lightness or darkness of black and white output. To darken the output, IGHTEN ARKEN select the down scroll button. To lighten the output, select the up scroll button. Prevents undesired marks or images that are printed on the back of an original from ACKGROUND appearing on the output. -
Page 144: Original Type
Original Type Use this feature to enhance the quality of the output based on the type of original being scanned. Options: Use this option for original documents that contain lithographs, or pictures and & T HOTO printed text. Use this option for original documents that contain photographs. HOTO Use this option when copying text documents composed of fine line characters or other high contrast documents with bright, dense colors. -
Page 145: Sides Scanned
Sides Scanned This is used to specify whether the originals are single-sided or double-sided. For 2-sided originals the orientation can also be programmed. Options: Use this option for originals that are printed on 1 side only. IDED Use this option for originals that are printed on both sides. IDED Use this option for originals that are printed on both sides. -
Page 146: Edge Erase
Edge Erase Use this feature to “refresh” the quality of an original that has become torn or frayed at the edges, or that has hole punch, staple or other marks. Options: Erases equal amounts on all edges of your output image. Up to 2.0 inches (0 - 50 ORDER RASE mm) in 0.05 inch (0.1 mm) increments can be erased. -
Page 147: Original Input
Original Input Use this option to program the size of the originals being scanned or enable the machine to recognize the size of the originals. Options: Use this option to allow the machine to determine the size of the originals being fed through the document handler. -
Page 148: Resolution
Resolution Resolution affects the appearance of the scanned image. The higher the scanning resolution the better the image quality. Options: Recommended for use with average quality text documents and line art. Does not produce the best image quality for photos and graphics. Recommended for use with high quality text documents, that are destined to pass through OCR applications. -
Page 149: Output Format
UTPUT ORMAT Use the features available to temporarily change the format of the scanned image file at the destination server. Touch any of the top level buttons to select a feature. To view all the options for a feature, select the feature required. Multiple options can be selected for each scan job if required. -
Page 150: Document Name
Document Name Use Document Name to specify the name of the folder that you want your scanned image stored to. This option only applies to the folder name. If File Already Exists Use this option to tell the machine what to do when the document destination folder already contains a document with the same name as your current scan job. -
Page 151: Document Format
Use this option to add the newly created scanned image file to an existing document PPEND TO with the same name as the document being scanned. XISTING NOTE: This option is not available with Multi-Page Tiff and PDF file format options. Use this option to abort the scanning operation if a file with the same name as the newly created scanned image file is detected. -
Page 152: Document Management Fields
Document Management Fields Document Management Fields allows you to enter information into the template from your machine which is unique to your scanning requirements. These fields must be enabled when creating the template at the Web UI. NOTE: If your selected template does not contain any enabled fields the Document Management Fields button will not be available. -
Page 153: Refresh Destinations
EFRESH ESTINATIONS Select the Refresh Destinations tab to access the Update Template List feature. Touch the Update Template List button if the template has been recently created or modified. The system automatically updates the Template List. UTHENTICATION Authentication is a useful network security management tool - limiting, restricting and monitoring access to the network via the machine. - Page 154 6-20 C2128/C2636/C3545 Q EROX ENTRE ENTRE UICK EFERENCE UIDE...
-
Page 155: Mail
7 E- MAIL E-mail..7-2 Color Options ..7-6 Image Adjustment..7-7 Output Format..7-14 Authentication Mode ..7-17 C2128/C2636/C3545 Q EROX ENTRE ENTRE UICK EFERENCE UIDE... -
Page 156: E-Mail
MAIL The E-mail feature is optional on the WorkCentre Pro. It is not available on the CopyCentre. This chapter contains information about the options available within E- mail. When enabled, scanned images can be sent as an e-mail attachment to a specified e-mail recipient or recipients. -
Page 157: Send
Most feature screens include three buttons to confirm or cancel your choices. The Undo button resets the current screen to the default values that were displayed when the screen was opened. The Cancel button resets the screen and returns to the previous screen. The Save button saves the selections made and returns to the previous screen. -
Page 158: Entering An E-Mail Address
Entering an E-mail Address The e-mail address can be entered in one of two ways - manually or via an address book. NOTE: When entering e-mail details you can change the keypad to show upper or lower case, accented characters or numbers by selecting any Back button. Manually If you already know the full SMTP e-mail address of the recipient, or if you know that the recipient is not in any of the configured address books, you can select the To... - Page 159 Address Book Types Public Address Book The Public Address Book stores external company addresses on the machine. The address book contains a list of user names and their e-mail addresses. The file must be a .CSV (Comma Separated Value) format for your machine to be able to read the file contents.
-
Page 160: Color Options
OLOR PTIONS The Color Options tab is used to select different color features for the scanned image. Touch any of the top level buttons to select a feature. To view all the options for a feature, select the feature required. Multiple options can be selected for each copy job if required. -
Page 161: Image Adjustment
MAGE DJUSTMENT The Image Adjustment tab is used to temporarily program features to enhance the appearance and style of the scanned e-mail image. Touch any of the top level buttons to select a feature. To view all the options for a feature, select the feature required. -
Page 162: Image Quality
Image Quality Use this feature to enhance the quality of your scanned originals. Options: Adjusts the lightness or darkness of black and white output. To darken the output, IGHTEN ARKEN press the down scroll button. To lighten the output, press the up scroll button. Prevents undesired marks or images printed on the back of an original from ACKGROUND appearing on the output. -
Page 163: Original Type
Original Type Use this feature to enhance the quality of the output based on the type of original being scanned. Options: Use this option for original documents that contain lithographs, or pictures and & T HOTO printed text. Use this option for original documents that contain photographs. HOTO Use this option when copying text documents composed of fine line characters or other high contrast documents with bright, dense colors. -
Page 164: Sides Scanned
Sides Scanned This is used to specify whether the originals are single-sided or double-sided. For 2-sided originals the orientation can also be programmed. Options: Use this option for originals that are printed on 1 side only. IDED Use this option for originals that are printed on both sides. IDED Use this option for originals that are printed on both sides. -
Page 165: Edge Erase
Edge Erase Use this feature to “refresh” the quality of an original that has become torn or frayed at the edges, or that has hole punch, staple or other marks. Options: Erases equal amounts on all edges of your output image. Up to 2.0 inches (0 - 50 ORDER RASE mm) in 0.05 inch (0.1 mm) increments can be erased. -
Page 166: Original Input
Original Input Use this option to program the size of the originals being scanned or enable the machine to recognize the size of the originals automatically. Options: Use this option to allow the machine to recognize the size of the originals being fed through the document handler. -
Page 167: Resolution
Resolution Resolution affects the appearance of the scanned image. The higher the scanning resolution the better the image quality. Options: Recommended for use with average quality text documents and line art. Does not produce the best image quality for photos and graphics. Recommended for use with high quality text documents, that are destined to pass through Optical Character Recognition (OCR) applications. -
Page 168: Output Format
UTPUT ORMAT Use this feature to change the Reply To e-mail address and to identify the file format required for the e-mail scanned image. Touch any of the top level buttons to select a feature. To view all the options for a feature, select the feature required. -
Page 169: Document Format
Document Format Use the Document Format option when the job is to be sent with a different file format than that set as the template default. Options: Tagged-Image File Format. A graphic file that can be opened in a variety of graphic software packages across a variety of computer platforms. -
Page 170: Reply To
Reply To Use the Reply To feature to alter the default address to which replies to an e-mail job can be sent. Message Body Use this feature to edit the default e-mail message. The message body is the text contained within the e-mail and not the e-mail subject line. 7-16 EROX ENTRE... -
Page 171: Authentication Mode
UTHENTICATION Authentication is a useful network security management tool - limiting, restricting and monitoring access to the network via the machine. Authentication can be set up by the System Administrator to restrict access to the features within Scan to E-mail, Network Scanning and Internet Faxing. - Page 172 7-18 C2128/C2636/C3545 Q EROX ENTRE ENTRE UICK EFERENCE UIDE...
-
Page 173: Print
RINT Introduction to Print..8-2 Printer Driver Features...8-3 C2128/C2636/C3545 Q EROX ENTRE ENTRE UICK EFERENCE UIDE... - Page 174 NTRODUCTION TO RINT When the CopyCentre/WorkCentre Pro is connected to the network, electronic jobs that require printing can be sent from a workstation directly to the machine. The CentreWare printer drivers enable printing from a workstation to a CopyCentre/ WorkCentre Pro on a network. The CentreWare drivers contain a variety of feature options which enable print jobs to be customized.
-
Page 175: Printer Driver Features
RINTER RIVER There are a number of Printer Drivers available for the CopyCentre/WorkCentre Pro. The features available will depend on the printer driver being used. The following descriptions provide an overview of the typical features provided by the CopyCentre/WorkCentre Pro Printer Drivers. For information about a specific Printer Driver feature, please refer to the on-line Help facility provided as part of the Printer Driver software. -
Page 176: Advanced
Advanced This tab can be used to select options such as Number of Copies, Image Orientation, and Color Correction. Banner sheets and set offsets can also be requested on this tab. Paper/Output This tab can be used to select options such as the Job Type, Paper Type, Covers, Transparency Separators, 2 Sided Printing, Output Color, and Output Destination. -
Page 177: Layout/Watermark
Layout/Watermark This tab can be used to change the layout of a document and add watermarks. In addition, documents can be printed 1 Up, 2 Up and so on, up to 16 Up. Booklet Layout is also available on this tab. EROX ENTRE ENTRE... - Page 178 C2128/C2636/C3545 Q EROX ENTRE ENTRE UICK EFERENCE UIDE...
-
Page 179: Maintenance
AINTENANCE Customer Replaceable Units..9-2 Cleaning the Machine..9-3 Calibration..9-4 Further Assistance..9-5 C2128/C2636/C3545 Q EROX ENTRE ENTRE UICK EFERENCE UIDE... -
Page 180: Customer Replaceable Units
Information CD (CD2), contained in the CopyCentre/WorkCentre Pro CD Pack delivered with your CopyCentre/WorkCentre Pro. HINT: To place an order for replaceable units or any other Xerox consumables, please contact your local Xerox Representative giving your Company Name, product number and the machine serial number. -
Page 181: Cleaning The Machine
LEANING THE ACHINE WARNING:When cleaning the machine do NOT use organic or strong chemical solvents or aerosol cleaners. Do NOT pour fluids directly onto any area. Use supplies and cleaning materials only as directed in this documentation. Keep all cleaning materials out of the reach of children. User Interface Use a soft, lint-free cloth, lightly dampened with water. -
Page 182: Calibration
ALIBRATION Calibration can be performed to correct or adjust image quality problems associated with printing and copying. The Calibration feature is accessed via the Tools Login screen. NOTE: You can open the Tools Login screen by touching the Access button on the Control Panel. -
Page 183: Further Assistance
URTHER SSISTANCE For any additional help visit our customer web site at www.xerox.com or contact the Xerox Welcome and Support Center quoting the machine serial number. Press the Machine Status button on the control panel. The Machine Information screen will be displayed. - Page 184 C2128/C2636/C3545 Q EROX ENTRE ENTRE UICK EFERENCE UIDE...
-
Page 185: Troubleshooting
10 T ROUBLESHOOTING General ..10-2 Fault Clearance...10-3 Xerox Welcome and Support Center..10-4 Troubleshooting Tips...10-5 C2128/C2636/C3545 Q 10-1 EROX ENTRE ENTRE UICK EFERENCE UIDE... -
Page 186: General
ENERAL A variety of situations can affect the quality of your output. For optimal performance, ensure the following guidelines are followed: • Do not position the CopyCentre/WorkCentre Pro in direct sunlight or near a heat source such as a radiator. •... -
Page 187: Fault Clearance
Re-order the documents as at the start of the job and reload. The documents will be recycled automatically to recover the job. If you are unable to clear the fault, refer to the next section to contact your local Xerox Welcome and Support Center for assistance. EROX ENTRE... -
Page 188: Locating The Serial Number
If a fault cannot be resolved by following the touch screen instructions, check the Troubleshooting Tips in the next section - they may help to solve the problem quickly. If the difficulty persists, contact the Xerox Welcome and Support Center. The Welcome and Support Center will want to know the following information: The nature of the problem, the Machine Serial number, the fault code (if any) plus the name and location of your company. -
Page 189: Troubleshooting Tips
ROUBLESHOOTING Power The machine will not power on: Check to see that the machine is not in Low Power Mode as indicated by the green light on the User Interface. Switch the ON/OFF button to the ON position. Check to see if the power cord is correctly installed. Document Handler Documents will not feed through the Document Handler Ensure that all staples or paper clips have been removed from the originals. -
Page 190: Finisher
Paper Jams inside the machine Check the Paper Path for obstructions. Flip the paper over in the paper tray. Check the paper tray Edge Guides to see if they are against the edges of the paper. Check that the Touch Screen is displaying the correct size for the paper in use. Load fresh paper. -
Page 191: Output Quality
Output Quality Stray marks or black marks from hole punched originals are not removed Use the Edge Erase to erase the edge with the drilled holes. Copy from the document glass with the Document Cover down. Images are out of sequence or upside down when the Booklet Creation Feature is used Ensure that the originals are in the correct sequence. - Page 192 If copying from the Document Glass, check the quality of the originals, set the input to Manual Size Input, close the cover and try again. Ensure that the original is entirely flat against the Document Glass. Missing characters on output Load fresh paper.
-
Page 193: Index
11 I NDEX Numerics 2-Sided Copy 3–5 About this Guide 1–2 Acknowledgment Report Internet Fax 5–15 Add File Destination Network Scanning 6–17 Added Fax Features Embedded Fax 4–14 Additional Resources 1–4 Advanced Fax Features Embedded Fax 4–23 Advanced Tab Print 8–4 Authentication Mode E-mail 7–17 Internet Fax 5–17... - Page 194 Dial Directory Setup Embedded Fax 4–27 Dialing Options Server Fax 4–28 Dialling Options Embedded Fax 4–5 Document Format E-mail 7–15 Internet Fax 5–14 Network Scanning 6–16 Document Handler Troubleshooting Tips 10–5 Document Management Fields Network Scanning 6–17 Document Name Network Scanning 6–15 Edge Erase Copy 3–19 E-mail 7–11...
- Page 195 Copy 3–25 Network Scanning 6–3 Original Input Copy 3–20 E-mail 7–12 Embedded Fax 4–11 Internet Fax 5–12 Network Scanning 6–12 Server Fax 4–35 Original Type Copy 3–17 E-mail 7–9 Embedded Fax 4–13 Internet Fax 5–9 Network Scanning 6–9 Server Fax 4–34 Output Copy 3–4 Output Color...
- Page 196 Network Scanning 6–5 11-4 Template Overview Network Scanning 6–4 Transmission Options Embedded Fax 4–15 Transparencies Copy 3–23 Troubleshooting 10–2 Troubleshooting Tips 10–5 Welcome 1–2 Workstation Features Overview 1–7 Xerox Welcome and Support Center 10–4 EROX ENTRE ENTRE C2128/C2636/C3545 Q UICK EFERENCE UIDE...
- Page 197 701P41734 September 2004 Xerox Corporation Global Knowledge and Language Services 780 Salt Road Webster, New York 14580...
Need help?
Do you have a question about the CopyCentre C2128 and is the answer not in the manual?
Questions and answers