Lumens VC-TR60 User Manual
Auto tracking camera
Hide thumbs
Also See for VC-TR60:
- User manual (39 pages) ,
- Quick installation manual (2 pages) ,
- Firmware update manual (4 pages)
Table of Contents
Advertisement
Quick Links
Advertisement
Table of Contents

Related Manuals for Lumens VC-TR60


Summary of Contents for Lumens VC-TR60
- Page 1 VC-TR60 Auto Tracking Camera (PTZ Video Camera) User Manual - English Version VXY015K [Important] To download the latest version of Quick Start Guide, multilingual user manual, software, or driver, etc., please visit Lumens https://www.MyLumens.com/support...
-
Page 2: Table Of Contents
Table of Contents Chapter 1 Package Contents ..............2 Chapter 2 Product Overview ..............3 2.1 I/O functions Introduction ................3 2.2 Description of LED indicator ................3 Chapter 3 Instruction for installation ............4 3.1 Scenario ......................4 3.2 Preparation before installation ..............4 3.3 Instruction for installation ................4 3.4 Connecting devices ..................7 Chapter 4 Remote Control and Setting Menu ........ -
Page 3: Chapter 1 Package Contents
Chapter 1 Package Contents 3-PIN to 2-PIN Camera Power Adapter Power Cord connector Appearance may vary depending on (For Japan only) country/region RS232/RS422 USB cable - 2M Remote Control Connection (Type B to Type A) Instruction English-2... -
Page 4: Chapter 2 Product Overview
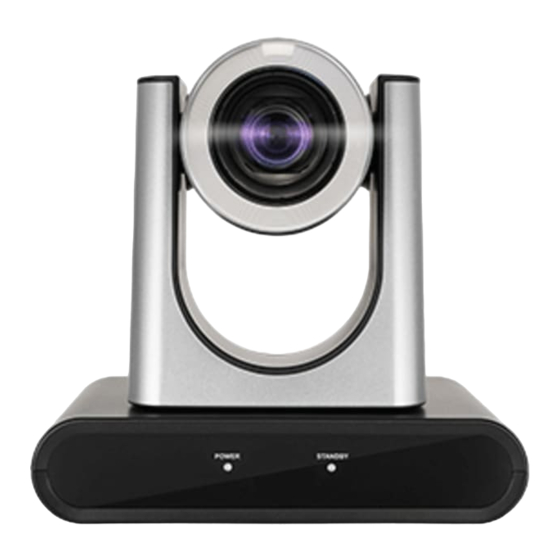
Chapter 2 Product Overview 2.1 I/O functions Introduction Front View Back View ○ ○ ○ ○ ○ ○ ○ ○ ○ ○ Item Function Descriptions Main camera lens HD camera lens Panoramic lens Panoramic camera lens The USB port is for connecting to the USB port of the computer and USB Port providing USB signal images HDMI output... -
Page 5: Chapter 3 Instruction For Installation
Chapter 3 Instruction for installation 3.1 Scenario 3.1.1 Applicable distance range of VC-TR60: 2 - 20 m, best tracking target distance recommended: 3.1.2 Mounting height: 2.5 - 6 m, best height recommended: 2.5 m <Note> For maintaining the best tracking results, please avoid images of people on posters, screens, monitors, TVs in the background 3.2 Preparation before installation... - Page 6 3.3.2 I would like to install the camera on the ceiling/wall/TV stand Lumens can provide the following optional accessories. Please contact your Lumens distributer if needed for purchase VC-WM14 3 in 1 Folding Bracket VC-WM15 Ceiling Mounted Bracket...
- Page 7 3.3.3 Camera Size Length x Width x Height: 190 x 149 x 185 mm Weight: 1.6 Kg 3.3.4 Dimensions of the bottom of the machine The camera can be mounted on a 1/4” - 20 UNC PTZ tripod deck by using the lock holes on the bottom for the tripod English-6...
-
Page 8: Connecting Devices
3G-SDI output LAN port RS-232 output Power HDMI output Audio In RD-232 input Supply Display Microphone Computer / Control keyboard <Remark> Network cable port, supporting PoE (IEEE802.3af) power supply 3.4.1 RS-232 connection (at most 7 Lumens cameras can be connected) English-7... - Page 9 RS-232 pins definition instructions English-8...
-
Page 10: Chapter 4 Remote Control And Setting Menu
Chapter 4 Remote Control and Setting Menu 4.1 Remote Control Item Description ➊ Power Switch Power ⓫ Numeric Keys 0 - 9: Click to call the ➋ preset Preset: Appoint an ID (0 ~ 9) to save the Preset current position data ... -
Page 11: Setting Menu
4.2 Setting Menu <Remark> Press [Menu] on the remote control to enter the setting menu; the bold underlined values in the following table are defaults. Level Level Level Function Descriptions Major Items Minor Items Adjustment Values Full Auto / Shutter Pri / Iris Mode Exposure mode setting Pri / Manual / White Board... - Page 12 Level Level Level Function Descriptions Major Items Minor Items Adjustment Values 0~ C ~25 Adjustable when the Image mode is set Contrast to Custom 0~ C ~25 Adjustable when the Image mode is set Saturation to Custom Adjustable when the Image mode is set Sharpness 0~ C ~14 to Custom...
- Page 13 Level Level Level Function Descriptions Major Items Minor Items Adjustment Values Enable/disable the dynamic host DHCP On / Off configuration IP Address 192.168.100.100 Ethernet Subnet Mask 255.255.255.0 Configurable when DHCP is set to Off Gateway 192.168.100.254 Audio Enable On / Off Turn on/off audio output Audio In Line In...
- Page 14 Level Level Level Function Descriptions Major Items Minor Items Adjustment Values Language English / Chinese Select the camera lens to return to the Last operated position or the First Last operation / First default Initial Position preset position after POWER ON value <Remark>...
-
Page 15: Chapter 5 Network Function Settings Description
E.g.: http://192.168.100.100 (default IP address) Enter administrator’s account and password <Remark> For the first-time login, please refer to 5.2.10 System Settings - User to change the default password Lumens Network Camera Account: admin Password: 9999 (Default) English-14... - Page 16 5.1.3 Using RTSP Player to View the Images RTSP connections can be made using free software, e.g.: VLC, Quick Time, PotPlayer, etc. RTSP connection address formats are as follows: RTSP Stream 1 => rtsp://camera IP:8557/stream1 RTSP Stream 2 => rtsp://camera IP:8557/stream2 If password authentication is enabled, the RTSP connection address is as follows: ...
-
Page 17: Web Page Menu Function Description
5.2 Web Page Menu Function Description 5.2.1 Login Screen ○ ○ ○ ○ ○ Item Function Descriptions User Login Account Enter user login account (default: admin) Enter user password (default: 9999) User Password <Remark> For the first-time login, please refer to 5.2.11 System Settings - User to change the default password... - Page 18 5.2.2 Live Viewer - PTZ Control ○ ○ ○ ○ ○ ○ ○ ○ ○ ○ ○ ○ 8 ○ 7 ○ 8 Item Function Descriptions ○ Camera Display camera ID/location ○ 7 ID/location Please refer to 5.2.7 System - Device Preview window Display the screen currently captured by the camera Preset setting...
- Page 19 5.2.3 Live Viewer - Camera Setting ○ ○ ○ ○ ○ ○ ○ ○ 7 Item Function Descriptions Mode: Select exposure mode (Full Auto/Shutter Pri/Iris Pri/Manual/ White Board) WDR: Set the level of wide dynamic range (WDR) in order to obtain better images ...
- Page 20 Pan/Tilt limit: Enable, and set the pan/tilt limit Preset Speed: Set the rotation speed of the cradle head when Preset is executed Pan Tilt Zoom (PTZ) Initial Position: Set the camera lens to return to the last operated position or the first preset position after POWER ON <Remark>...
- Page 21 5.2.4 Tracking ○ ○ ○ ○ ○ ○ ○ ○ ○ ○ ○ ○ ○ Item Function Descriptions Camera ID/location Please refer to 5.2.7 System - Device to display camera ID/location Preview window Display the screen currently captured by the camera lens <Remark>...
- Page 22 Advanced Setting Advanced Setting of Everywhere / Stage / Partition Tracking of Tracking Mode Settings - 13.1 Everywhere Please refer to 5.2.4.1 Everywhere for the setting steps Body Size: Set Full/Half Body Body in Frame: Set the position of the person in the screen ...
- Page 23 5.2.4.1 Everywhere 1. Select [Everywhere] for Tracking Mode, and click box to select an area (orange box) 2. After the selection, click to set, and the preview screen will display the selected area, then click to access the settings English-22...
- Page 24 3. Set the Left/Right Border Left Border: Click to move the position and click when finished Right Border: Click to move the position and click when finished Click to complete the settings after setting the left/right border 4.
- Page 25 7. Set the Left/Right Border Left Border: Click to move the position and click when finished Right Border: Click to move the position and click when finished Click to complete the settings after setting the left/right border 8.
- Page 26 3. If you need to set other partitions, please continue using PTZ function to adjust the screen, and then click to save <Remark> If a red box is displayed when adjusting the screen, it means that the position overlaps with that of other partitions.
- Page 27 5.2.5 Audio ○ ○ ○ Item Function Descriptions Select to enable Audio function Audio In: Line In Audio Enable Encode Type: AAC Encode sample rate: Encode type and sample rate (48 / 44.1 / 16 KHz) Audio Volume: Adjust Audio Volume Audio Delay After checking the box, set the audio delay time (-10 ~ -500 ms)
- Page 28 5.2.6 Streaming ○ ○ ○ ○ ○ Item Function Descriptions Streaming 1/ Supporting 2-way streaming output Streaming 2 Streaming Please refer to 5.2.6.1 Streaming Parameter Setting for relevant settings parameter setting Select to enable RTSP Enable/Disable Multicast It is suggested to enable Multicast when the number of users online watching the live image simultaneously is more than 4 ...
- Page 29 5.2.7 System - Device ○ ○ ○ Item Function Descriptions Change camera ID here Supporting1 - 15 characters for the camera ID Please mix uppercase and lowercase letters or numbers for characters. Camera ID Special symbols such as “/” and “space” cannot be used <Remark>...
- Page 30 5.2.8 System - Output ○ ○ ○ ○ ○ ○ Item Function Descriptions Set the HDMI output resolution HDMI Resolution After switching the resolution, the camera will restart. Please refresh the browser Set the SDI output resolution SDI Resolution After switching the resolution, the camera will restart. Please refresh the browser Set HDMI First or UVC First Output Mode...
- Page 31 5.2.9 System - Network ○ ○ ○ ○ 4 Item Function Descriptions Network setting of camera. Change of setting is available when DHCP DHCP function is closed HTTP port Set HTTP port. The default Port value is 80 HTTPS port Set HTTPS port.
- Page 32 5.2.10 System - Date & Time Function Descriptions Display the current camera/PC date and time, and set the display format and synchronization way When Manually Set is selected for [Time Settings], Date & Time can be customized English-31...
- Page 33 5.2.11 System - User Function Descriptions Add/Modify/Delete user account Supporting 4 - 32 characters for user name and password Please mix uppercase and lowercase letters or numbers for characters. Special symbols or the underlined cannot be used Authentication Mode: Set the new account management permissions User Type Admin Operator...
- Page 34 5.2.12 System - Control ○ ○ ○ ○ 4 ○ ○ ○ ○ 7 Item Function Descriptions Protocol VISCA/Pelco D protocol is supported Choose the transmission speed of the control signal as Baud Rate 9600/38400 VISCA address The camera ID address 0 ~ 7 can be assigned Pelco D address The camera ID address 1 ~ 255 can be assigned Tally Lamp...
- Page 35 Reset all configurations to factory default settings Save setup parameters as a Profile, and users can download and System Settings upload camera setup parameters If the camera operates abnormally, please export error log and Error Log provide it to Lumens for confirmation English-34...
- Page 36 5.2.14 About Function Descriptions Display the firmware version, serial number, and other related information of the camera For technical support, please scan the QRcode at the bottom right for assistance English-35...
-
Page 37: Chapter 6 Troubleshooting
Chapter 6 Troubleshooting This chapter describes problems you may encounter while using VC-TR60. If you have questions, please refer to related chapters and follow all the suggested solutions. If the problem still occurred, please contact your distributors or the service center. -
Page 38: Chapter 7 Safety Instructions
Chapter 7 Safety Instructions Always follow these safety instructions when setting up and using VC-TR60: 1 Operation 1.1 Please use the product in the recommended operating environment, away from water or source of heat. 1.2 Do not place the product on a tilted or unstable trolley, stand or table. -
Page 39: Copyright Information
Lumens is a trademark that is currently being registered by Lumens Digital Optics Inc. Copying, reproducing or transmitting this file is not allowed if a license is not provided by Lumens Digital Optics Inc. unless copying this file is for the purpose of backup after purchasing this product.
Need help?
Do you have a question about the VC-TR60 and is the answer not in the manual?
Questions and answers