Table of Contents
Advertisement
Quick Links
Advertisement
Table of Contents

Related Manuals for Advantech DS-202


Summary of Contents for Advantech DS-202
- Page 1 User Manual DS-202 Main Board Module...
- Page 2 No part of this manual may be reproduced, copied, translated, or transmitted in any form or by any means without the prior written permission of Advantech Co., Ltd. The information provided in this manual is intended to be accurate and reliable.
- Page 3 Product Warranty (2 years) Advantech warrants the original purchaser that each of its products will be free from defects in materials and workmanship for two years from the date of purchase. This warranty does not apply to any products that have been repaired or altered by persons other than repair personnel authorized by Advantech, or products that have been subject to misuse, abuse, accident, or improper installation.
- Page 4 Consult the dealer or an experienced radio/TV technician for assistance. Technical Support and Assistance Visit the Advantech website at www.advantech.com/support to obtain the latest product information. Contact your distributor, sales representative, or Advantech's customer service center for technical support if you need additional assistance. Please have the following information ready before calling: –...
- Page 5 Pour éviter tout risque d'électrocution,cet équipement ne doit être branché qu'au réseau d'alimentation avec une terre de protection. Warning! Restricted access area: area assessable only to skilled persons and instructed persons with the proper authorization. DS-202 User Manual...
- Page 6 70 dB (A). RESTRICTED ACCESS AREA: The equipment should only be installed in a Restricted Access Area. DISCLAIMER: These instructions are provided according to IEC 704-1 standards. Advantech disclaims all responsibility for the accuracy of any statements contained herein. DS-202 User Manual...
- Page 7 ZONE D'ACCÈS RESTRICTED: L'équipement ne doit être installé que dans une zone d'accès restreint. AVERTISSEMENT: Cet ensemble d'instructions est donné conformément à la norme CEI 704-1. Advantech décline toute responsabilité quant à l'exactitude des déclara- tions contenues dans ce document. DS-202 User Manual...
- Page 8 DS-202 User Manual viii...
-
Page 9: Table Of Contents
1.6.5 Shock During Vibration ..............4 1.6.6 EMC ....................4 Chapter Hardware configuration ......5 DS-202 Series I/O Connectors..............6 Figure 2.1 I/O Bracket..............6 2.1.1 Audio Connectors ................. 6 Figure 2.2 Audio Connectors ............6 2.1.2 LED ....................6 Figure 2.3 Power ................. 6 Figure 2.4 LED - HDD.............. - Page 10 3.2.12 Advanced → Network Stack Configuration......... 30 Chipset....................31 3.3.1 Chipset → System Agent (SA) Configuration ......31 3.3.2 Chipset → PCH-IO Configuration ..........33 Security ....................37 3.4.1 Security → Secure Boot ............. 38 Boot......................40 Save & Exit ..................... 41 DS-202 User Manual...
-
Page 11: Chapter 1 General Information
Chapter General Information This chapter gives background information on DS-202 series. -
Page 12: Introduction
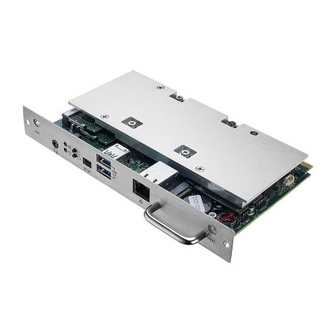
Introduction ® The DS-202 design is based on the Intel SDM specification and is powered by Intel processors. DS-202 delivers 4K UHD output and smooth content streaming via a card edge connector, while maintaining high-energy efficiency. DS-202 allows slot-in integration that reduces space requirements and lowers deployment and field main- tenance costs. -
Page 13: Mechanical Specification
1.2 x 1 @3840x2160 30Hz Expansion: M.2 2230 E Key x 1 Mechanical Specification 1.4.1 Dimension 175 x 100 x 20 mm (L x W x H) Figure 1.1 Dimensions 1.4.2 Weight 1 kg DS-202 User Manual... -
Page 14: Power Requirements
1.6.4 Vibration Loading During Operation 0.5 Grms, IEC 60068-2-64, random, 5 ~ 500 Hz, 1 hr/axis. 1.6.5 Shock During Vibration 20 G, IEC 60068-2-27, half sine, 11 ms duration 1.6.6 CE, FCC Class B DS-202 User Manual... -
Page 15: Chapter 2 Hardware Configuration
Chapter Hardware configuration This chapter introduces external IO and the installation of DS-202 series Hardware. -
Page 16: Ds-202 Series I/O Connectors
DS-202 Series I/O Connectors Figure 2.1 I/O Bracket 2.1.1 Audio Connectors DS-202 audio connectors can be connected with stereo speakers, earphone, or microphone buy selecting from Windows audio application. Figure 2.2 Audio Connectors 2.1.2 Below LED indicator means power on status when it shows green. -
Page 17: Power On/Off & Reset Button
2.1.3 Power On/off & Reset Button Push below button to power on/off DS-202. Figure 2.5 Power Button Push below button to reset DS-202. Figure 2.6 Rest Button 2.1.4 mini-DP Below connector is mini-DP connector to let user to connect to esternal display which is with mini-DP interface. -
Page 18: Usb 3.0 Connector
2.1.5 USB 3.0 Connector DS-202 supports 4x USB 3.0 interfaces. The USB interfaces complies with USB UHCI, Rev. 3.0 standards. Please refer to Table 2.5 for its pin assignments. USB 3.0 connectors contain legacy pins to interface with USB 2.0 devices, and a new set of pins for USB 3.0 connectivity. -
Page 19: Lan Connector
Always turn on without transmitting/receiving data Activity status Flash Left side LED: Green/Orange LED Status Display 10Mbps Always off 100Mbps Green 1000Mbps Orange 2.1.7 WiFi Antenna DS-202 provides two WiFi antenna connectors to connect with SMA antenna. Figure 2.10 SMA Connector DS-202 User Manual... -
Page 20: Jumpers
Jumpers Figure 2.11 Jumper Layout 2.2.1 Clear CMOS (JCMOS1) Location JCMOS1 Part number 1653003101 Foot Print HD_3x1P_79_D Description PIN HEADER 3x1P2.0mm 180D(M)DIP 2000-13WS Setting Function (1-2)* Normal operation (Default) (2-3) Clear CMOS Figure 2.12 Jumper DS-202 User Manual... -
Page 21: At/Atx (Pson1)
2.2.2 AT/ATX (PSON1) Location PSON1 Part number 1653003101 Foot Print HD_3x1P_79_D Description PIN HEADER 3x1P2.0mm 180D(M)DIP 2000-13WS Setting Function (1-2) (2-3)* ATX (Default) Figure 2.13 Jumper Modules Introduction Figure 2.14 Module Introduction DS-202 User Manual... - Page 22 DS-202 User Manual...
-
Page 23: Chapter 3 Bios Settings
Chapter BIOS Settings... -
Page 24: Bios Introduction
AMIBIOS has been integrated into motherboards for over two decades. With the AMIBIOS Setup program, users can modify BIOS settings and control various sys- tem features. This chapter describes the basic navigation of the DS-202 BIOS setup screens. AMI's BIOS ROM has a built-in Setup program that allows users to modify the basic system configuration. -
Page 25: Entering The Setup
BIOS supports your CPU. If there is no number assigned to the patch code, please contact an Advantech application engineer to obtain an up- to-date patch code file. This will ensure that your CPU‘s system status is valid. -
Page 26: Advanced
3.2.2 Advanced DS-202 User Manual... -
Page 27: Advanced → Cpu Configuration
→ 3.2.3 Advanced CPU Configuration Intel (VMX) Virtualization Enable or Disable Intel VMX Virtualization support. Active Processor Cores Enable all or 1/2/3. MonitorMWait Enable or disable MonitorMWait support. DS-202 User Manual... -
Page 28: Advanced → Power & Performance
→ 3.2.4 Advanced Power & Performance DS-202 User Manual... - Page 29 Boot performance mode Max non-Turbo performance. Max battery Turbo performance. Intel SpeedStep Enable or disable Intel SpeedStep support. Turbo mode Enable or disable Turbo mode. C states Enable or disable C states. DS-202 User Manual...
-
Page 30: Advanced → Pch-Fw Configuration
→ 3.2.5 Advanced PCH-FW Configuration ME State Enable or disable ME State. ME Unconfig on RTC Clear Enable or disable ME Unconfig on RTC Clear. DS-202 User Manual... - Page 31 3.2.5.1 Advanced → PCH-FW Configuration → Firmware Update Configuration Me FW Image Re-Flash Enable or disable Me FW Image Re-Flash. FW Update Enable or disable FW Update. DS-202 User Manual...
- Page 32 3.2.5.2 Advanced → PCH-FW Configuration → PTT Configuration TPM Device Selection Select PTT or dTPM. DS-202 User Manual...
-
Page 33: Advanced → Acpi Settings
3.2.6 Advanced → ACPI Settings Enable ACPI Auto Configuration Enable or disable ACPI Auto Configuration. Enable Hibernation Enable or disable Hibernation. ACPI Sleep State. Select S3 (Suspend to RAM) or suspend Disabled. DS-202 User Manual... -
Page 34: Advanced → It5121 Hw Monitor
3.2.7 Advanced → IT5121 HW Monitor Fan Mode Select Smart Fan/Fan off/Fan on. High Limit Temp Configure High Limit Temp. Low Stop Temp Configure Low Stop Temp. DS-202 User Manual... -
Page 35: Advanced → It5121 Super Io Configuration
75° C/167° F 80° C/176° F 85° C/185° F 90° C/194° F 95° C/205° F Watch Dog Timer (PreBoot) Enable or disable Watch Dog Timer (PreBoot). Watch Dog Timer Enable or disable Watch Dog Timer. DS-202 User Manual... - Page 36 3.2.8.1 Advanced → IT5121 Super IO Configuration → Serial Port 1 Configuration Serial Port Enable or disable Serial Port. Change Settings Auto or Change IRQ setting. DS-202 User Manual...
-
Page 37: Advanced → Trusted Computing
3.2.9 Advanced → Trusted Computing Security Device Support Enable or disable Security Device Support. SHA256 PCR Bank Enable or disable SHA256 PCR Bank. Pending operation None or TPM Clear. DS-202 User Manual... -
Page 38: Advanced → S5 Rtc Wake Settings
3.2.10 Advanced → S5 RTC Wake Settings Wake system from S5 Enable or disable Wake system from S5. DS-202 User Manual... -
Page 39: Advanced → Usb Configuration
Configure time for USB transfer time-out. Device reset time-out Configure time for Device reset time-out. Device power-up delay Auto or Manual set. UFD 2.0 Silicon-Power16GPMAP Auto or Floppy or Forced FDD or Hard Disk or CD-ROM. DS-202 User Manual... -
Page 40: Advanced → Network Stack Configuration
Enable or disable IPv4 PXE Support. IPv6 PXE Support Enable or disable IPv6 PXE Support. PXE boot wait time Configure time of PXE boot wait time. Media detect count Configure Media detect count. DS-202 User Manual... -
Page 41: Chipset
Chipset 3.3.1 Chipset → System Agent (SA) Configuration VT-d Enable or disable VT-D. DS-202 User Manual... - Page 42 3.3.1.1 Chipset → System Agent (SA) Configuration → Memory Configuration DS-202 User Manual...
-
Page 43: Chipset → Pch-Io Configuration
Enable or disable Onboard LAN Controller. LAN1 PXE OpROM Enable or disable LAN1 PXE OpROM. PCIE Wake Enable or disable PCIE Wake. PinCntrl Driver GPIO Scheme Enable or disable PinCntrl Driver GPIO Scheme. DS-202 User Manual... - Page 44 SATA Mode Selection Select AHCI. Aggressive LPM Support Enable or disable Aggressive LPM Support. SATA Controller Speed Select Default or Gen1 or Gen2 or Gen3. M.2 M-Key → Port 1 Enable or disable M.2 M-Key. DS-202 User Manual...
- Page 45 Enable or disable USB3 Port 2. USB3 (SDM) Enable or disable USB3 (SDM). USB2 Port 1 Enable or disable USB2 Port 1. USB2 Port 2 Enable or disable USB2 Port 2. USB2 (SDM) Enable or disable USB2 (SDM). DS-202 User Manual...
- Page 46 3.3.2.3 Chipset → PCH-IO Configuration → HD Audio Configuration HD Audio Enable or disable HD Audio. DS-202 User Manual...
-
Page 47: Security
Security Administrator Password Set/Configure Administrator Password. User Password Set/Configure User Password. DS-202 User Manual... -
Page 48: Security → Secure Boot
3.4.1 Security → Secure Boot Secure Boot Enable or disable Secure Boot. Secure Boot Mode Select Custom or Standard. DS-202 User Manual... - Page 49 3.4.1.1 Security → Secure Boot → Key Management Factory Key Provision Enable or disable Factory Key Provision. DS-202 User Manual...
-
Page 50: Boot
Boot Setup Prompt Timeout Configure Setup Prompt Timeout. Bootup Numlock State Select On or off. Quiet Boot Enable or disable Quiet Boot. DS-202 User Manual... -
Page 51: Save & Exit
Discard Changes Discard your changes. Restore Defaults Restore all the changes and back to default. Save as User Defaults Save all your changes as user defaults. Restore User Defaults Restore back to user defaults. DS-202 User Manual... - Page 52 No part of this publication may be reproduced in any form or by any means, such as electronically, by photocopying, recording, or otherwise, without prior written permission from the publisher. All brand and product names are trademarks or registered trademarks of their respective companies. © Advantech Co., Ltd. 2023...
Need help?
Do you have a question about the DS-202 and is the answer not in the manual?
Questions and answers