
Related Manuals for NCR 7707-K553


Summary of Contents for NCR 7707-K553
- Page 1 Kit Instructions No Note/Coin Recycler Front Panel and Top Panel Chute Blanking Plates 7707-K553 Issue A...
- Page 2 NCR, therefore, reserves the right to change specifications without prior notice. All features, functions, and operations described herein may not be marketed by NCR in all parts of the world. In some instances, photographs are of equipment prototypes. Therefore, before using this document, consult with your NCR representative or NCR office for information that is applicable and current.
-
Page 3: Revision Record
Revision Record Issue Date Remarks Aug 2021 First Issue... -
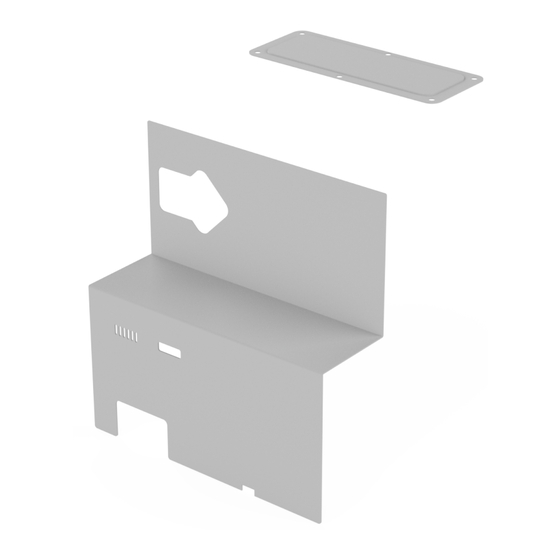
Page 5: Kit Contents
This publication provides procedures for installing No Note/Coin Recycler Front Panel and Top Panel Chute Blanking Plates on an NCR SelfServ™ Checkout (7707) unit. Note: The 7707-K553 No Note/Coin Recycler Front Panel and Top Panel Chute Blanking Plates is only intended for units with Bagwell configurations. -
Page 6: Installation Procedures
To install the No Note/Coin Recycler Front Panel and Top Panel Chute Blanking Plates, follow these steps: 1. Shut down the NCR SelfServ™ Checkout (7707) R6-Japan software system. 2. Unlock and open the NCR SelfServ Checkout Cabinet Door, using a key. 3. Remove the following devices: •... - Page 7 Note: Use a flat surface with an approximate height of 68 cm and place it up to 22 cm from the edge of the Cabinet. Caution: For safety reasons, NCR recommends placing the Coin Recycler on a flat surface to hold the weight. The Coin Recycler (Glory RT-375) weighs approximately...
- Page 8 Note: Use a flat surface with an approximate height of 40 cm and place it up to 13 cm from the edge of the Cabinet. Caution: For safety reasons, NCR recommends placing the Note Recycler on a flat surface to hold the weight. The Note Recycler (Glory RAD-375) weighs...
-
Page 9: Removing Front Panel
No Note/Coin Recycler Front Panel and Top Panel Chute Blanking Plates Removing Front Panel To detach the Front Panel, remove the twelve (12) serrated nuts, as shown in the image below. -
Page 10: Removing Cables
No Note/Coin Recycler Front Panel and Top Panel Chute Blanking Plates Removing Cables To remove the cables, follow these steps: 1. Disconnect cables from the back of the Coin Recycler (Glory RT-375). Refer to the table below for the corresponding locations of the connectors. Source (Note Recycler) Destination Connection (Location) Coin Recycler (Glory RT-375) 24V, 600W DC Power Supply... - Page 11 No Note/Coin Recycler Front Panel and Top Panel Chute Blanking Plates 2. Disconnect the cables from the Note Recycler (Glory RAD-375). Refer to the table below for the corresponding locations of the connectors. Source (Note Recycler) Destination Connection (Location) Note Recycler (Glory RAD-375) 24V, 600W DC Power Supply Note Recycler (Glory RAD-375) Coin Recycler (Glory RT-375)
- Page 12 No Note/Coin Recycler Front Panel and Top Panel Chute Blanking Plates Removing Coin Recycler Chute To remove the existing Coin Recycler Chute, follow these steps: 1. Remove three (3) screws to detach the Prevention Plate Assembly from the Coin Recycler Chute, as shown in the image below. 2.
- Page 13 No Note/Coin Recycler Front Panel and Top Panel Chute Blanking Plates 3. Push the Coin Recycler Chute upward to remove it out of its slot. 4. Remove six (6) nuts to detach the Coin Recycler Chute Bracket and Rubber Gasket from the six (6) studs, as shown in the image below.
- Page 14 No Note/Coin Recycler Front Panel and Top Panel Chute Blanking Plates Installing No Note Recycler Front Panel To install the No Note Recycler Front Panel, follow these steps: 1. Remove the existing Front Panel, if necessary. For more information, refer to Removing Front Panel on page 5.
- Page 15 No Note/Coin Recycler Front Panel and Top Panel Chute Blanking Plates Installing Top Panel Chute Blanking Plate To install the Top Panel Chute Blanking Plate, follow these steps: 1. Align and insert the Top Panel Chute Blanking Plate onto the six (6) studs under the Coin Recycler Chute cutout.
Need help?
Do you have a question about the 7707-K553 and is the answer not in the manual?
Questions and answers