
Subscribe to Our Youtube Channel
Related Manuals for Ender Ender-3 Max Neo


Summary of Contents for Ender Ender-3 Max Neo
- Page 1 CREATE REALITY,ACHIEVE DREAMS Ender-3 Max Neo Ender-3 Max Neo 3D Printer User Manual V1.2...
- Page 2 To Our Dear Users Thank you for choosing Creality. For your convenience, please read through this User Manual before you start and follow the instructions provided carefully. Creality is always ready to provide you with high-quality services. If you encounter any issues or have any questions when using our products, please use the contact information at the end of this manual to contact us.
- Page 3 NOTES Do not use this printer by methods or operations that are not described in this manual, otherwise it may result in accidental injury or property damage. Do not place this printer near flammable materials, explosive materials or high heat sources. Please place this printer in a ventilated, cool and low-dust environment. Do not place this printer in a vibrating or any other unstable environment, as the printing quality will be compromised when the printer shakes.
-
Page 4: Table Of Contents
Table of Contents About the Printer 01-01 Equipment Parameters 02-02 Package Content 03-03 Product Installation 04-04 Equipment Wiring 05-05 Initialization Settings 06-07 Automatic Leveling 08-08 Preheating Mode 09-09 Filling the Filament 10-10 Start Printing 11-11... -
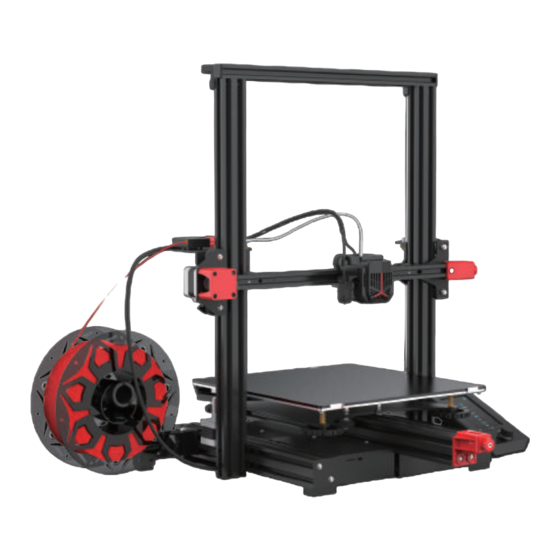
Page 5: About The Printer
1. About the Printer X Axis Limit Switch Tool box Motor 01 Filament Holder Screen Extrusion kit Printing Platform Power Switch Motor 02 Storage Card Slot Tension Adjustment 02 Filament Detector Tension Adjustment 01 Nozzle Kit... -
Page 6: Equipment Parameters
2. Equipment Parameters Model Ender-3 Max Neo Language English Print Method TF card/USB online printing Molding Technology Number Of Nozzles Printing Size 300*300*320mm Layer Thickness 0.1-0.35mm Printing Speed ≤60mm/s Nozzle Diameter 0.4mm Heated Bed Temperature ≤100℃ Nozzle Temperature ≤260℃ Printing Materials... -
Page 7: Package Content
3. Package Content Parts List Base Frame Material rack Material barrel Gantry Frame Display Screen Filament Tools list Cutting pliers Nozzle Cleaner Power cable Cable tie M5x65 Hexagon round TF card /Card Wrench and Blade head screws reader screwdrive Blue clip×2 Nozzle... -
Page 8: Product Installation
4. Product Installation 1. Gantry installation 2. Gantry installation Place the gantry frame in the slot of the base and pre-lock with four M5x65 Place the screen kit on the right side of the profile, snap it into the profile hexagon socket head spring washer combination screws aligned with the horizontally and then tighten the screws. -
Page 9: Equipment Wiring
5. Equipment Wiring Connect the Z-axis stepper motor as prompted on the label on the 6-pin (4 wires) port. ● Please ensure the correct position for the power supply switch and mains before supply connection, in order to avoid damage to the device. ●... -
Page 10: Initialization Settings
6. Initialization Settings Enter “Control → Reset configuration” to reset the printer parameters. Enter “Prepare→ Auto Home” and return to the starting position. Leveling Leveling Enter “Prepare → Move → Move Z”, and clear the value. Leveling... - Page 11 7. Initialization Settings Enter “Prepare→Z-offset”, adjust the Z-axis compensation value so that the height from the nozzle to the platform is almost the thickness of a piece of A4 paper (0.08-0.1mm), click the knob to confirm, and complete the center point leveling. Leveling Enter “Prepare →...
-
Page 12: Automatic Leveling
08. Automatic leveling Turn on the equipment and select “Leveling”. Default operation: The printer first automatically returns home for automatic calibration of 25 points, and then returns home again to complete the leveling. Leveling Enter “Prepare→Z-offset", adjust the Z-axis compensation value so that the height from the nozzle to the printing platform is about the thickness of a piece of A4 paper (0.08-0.1mm), click the knob to confirm, and the Z-axis compensation value is determined successfully. -
Page 13: Preheating Mode
09. Preheating mode Method1 Leveling Method2 Leveling... -
Page 14: Filling The Filament
10.Filling the Filament When you are waiting for the temperature to rise, hang the consumables on the rack. Press and hold the extrusion spring and insert the filaments into the nozzle position along the extruder hole. When the temperature reaches the set target value, you can see that there are filaments flowing out of the nozzle and the loading is completed. -
Page 15: Start Printing
11.Start Printing Ender-3 Max Neo Ender-3 Max Neo Creality Slicer 4.8.2 Ender-3 Max Neo For details on the software instructions , please refer to the slicing software manual in the memory card! Creality Slicer 4.8.2 Please don't insert or remove storage Double click to install the software. - Page 16 Due to the differences between different machine models, the physical objects and the images can be differ.The final explanation rights shall be reserved by Shenzhen Creality 3D Technology Co, Ltd. Add:18th Floor, JinXiuHongDu Building, Meilong Road, Xinniu Community, Minzhi Street, Longhua District, Shenzhen City, China. Official Website: www.creality.com Tel: +86 755-8523 4565 E-mail: cs@creality.com...
Need help?
Do you have a question about the Ender-3 Max Neo and is the answer not in the manual?
Questions and answers
what kind interface does it have
The Ender-3 Max Neo has a non-touchscreen LCD with a text-based interface.
This answer is automatically generated
@Mr. Anderson . and how **** i to plug my computer into the printer