Table of Contents
Advertisement
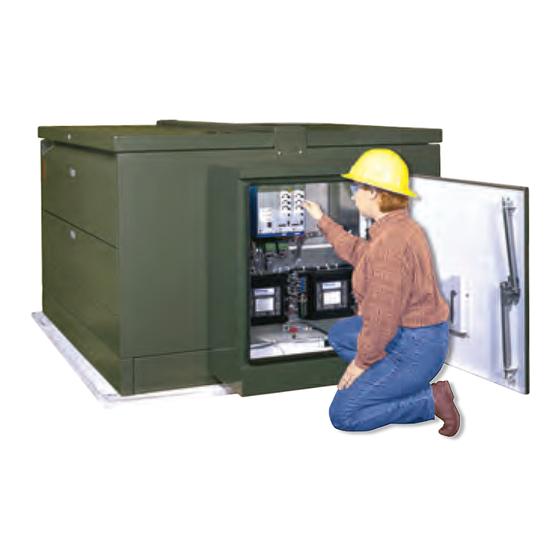
Remote Supervisory Vista
Distribution Switchgear
Outdoor Distribution (15.5 kV through 38 kV)
This green leaf icon designates information specifically for Vista Green Underground Distribution Switchgear
that uses an eco-friendly insulating gas. Unless otherwise designated, instructions provided apply to all manual
Vista switchgear products.
Table of Contents
Introduction � � � � � � � � � � � � � � � � � � � � � � � � � � � � � 2
Qualified Persons � � � � � � � � � � � � � � � � � � � � � � � � � � � �2
Read this Instruction Sheet � � � � � � � � � � � � � � � � � � � �2
Retain this Instruction Sheet� � � � � � � � � � � � � � � � � � � �2
Proper Application � � � � � � � � � � � � � � � � � � � � � � � � � � �2
Warranty � � � � � � � � � � � � � � � � � � � � � � � � � � � � � � � � � � �3
Safety Information � � � � � � � � � � � � � � � � � � � � � � � � 4
Understanding Safety-Alert Messages � � � � � � � � � � � �4
Following Safety Instructions � � � � � � � � � � � � � � � � � � �4
Replacement Instructions and Labels � � � � � � � � � � � �4
Location of Safety Labels � � � � � � � � � � � � � � � � � � � � � �5
Safety Precautions � � � � � � � � � � � � � � � � � � � � � � � 6
Components � � � � � � � � � � � � � � � � � � � � � � � � � � � � 7
Overview of Components � � � � � � � � � � � � � � � � � � � � � �7
Operation � � � � � � � � � � � � � � � � � � � � � � � � � � � � � � 12
Grounding a Way � � � � � � � � � � � � � � � � � � � � � � � � �12
Locking Out Grounded Position � � � � � � � � � � � � � � � �16
Motor Operator Decoupling � � � � � � � � � � � � � � � � � � �22
Indicator � � � � � � � � � � � � � � � � � � � � � � � � � � � � � � � �24
Indicator with Phasing � � � � � � � � � � � � � � � � � � � � �27
September 25, 2023
© S&C Electric Company 1999-2023, all rights reserved
Underground
®
Operation
Pad-Mounted, Dry-Vault-Mounted, Wet-
Vault-Mounted, and Undercover™ Styles
Maintenance � � � � � � � � � � � � � � � � � � � � � � � � � � � � 29
Components � � � � � � � � � � � � � � � � � � � � � � � � � � � � � � 29
Returning Equipment to Service � � � � � � � � � � � � � � � 30
Enclosure Finish � � � � � � � � � � � � � � � � � � � � � � � � � � � �31
Corrosive Environments � � � � � � � � � � � � � � � � � � � �31
Dielectric Testing� � � � � � � � � � � � � � � � � � � � � � � � 32
Routine Switchgear Testing � � � � � � � � � � � � � � � � � � 32
Cable Testing and Fault Locating � � � � � � � � � � � � � � 33
Fault-Interrupter Testing � � � � � � � � � � � � � � � � � � � � � 34
Resistance Measurement � � � � � � � � � � � � � � � � � � � � 35
Instruction Sheet 682-510
Advertisement
Table of Contents

Related Manuals for S&C Vista


Summary of Contents for S&C Vista
-
Page 1: Table Of Contents
Vault-Mounted, and Undercover™ Styles Outdoor Distribution (15.5 kV through 38 kV) Operation This green leaf icon designates information specifically for Vista Green Underground Distribution Switchgear that uses an eco-friendly insulating gas. Unless otherwise designated, instructions provided apply to all manual Vista switchgear products. -
Page 2: Introduction
4 through 6� The latest version of this publication is available online in PDF format at https://www�sandc�com/en/contact-us/product-literature/� Retain this This instruction sheet is a permanent part of the remote supervisory Vista Underground Distribution Switchgear. Designate a location where users can easily retrieve and refer to this publication. Instruction... -
Page 3: Warranty
Introduction Warranty The warranty and/or obligations described in S&C’s Price Sheet 150, “Standard Conditions of Sale–Immediate Purchasers in the United States,” (or Price Sheet 153, “Standard Conditions of Sale–Immediate Purchasers Outside the United States”), plus any special warranty provisions, as set forth in the applicable product-line specification bulletin, are exclusive. -
Page 4: Safety Information
Understanding Several types of safety-alert messages may appear throughout this instruction sheet and on labels and tags attached to the remote supervisory Vista Underground Distribution Switchgear. Safety-Alert Familiarize yourself with these types of messages and the importance of these various signal words:... -
Page 5: Location Of Safety Labels
Safety Information Location of Safety Labels Pad-mounted enclosure ● Top of switchgear Reorder Information for Safety Labels Location Safety-Alert Message Description Part Number WARNING Keep Out—Hazardous Voltage Inside G-6681 DANGER Hazardous Voltage—Always Consider Circuits and Components Live � � � G-6700 DANGER Never Drill Into Tank—Hazardous Voltage, Contains Pressurized Gas... -
Page 6: Safety Precautions
Safety Precautions DANGER Vista Underground Distribution Switchgear contains high voltage� Failure to observe the precautions below will result in serious injury or death� Some of these precautions may differ from company operating procedures and rules� Where a discrepancy exists, users should follow their company’s operating procedures and rules�... -
Page 7: Components
600-ampere three-phase remotely when an RTU and a communi cation device are circuits. These switches also provide a visible gap when integrated with the remote supervisory Vista motor opera- open and internal grounding for all three phases. When tor and controls. - Page 8 Components Motor operator User-specified communi cation control boards device (optional) Operation selector Operating disk Figure 4� The Open position indication on the motor operator� User-specified RTUs (optional) Figure 5� The low-voltage enclosure� LOCAL/REMOTE switch Battery charger Position- Operation pushbuttons indicating LEDs PUSH-TO-TEST LAMPS button...
- Page 9 Grounded position, and vice versa Figure 7� The termination side and top of switchgear� ● The gas-fill port is field-accessible for SF models� For Vista Green switchgear models, the gas-fill port is designed to prevent field-refilling� S&C Instruction Sheet 682-510...
- Page 10 The Vista switchgear unit is OK to operate. Green/Yellow zone: The Vista switchgear unit may have lost some gas but is still OK to operate. For SF models: The unit should be evaluated to determine whether it needs to be refilled with gas via the field-accessible fill port and repaired accord- ingly.
- Page 11 Components Gauge Needle Fluctuations from Rapid Ambient Temperature Changes When the Vista switchgear tank experiences rapid changes in ambient temperature, the gas-pressure gauge needle may temporarily move to indicate a higher gas pressure when the tank is rapidly cooled or at a lower gas pressure when the tank is rapidly heated.
-
Page 12: Operation
Yellow striped zone, the switch gear can be operated but the tank must be repaired (if necessary) and refilled with gas as soon as possible. Note: If the Vista Green switchgear gas is in the Green-and-Yellow striped zone, the switchgear can be operated but must be serviced. Contact... - Page 13 Operation STEP 2� Remove the electrical-operation mechanical WARNING blocking key from the motor operator. Verify the operation selector is in the far right posi tion. This ALWAYS confirm the position of switches or fault allows operation between Closed and Open posi- WARNING interrupters by VISUALLY OBSERVING blade position�...
- Page 14 Operation In the far left position, the operation selector STEP 4� allows operation between the Open and Grounded positions. See Figure 16. The opera- tion selector in this position prevents inadvertent manual operation directly from the Grounded position to the Closed position. STEP 5�...
- Page 15 Operation STEP 7� When operating from Closed to Open position, the oper ating handle must be rotated all the way to the line, as shown on the label to recharge the mechanism. See Figure 18 on page 14. For the three-pole fault interrupter, the operating handle cannot be removed until the mecha nism is fully charged.
-
Page 16: Locking Out Grounded Position
Operation WARNING ALWAYS make sure the cables con nected to the load- interrupter switch or fault interrupter are de-energized before grounding the switchgear� Failure to fol low this precaution can result in a flashover and equipment damage� STEP 8� If operation is to the Grounded position, rotate the operation selector to the far left and make sure the cables connected to the load-interrupter switch or fault interrupter are de-energized. -
Page 17: Locking In Closed, Open, Or Grounded Position
Operation Locking In Closed, Open, or Grounded Position To lock a motor operator into position, insert a padlock through the operating mechanism and the center hole in the locking collar. See Figures 23 through 25. Operating mechanism Locking collar Figure 23� Locked in the Closed position� Figure 24�... -
Page 18: Electrically Opening, Closing, Or Grounding A Way �18
Operation Electrically Opening, Closing, or Grounding a Way LOCAL/REMOTE switch NOTICE When electrically operating a way using a motor operator more than two times in succession (for example, running multiple operations during a testing sequence), allow a 15-second period between each successive operation�... - Page 19 Operation Make sure the operating handle is removed from STEP 4� the operating disk of the motor operator. See Figure 29. Make sure the electrical-operation mechanical STEP 5� blocking key is set in the motor operator operat- ing disk. See Figure 30. Manual operating handle Figure 29�...
- Page 20 Operation STEP 6� If the operation selector is blocking operation, rotate the operation selector out of the way, as shown in Figure 31. It may be necessary to remove the electri cal-operation mechanical blocking key to move the operation selector. The operation selector prevents inadvertent operation of the motor operator.
- Page 21 Operation STEP 7� Press the PUSH TO TEST LAMPS pushbutton on WARNING each motor operator control board to ensure all of the LEDs are working. See Figure 34. ALWAYS make sure the cables con nected to the load- interrupter switch or fault interrupter are de-energized STEP 8�...
-
Page 22: Motor Operator Decoupling
Operation Motor Operator Decoupling STEP 1� Loosen and remove the bolt from the stop ring located on the operating disk collar. See Figure 35. STEP 2� Lift the motor operator over the operating shaft of the gear. See Figure 36. STEP 3� For submersible applications, do not remove the cable from the motor operator. - Page 23 Operation STEP 4� Reposition the motor operator to one side of the operating shaft. See Figure 38. STEP 5� Refasten the bolt to the stop ring located on the operating disk collar. See Figure 39. Figure 38� Reposition the motor operator� Figure 39�...
-
Page 24: Checking For Voltage Using Optional Voltage
Operation Checking for Voltage Using Optional VOLTAGE Indicator Photocell TEST window TEST button PHASE indicator WARNING Before using a voltage indicator, ALWAYS test for proper operation� If the voltage indi cator is not operating properly, test for volt age using an alternate method� Failure to follow this precaution can result in an injury or equipment damage�... - Page 25 Operation STEP 3� Test the VOLTAGE indicator for proper opera- Test circuitry can be powered by tion as follows: flashlight or bright sun (a) Shine a flashlight approximately 4 inches (102 mm) above the photocell, and simul- taneously cover the TEST button with a gloved finger.
- Page 26 Operation (c) If the dot or any of the flashing light ning The absence of a dot in TEST window indicates the bolts do not appear, make sure the TEST VOLTAGE indicator is not in Test mode� button is completely covered with a gloved finger so no light shines on that photocell and there is ade quate light (provided either by a flashlight or the sun) to power the test...
-
Page 27: Low-Voltage Phasing Using Optional Voltage
Operation Low-Voltage Phasing Using Optional VOLTAGE Indicator with Phasing Phasing Pin 1 Phasing Pin 2 Phasing Pin 3 STEP 1� Clean the surface and phasing pins of the VOLT AGE indicator of dirt and debris. See Figure 47. STEP 2� Test the VOLTAGE indicators for proper opera- tion by following the “Checking for Voltage Using Optional Voltage Indicator”... - Page 28 Operation STEP 4� Determine the phase-to-phase relationships of the two ways to be phased as follows: (a) Remove the test probe of the voltmeter from the switchgear tank. (b) Place one of the test probes on Phasing Pin 1 of the first way and place the other probe on Phasing Pin 1 of the second way.
-
Page 29: Maintenance
Maintenance ★ Components DANGER No maintenance is required for remote supervisory Vista Under ground Distribution Switchgear. However, occa- When access to the bushings or high-voltage sional inspection of the switchgear and exercising of components is required for inspection, service, or the load-interrupter switches and fault interrupters are repairs, always observe the pre cautions below�... -
Page 30: Returning Equipment To Service
Maintenance Returning Equipment to Service When returning the equipment to service, the following procedures should be observed: STEP 1� Make sure the load-interrupter switch and fault- interrupter grounding means are removed. STEP 2� Make certain the load-interrupter switches and fault interrupters are in the cor rect Open or Padlock Closed positions. -
Page 31: Enclosure Finish
Maintenance Enclosure Finish instructions. If not further exposure to a corrosive environ- ment is expected, one treatment may be enough. The responsibility for ensuring that the finish protects the enclosure lies with both the man ufacturer and the user. To remove accumulated contaminants, use a mild deter- Enclosures provided are finished with S&C’s Ultradur II gent and potable water. -
Page 32: Dielectric Testing
Vista switchgear are given in Table 1. These test values are significantly greater WARNING than the normal operating voltage of the switchgear and are near the flashover voltage of the gear. -
Page 33: Cable Testing And Fault Locating
Vista switchgear� If the open end of S&C Instruction Sheet 682-510... -
Page 34: Fault-Interrupter Testing
Dielectric Testing Fault-Interrupter Testing When performing dielectrical tests on Vista switch- gear, the vacuum fault interrupters will not be subject to voltage across the open gap because the disconnect switch will isolate the vacuum interrupter from the test voltage. Because the vacuum interrupter will not be ener-... -
Page 35: Resistance Measurement
STEP 3� DANGER resistance values are: • Less than 500 microohms De-energize the Vista Underground Distribution Switchgear before per forming the resistance • Less than 600 microohms for tie switches measurements described in this procedure� Follow all applicable safety procedures� Failure to de-energize...
Need help?
Do you have a question about the Vista and is the answer not in the manual?
Questions and answers