Advertisement
Quick Links
Advertisement

Related Manuals for Sprout SOSTA


Summary of Contents for Sprout SOSTA
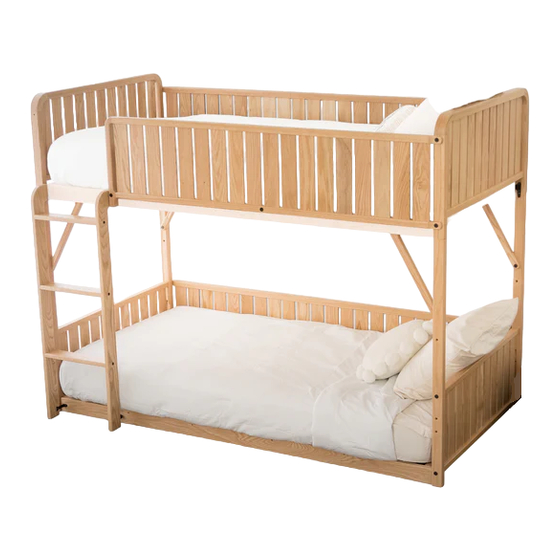
- Page 1 SOSTA BUNK BED ASSEMBLY & USE GUIDE Growing together through every stage...
-
Page 2: We're Here To Help
Ensuring more than just a stylish addition to your space; the Sosta Bunk Bed was meticulously hand-crafted with premium materials to make an heirloom-quality piece that will grow with your family. Made to grow with Crafted from American made your little one... - Page 3 ASSEMBLY VIDEO Enjoy the best assembly experience sprout-kids.com/platform SOSTA BED PLATFORM ASSEMBLY GUIDE PARTS INCLUDED TOOLS Long (2x) Phillips Bit Side REQUIRED (12x) (2x) (2x) Phillips Screw Slat Roll Phillips Power Screwdriver Drill Lay out (2x) Sides and (2x) Ends as shown.
- Page 4 With webbing face up, align the Slat Roll holes with the Screw a Phillips Screw into corner of End and Side Holes in Side as you lay one of the Slat Rolls onto Repeat with each corner. one half of the bed frame. Insert the tips of (2x) Phillips Screws through the Slat Screw the (2x) Phillips Screws...
- Page 5 Repeat steps 10-13 to attach remaining Slat Roll Set the tips of the additional (2x) Phillips Screws through the other Slat Roll holes and screw them into the holes of Side You have completely assembled the platform. If you are left with an extra screw, don’t worry! It was just there in case one got lost.
-
Page 6: Assembly Guide
(2x) Headboard Bracket (4x) (2x) If you already have an assembled Sosta Bed, then rst 1.2” Hex Screw 1.6” Hex Screw remove any sideboards. If installing a headboard for the rst time, skip to Step 5. With the high-powered drills available today, the most Next, remove any headboards. - Page 7 With groove opening face up, set Headboard/Footboard long tab Place Bracket rmly into groove with the on ground, as shown. facing DOWN. Repeat for both sides of the Headboard/Footboard Insert (1x) 1.2” Hex Screw as shown to secure Long tab Bracket .
- Page 8 ASSEMBLY VIDEO Enjoy the best assembly experience sprout-kids.com/fullrail SOSTA BED FULL RAIL ASSEMBLY GUIDE PARTS INCLUDED TOOLS (4x) (2x) 4mm Hex Wrench Full Side Rail 1.6” Hex Screw 2” Hex Screw OPTIONAL Power Phillips Drill Screwdriver With the high-powered drills...
- Page 9 Screw the (2x) 2” Hex Screws into the center holes of Screw (2x) 1.6” Hex Screws through the top holes of and into the top holes of the Head- the Full Side Rail the Full Side Rail board and Footboard. 2”...
- Page 10 ASSEMBLY VIDEO Enjoy the best assembly experience sprout-kids.com/3-4rail SOSTA BED 3/4 RAIL ASSEMBLY GUIDE PARTS INCLUDED TOOLS (2x) (2x) 4mm Hex Wrench 3/4 Side Rail 1.6” Hex Screw 2” Hex Screw OPTIONAL Power Drill With the high-powered drills available today, the most...
- Page 11 Partially screw (2x) 1.6” Hex Screws through the side Partially screw (2x) 2” Hex Screws through the holes of the 3/4 Side Rail and into the side holes of the bottom holes of the 3/4 Side Rail and into the holes of Headboard.
- Page 12 43” BUNK ASSEMBLY GUIDE WOOD PARTS INCLUDED TOOLS 4mm Ball-end 4mm Hex Long Hex Bit Wrench Phillips Bit Platform assembled per Sosta Bed Platform Assembly Guide REQUIRED Full Side Rail Phillips Power Screwdriver Drill (2x) Left Post (2x) Right Post (2x)
- Page 13 With the high-powered drills Insert Post Brackets into lower slot on Right Posts available today, the most Left Posts . Secure with a single 1.2” Hex Screw in the signi cant assembly issue that top hole, as shown. can occur is rounding-out hex shape in the head of a hex screw.
- Page 14 Insert Post Brackets into bed frame slots. Ensure posts are Flip frame onto its side, then insert 1.6” Hex Screw ush against bedframe before proceeding (using a rubber secure end frame to bed frame. Repeat for the other (3) mallet if necessary). Repeat with other side. corners.
- Page 15 With help from another adult, lift up Top Bunk, and place Once each corner is correctly set over its pin, push down over 4” Pins on Posts. until ush. NOTE: If brackets don’t slide into slot DO NOT NOTE: on top of post, then carefully insert your ngers or hands screwdriver and rotate against pin to between the posts!
- Page 16 Repeat for the other Ladder Side. Ensure the ladder sides Secure L-Brackets to top of ladder using Phillips Screw, are oriented with the large portion at the same end. as shown. Secure (2) Dovetail Brackets to base of Ladder Sides using Phillips Screw , as shown.
- Page 17 Attach Dovetail brackets to bottom platform with Insert Left Diagonal Brace into hole on upper platform Phillips Screws , as shown. Phillips screws will go in the orientation shown. Insert (2) 1.6” Hex Screws through hole in Dovetail bracket into pilot hole on side of secure.
- Page 18 Remove 1.2” Hex Screw holding bracket into post. Carefully remove (4) 1.6” Hex Screws holding brackets Then carefully push bunk post away from bracket, into platform. removing bracket from slot. Repeat for other 3 posts. Using mallet or hammer, remove (4) brackets from With help from another adult, lift up platform.
- Page 19 push the tip While still carefully supporting the platform, Carefully re-install (4) 1.6” Hex Screws removed on of the Bracket l into its slot, then insert 1.2” Hex Screw Step 21, securing the bracket to the platform. through Bracket into Post to secure. Repeat with the other 3 Posts.
-
Page 20: Safety Information
Safety Information To ensure you have an enjoyable, safe Sosta Bunk Bed experience, please thoroughly read and follow the information provided below. Sprout is not liable for any injury or damage caused by mis-use or incorrect assembly. Ma ress Guidelines for Safe Use •...
Need help?
Do you have a question about the SOSTA and is the answer not in the manual?
Questions and answers