Table of Contents
Advertisement
Quick Links
TABLE OF CONTENTS
INTRODUCTION..............................2
Parts Check List:.............................3
HANDSET BATTERIES...................6
GETTING STARTED........................8
Setting Up Your VTech 900i ...........8
WALL MOUNTING...........................10
QUICK REFERENCE GUIDE..........11
INITIAL POWER-UP......................11
Answering Device (ITAD)..............12
Making Calls...................................13
Disconnecting..................................13
To Put A Call On Hold..................13
The Mute Feature...........................13
Changing Channels........................14
Temporary Tone.............................14
Programming the Ringer Type......14
Turning Off The Ringer..................15
Checking the Ringer.......................15
Memory Dialing..............................15
Storing Pauses in Memory............16
Using Redial...................................16
The Page Feature..........................17
Tone Definitions.............................17
DEVICE (ITAD) OPERATION................18
LCD DISPLAY................................18
LCD Display lcons..........................18
LCD Display Digits.........................19
BASE KEYPAD FUNCTIONS......19
Main Function Keys........................19
Message Playback Keys...............22
INITIAL SET-UP............................23
Ring Type Programmi...................23
Security Code Programming..........23
Time and Day Setup...................24
Mailbox Programming..................24
Selecting the Announcement........25
Recording the Announcement......25
Leaving a Message.....................26
Recording a Memo......................26
Listening to Messages...................27
REMOTE OPERATION OF ITAD......29
ACTIVATING REMOTE OPERATION..29
cordless handset...........................29
different telephone line.................29
VOICE PROMPTS........................30
Listening to Messages.................31
Changing the Announcement......31
Recording a Memo......................31
REMOTE COMMANDS.................32
MAINTENANCE...............................35
OUT OF RANGE INDICATION.......36
IN CASE OF DIFFICULTY..............37
WARRANTY STATEMENT..............39
FCC AND IC REGULATIONS........40
TECHNICAL SPECIFICATIONS.....43
1
Advertisement
Table of Contents

Related Manuals for VTech 900i


Summary of Contents for VTech 900i
-
Page 1: Table Of Contents
Parts Check List:...3 IMPORTANT SAFETY INSTRUCTIONS...4 HANDSET BATTERIES...6 Charging the Handset Batteries...6 Replacing The Handset Batteries...7 GETTING STARTED...8 Setting Up Your VTech 900i ...8 WALL MOUNTING...10 QUICK REFERENCE GUIDE...11 INITIAL POWER-UP...11 VTech 900i Cordless Telephone...11 VTech 900i Integrated Telephone Answering Device (ITAD)...12 CORDLESS PHONE OPERATION...13... -
Page 2: Introduction
• 4 i n d i v i d u a l m a i l b o x e s f o r personalized message storage and retrieval. This manual is designed to familiarize you with the VTech 900i . To get the most use out of your VTech 900i , we strongly recommend you read the manual before using your phone. -
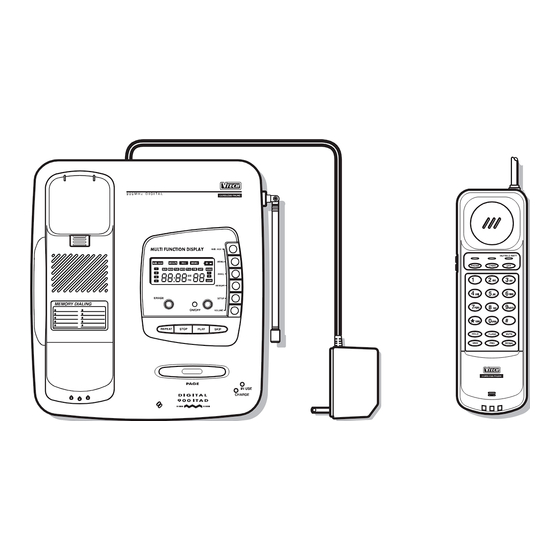
Page 3: Parts Check List
INTRODUCTION Parts Check List: 1. Handset 2. Base unit and AC adapter 3. Telephone line cord 4. Molded Battery pack 5. Wall mounting screws and caps 6. Wall mounting bracket... -
Page 4: Important Safety Instructions
IMPORTANT SAFETY INSTRUCTIONS When using your telephone equipment, basic safety precautions should always be followed to reduce the risk of fire, electric shock and injury to persons, including the following: 1. R e a d a n d u n d e r s t a n d a l l instructions. -
Page 5: Save These Instructions
13. Avoid using a telephone (other than a cordless type) during an electrical storm. There may be a remote risk of electric shock from lighting. 14. Do not use the telephone to report a gas leak in the vicinity of the leak. -
Page 6: Handset Batteries
Optional Accessory Battery and Charger Your 900i uses a molded battery pack which may need to be replaced at some point in the future. VTech offers an accessory battery, as well as a battery and charger (model# TBC-900) which is compatible with your 900i. -
Page 7: Replacing The Handset Batteries
CAUTION: To Reduce the Risk of Fire or Injury to Persons, Read and Follow the Instructions 1. Use only Vtech battery, part number: 80-4016-00-00. 2. Do not open or mutilate the battery. Released electrolyte is corrosive and may cause damage to the eyes or skin. -
Page 8: Getting Started
2. Install optional 9V back-up battery i n c o m p a r t m e n t l o c a t e d o n underside of 900i base unit. This battery retains memory in the event o f a p o w e r o u t a g e . - Page 9 If not, see IN CASE OF DIFFICULTY. CAUTION: 1. Never install telephone wiring during a lightning storm. 2. Never install telephone jacks in wet locations unless the jack is specifically designed for wet locations. 3. Never touch uninsulated telephone...
-
Page 10: Wall Mounting
6. Connect the telephone cord. The telephone line cord has a snap-in plug at each end. Insert one of the plugs into the jack on the bottom of the base. Insert the other end of the plug into the wall jack. -
Page 11: Quick Reference Guide
• If you experience noise or interference during a conversation, press CHAN to switch to a clear channel. FLASH • You can use your VTech 900i cordless telephone with services such as Call Waiting and Call Forwarding. Instead of pressing the switch-hook, press FLASH on the handset. -
Page 12: Vtech 900I Integrated Telephone
Press the (up) or keys to increase or decrease the volume. VTech 900i Integrated Telephone Answering Device (ITAD) SETTING THE RING TYPE • Press and hold SETUP until you hear a beep. -
Page 14: Cordless Phone Operation
When the call is on HOLD or if you are in STANDBY mode, the CHAN key is inactive. Temporary Tone If you have rotary (dial-pulse) telephone service, (TONE/PULSE switch is set to PULSE), this feature allows you to enter special codes and tones to operate... -
Page 15: Turning Off The Ringer
• Press OFF to exit The phone will ring once to show the ringer selected. Memory Dialing The VTech 900i can store up to 10 different phone numbers that you can dial just by pressing MEM and one of the number keys. -
Page 16: To Dial A Number From Memory
CORDLESS PHONE OPERATION If you hear a long buzzing tone, press OFF, then PRG, and store the number again. Follow the steps for each number you want to store. Assign each phone number to a different key (0..9). To Dial a Number From Memory 1. -
Page 17: Storing A Redial Number In Memory Dial
CORDLESS PHONE OPERATION Storing a Redial Number in Memory Dial To store the last number you dialed as a regular Speed Dial number, press PRG, a number key (0..9), REDIAL, MEM. The Page Feature From the base unit, press PAGE to signal the person at the handset. -
Page 18: Integrated Telephone Answering Device (Itad) Operation
INTEGRATED TELEPHONE ANSWERING DEVICE (ITAD) OPERATION LCD DISPLAY LCD Display Icons MAILBOX • The MAILBOX icon and the Mailbox Number icons remain on steadily if the ITAD is set-up for 1 or more mailboxes. Otherwise they remain off for zero mailboxes. See Mailbox programming. -
Page 19: Lcd Display Digits
INTEGRATED TELEPHONE ANSWERING DEVICE (ITAD) OPERATION LCD Display Digits CLOCK/TIME STAMP DISPLAY • The four digits on the left of the display, including the colon and the am/pm icons, display current time of day when the ITAD is not in use. - Page 20 10 successive rings on an incoming call. • The ITAD is activated whenever the cordless handset is used to access the 900i by pressing PHONE, *, # (see Activating Remote Operation). MAILBOX • The ITAD stores the messages into different mailboxes for retrieval by the corresponding mailbox user.
- Page 21 INTEGRATED TELEPHONE ANSWERING DEVICE (ITAD) OPERATION • Press and hold ANNC for 2 seconds to begin announcement recording (see Recording the Announce- ment). MEMORY • The MEMORY key is used to check the amount of memory still available for new messages/memos.
-
Page 22: Message Playback Keys
INTEGRATED TELEPHONE ANSWERING DEVICE (ITAD) OPERATION Message Playback Keys ERASE • The ERASE key is used to delete old messages (previously reviewed) from the ITAD. • Pressing ERASE during message playback deletes that message. • If this key is pressed and held for more... -
Page 23: Initial Set-Up
INTEGRATED TELEPHONE ANSWERING DEVICE (ITAD) OPERATION PLAY • The PLAY key is used to begin playback of all messages/memos (new and old) in the current mailbox selection (the default mailbox selection is All ). • This key is also used to play the... -
Page 24: Time And Day Setup
INTEGRATED TELEPHONE ANSWERING DEVICE (ITAD) OPERATION To change security code: 1. Press and hold SETUP until it beeps. 2. Press SETUP briefly. The LCD will display "SC" (Security Code) and the current security code setting. 3. Use REPEAT and SKIP to scroll to desired code, between 00 and 99. -
Page 26: Leaving A Message
INTEGRATED TELEPHONE ANSWERING DEVICE (ITAD) OPERATION 3 . Speak into the microphone on the base. Announcement can be no more than 2 minutes in length. More than 5 seconds of silence w i l l a u t o m a t i c a l l y recording. -
Page 27: Listening To Messages
INTEGRATED TELEPHONE ANSWERING DEVICE (ITAD) OPERATION will flash, and the clock display will start incrementing from 0 : 0 0 . 3 . Speak into the base microphone to record the memo. 4. Press the MEMO key again or press the STOP key to stop the recording. - Page 28 INTEGRATED TELEPHONE ANSWERING DEVICE (ITAD) OPERATION Message/memo playback begins with a voice prompt indicating the total number of messages present in the current mailbox selection. It then proceeds to play the messages; the most recently recorded messages are heard first.
-
Page 30: Voice Prompts
ITAD will automatically terminate remote access mode from a different telephone line. VOICE PROMPTS Upon entering the remote access mode you will be greeted with a series of voice prompts. -
Page 31: Listening To Messages
REMOTE OPERATION OF ITAD The more you use the ITAD in remote operation, the more familiar you will become with the various functions on the numbered keypad. Soon you may be able to access all functions with little or no help from the voice prompts! Listening to Messages 1. -
Page 32: Remote Commands
REMOTE OPERATION OF ITAD REMOTE COMMANDS You can access almost all of the ITAD functions in remote mode. By pressing keys on the numbered keypad you can access these functions. Below is a diagram of the numbered keypad with the related commands labeled. A description of each key follows. - Page 33 (This only occurs if you are in remote access mode on a different telephone line). • During memo or announcement recording, press 4 to stop the recording.
- Page 34 REMOTE OPERATION OF ITAD 8 SELECT ANNOUNCEMENT • Press 8 to toggle between available announcements. • A f t e r e a c h p r e s s , y o u h e a r "Announcement 1", "Announcement 2", or "Outgoing message".
-
Page 35: Maintenance
T A K I N G C A R E O F Y O U R TELEPHONE. Your VTech 900i cordless telephone contains sophisticated electronic parts so it must be treated with care. Avoid rough treatment Place the handset down gently. Save... -
Page 36: Out Of Range Indication
This is done automatically. Since the VTech 900i is a fully digital phone it does not suffer from noise associated with regular cordless phones. At times you may experience occasional “drop outs”... -
Page 37: In Case Of Difficulty
THE PHONE DOESN’T WORK AT ALL. • Make sure the power cord is plugged • Make sure the telephone line cord is plugged firmly into the base unit and the telephone wall jack. • Make sure the batteries are properly charged. - Page 38 WHEN YOU RECEIVE A CALL. • Make sure you have the handset ringer activated. • Make sure the telephone line cord is plugged firmly into the base unit and the telephone jack. Make sure the power cord is plugged in.
-
Page 39: Warranty Statement
• Include payment for any service or repair not covered by warranty, as determined by VTECH Communica- tions or VTECH Electronics Canada Ltd. • In the US, ship the unit via UPS Insured, or equivalent to:... -
Page 40: Fcc And Ic Regulations
Your VTech 900i is designed to operate at the maximum power allowed by the FCC and IC. This means your handset and base unit can communicate only... - Page 41 FCC. For repair procedures, follow the instructions outlined under the VTECH Limited Warranty. This equipment may not be used on coin service lines provided by the phone company or on party lines.
- Page 42 The Load Number (LN) assigned to this device denotes the percentage of the total load to be connected to a telephone loop which is used by the device to prevent overloading. The termination on a loop may consist of any...
-
Page 43: Technical Specifications
TECHNICAL SPECIFICATIONS FREQUENCY CONTROL C r y s t a l C o n t r o l l e d D u a l P L L Synthesizer TRANSMIT FREQUENCY Handset : 925.05 MHz to 927.75 MHz (All ten channels within this range) Base : 902.3 MHz to 905.0 MHz... -
Page 44: Wall Mounting Template
Tropez 900i Cordless Telephone Wall Mounting Template Use this template when wall mounting your base unit. To mark the positions of the mounting screws, hold this template against the wall, and press a pencil or pen point through the center of each crossmark. - Page 45 VTECH COMMUNICATIONS LTD. Distributed in the U.S.A. by VTECH Communications, 8770 SW Nimbus Avenue / Beaverton, Oregon, 97005 Distributed in Canada by VTECH Electronics Canada Ltd., 200-7671 Alderbridge Way, Richmond, B.C. Copyright 1996 for VTECH COMMUNICATIONS LTD. 91-4010-12-00 ISSUE 0...
Need help?
Do you have a question about the 900i and is the answer not in the manual?
Questions and answers