Advertisement
Quick Links
Quick Start Guide
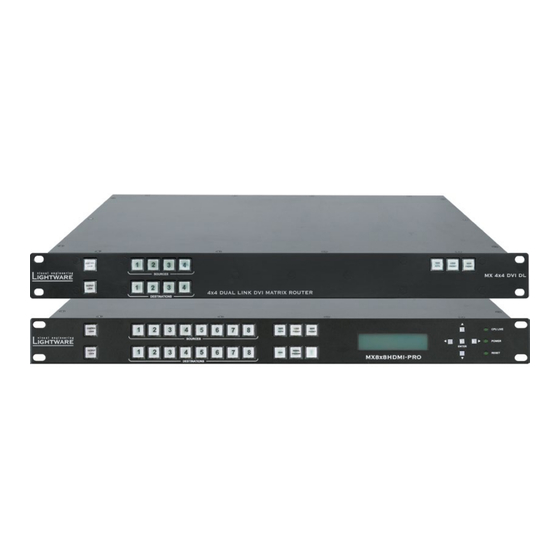
MX4x4DVI, 4x4DVI-DL, 6x6DVI-DL, 8x8DVI-DL
MX8x4DVI-Pro, 8x8DVI-Pro, 8x8DVI-HDCP-Pro, 8x8HDMI-Pro
MX9x9DVI-Slim, 12x12DVI-Slim, 16x16DVI-Slim
MX9x9DVI-Plus, 12x12DVI-Plus, 16x16DVI-Plus
Important Safety Instructions
Please read the supplied safety instruction document before using the product and keep it
available for future reference.
Introduction
Lightware's 4x4 to 16x16 I/O sized standalone matrix switchers are perfect for dynamically
changing environments. The switchers handle DVI-D, HDMI signals with HDCP support and
can be controlled either by RS-232 port, TCP/IP LAN connection, or by the built-in website -
depending on the capabilities of the appliance. Crosspoint switching is done instantly without
frame delay or frame latency.
Box Contents
MX standalone matrix
IEC power cable
RS-232 straight cable
Safety and warranty info,
Power supply unit, power
Quick Start Guide
cable with Neutrik plugs *
* The external PSU and the cable is only available for purchase for the Slim matrix switchers,
as a separate accessory. For the details, please contact sales@lightware.com.
Mounting with Front Rack Ears
The front rack ears allow mounting the device as a standard rack unit installation.
1
2
3
4
5
6
7
8
C C O O N N T T R R O O L L
T T A A K K E E
T T A A K K E E
L L O O A A D D
L L O O A A D D
S S A A V V E E
S S A A V V E E
L L O O C C K K
A A U U T T O O
A A U U T T O O
P P R R E E S S E E T T
P P R R E E S S E E T T
P P R R E E S S E E T T
P P R R E E S S E E T T
192.168.254.254
P10001 09220235
1
2
3
4
5
6
7
8
O O U U T T P P U U T T
SIGNAL
SIGNAL
SIGNAL
L L O O C C K K
EDID
EDID
EDID
PRESENT
PRESENT
PRESENT
Ventilation
To ensure the correct ventilation and avoid overheating let enough free space
around the appliance. Do not cover the appliance, let the ventilation holes free on both
sides.
Front View
1
2
4
3
1
2
3
4
Rear View
1
3
5
2
4
6
5
3
1
7
2
4
6
Connecting Steps (MX8x8-HDMI-Pro)
Power Amplifier
Touch panel
Ethernet
Audio
RS-232
CATx
C C O O N N T T R R O O L L
1
2
3
4
5
6
7
8
T T A A K K E E
T T A A K K E E
L L O O A A D D
L L O O A A D D
S S A A V V E E
S S A A V V E E
L L O O C C K K
A A U U T T O O
A A U U T T O O
P P R R E E S S E E T T
P P R R E E S S E E T T
P P R R E E S S E E T T
P P R R E E S S E E T T
192.168.254.254
P10001 09220235
O O U U T T P P U U T T
1
2
3
4
5
6
7
8
SIGNAL
SIGNAL
SIGNAL
L L O O C C K K
EDID
EDID
EDID
PRESENT
PRESENT
PRESENT
HDMI / DVI
HDMI / DVI
Power
HDTV
PC
5
6
9
q
w
7 8
5
6
e
r
Connect the HDMI/DVI cable(s) between the source(s) to the input port(s)
of the matrix.
Connect the HDMI/DVI cable(s) between the sink(s) and the output port(s)
of the matrix.
Optionally for S/PDIF audio extension: connect the audio cable(s) between
Audio
the audio device (e.g. power amplifier) and the S/PDIF output port(s) or the
matrix. *
RS-232
Optionally for serial extension: connect a controller device (e.g. touch panel)
to the RS-232 port.
Optionally connect the matrix to a LAN in order to control the device.
CATx
Firstly connect the power cable to the AC input connector on the matrix, then
Power
to the AC power socket.
* Only MX8x8HDMI-PRO model contains S/PDIF audio output ports.
Front View Legend
Output lock
Locks and protects one or more outputs.
1
Control lock
Disables or enables front panel operations. Red light means
2
the switching and function buttons are disabled.
Destinations
Buttons to select an output or to see the state of an output.
3
Sources
Buttons to select an input, to select a preset number, or to
4
view the state of the selected input port.
Take button
Switching between Take and Autotake working modes;
5
keep the button pressed for 3 seconds to toggle the modes.
6
Preset buttons
Performing preset operations (Load and Save).
EDID button
The EDID mode can be (de)activated by the button. The
7
illuminated button shows that the mode is active.
8
Signal present
This Signal present mode can be (de)activated by the
button. The illuminated button shows that the mode is active.
Display
2x16 character LCD display for menu operations.
9
q
Menu navigation
Up, down, left, right and enter buttons.
Status LEDs
Power LED indicates that the unit is powered on. CPU LIVE
w
blinking LED indicates normal operation.
e
Reset button
Reboots the matrix; the same as switching it off and on again.
Only on MX8x8HDMI-Pro and -DVI-HDCP-Pro switchers.
On/Off switch
r
The matrix can be switched on/off by the switch.
Rear View Legend
AC connector
Standard IEC connector accepting 100-240 V, 50 or 60 Hz.
1
2
Fuse
Replace with F3.15A type only when necessary. In the case
of DVI-DL series use an F1A fuse.
RS-232 port
9-pole D-sub female connector for a standard RS-232 port.
3
LAN
Standard RJ45 connector. This port can be connected to a
4
computer directly or to LAN via switch/router.
Input ports
Standard DVI-I or HDMI connectors for DVI-D or HDMI
5
input signals.
Output ports
Standard DVI-D or HDMI connectors for DVI-D or HDMI
6
signals.
Equipotential
Plug connector for potential equalization. Only in case of
7
connector
Plus and Slim matrix switchers.
8
Reset button
8
Reboots the matrix; the same as switching it off and on again.
Only in the case of Slim and Plus matrix switchers.
Further information on the device is available at www.lightware.com.
The User's Manual is also available via the QR code below:
Contact Us
sales@lightware.com
+36 1 255 3800
support@lightware.com
+36 1 255 3810
Lightware Visual Engineering PLC.
Budapest, Hungary
Doc. ver.: 1.3
19210046
Advertisement

Subscribe to Our Youtube Channel
Related Manuals for Lightware 4x4DVI-DL


Summary of Contents for Lightware 4x4DVI-DL
- Page 1 Replace with F3.15A type only when necessary. In the case Introduction of DVI-DL series use an F1A fuse. Lightware’s 4x4 to 16x16 I/O sized standalone matrix switchers are perfect for dynamically RS-232 port 9-pole D-sub female connector for a standard RS-232 port.
- Page 2 Query button of the connected COM port to list the device, select it then press Connect. The with the Lightware Device Controller software. If this is not possible for some reason, the IP factory default RS-232 port settings are the followings: address can be reset to factory default (192.168.254.254) with the front panel buttons.
Need help?
Do you have a question about the 4x4DVI-DL and is the answer not in the manual?
Questions and answers