Advertisement
Table of Contents
Keithley Instruments
28775 Aurora Road
Cleveland, Ohio 44139
1-800-833-9200
tek.com/keithley
Introduction
The AFG31000-RMK Fixed Rack-Mount Kit contains all of the hardware needed to install an AFG31000
Arbitrary Function Generator in a standard 19-inch equipment rack. The instrument occupies 5U of space when
installed.
071368001 January 2021
Model AFG31000-RMK Rack-Mount Kit
Assembly and mounting instructions
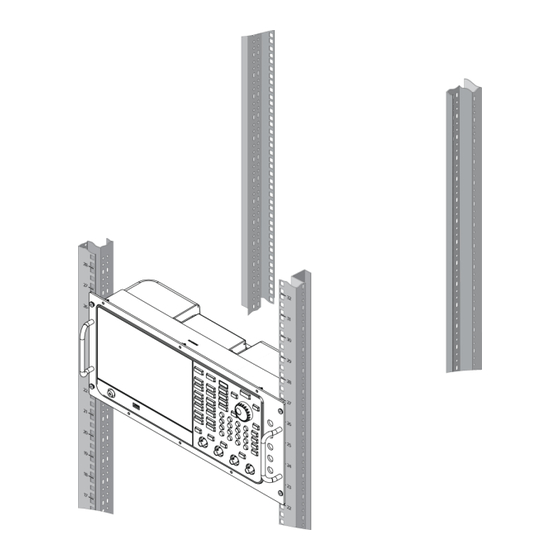
Figure 1: Typical installation
*P071368001*
1
Advertisement
Table of Contents

Related Manuals for Tektronix KEITHLEY AFG31000-RMK


Summary of Contents for Tektronix KEITHLEY AFG31000-RMK
- Page 1 Model AFG31000-RMK Rack-Mount Kit Keithley Instruments Assembly and mounting instructions 28775 Aurora Road Cleveland, Ohio 44139 1-800-833-9200 tek.com/keithley Introduction The AFG31000-RMK Fixed Rack-Mount Kit contains all of the hardware needed to install an AFG31000 Arbitrary Function Generator in a standard 19-inch equipment rack. The instrument occupies 5U of space when installed.
-
Page 2: Tools Required
Model AFG31000-RMK Rack-Mount Kit Assembly and mounting instructions Tools required ▪ Medium (#2) Phillips screwdriver ▪ 3/8-inch wrench ▪ Flat-bladed screwdriver or cage-nut installation tool Parts list The following figure shows the hardware that is supplied with this kit. The table following the figure lists the hardware, part numbers, and quantity. -
Page 3: Installation
Model AFG31000-RMK Rack-Mount Kit Assembly and mounting instructions Installation To install an instrument in the rack: 1. Determine where in the rack to mount the instrument. 2. Install cage nuts on each of the front rack rails as shown in the following figure. The clips must be 4U apart. Figure 3: Install the cage nuts on the front rails 071368001 January 2021... - Page 4 Model AFG31000-RMK Rack-Mount Kit Assembly and mounting instructions ® 3. Remove the handle from the instrument. A TORX screwdriver is required. Figure 4: AFG31000-RMK handle removal 4. Install the top bracket using the provided screws and the holes that were being used by the handle. Leave the screws slightly loose until the rest of the kit has been installed.
- Page 5 Model AFG31000-RMK Rack-Mount Kit Assembly and mounting instructions 5. Install the bottom bracket using the provided screws and the predrilled holes in the instrument. Figure 6: AFG31000-RMK bottom bracket installation 071368001 January 2021...
- Page 6 Model AFG31000-RMK Rack-Mount Kit Assembly and mounting instructions 6. Attach the handles to the front-panel cover plate. 7. Attach the front panel to the top and bottom brackets. Figure 7: AFG31000-RMK front bracket installation Turn off instrument power and unplug all cables before installing an instrument in a rack. Failure to remove power before installation may cause personal injury or death from electrical shock.
- Page 7 Model AFG31000-RMK Rack-Mount Kit Assembly and mounting instructions 9. Secure the instrument with the included screws that mate with the cage nuts on the front rails. Figure 8: AFG31000-RMK rack installation To prevent damaging heat build-up and ensure specified performance, make sure there is adequate ventilation and air flow around the instrument for cooling.
- Page 8 Model AFG31000-RMK Rack-Mount Kit Assembly and mounting instructions Hole plugs If you will not use the front-panel bracket mounting connector D-holes, install the provided hole plugs. See the following graphic. Figure 9: Installing hole plugs in panel mount 071368001 January 2021...
-
Page 9: Safety Precautions
Safety precautions The following safety precautions should be observed before using this product and any associated instrumentation. Although some instruments and accessories would normally be used with nonhazardous voltages, there are situations where hazardous conditions may be present. This product is intended for use by personnel who recognize shock hazards and are familiar with the safety precautions required to avoid possible injury. - Page 10 The CAUTION heading in the user documentation explains hazards that could damage the instrument. Such damage may invalidate the warranty. The CAUTION heading with the symbol in the user documentation explains hazards that could result in moderate or minor injury or damage the instrument. Always read the associated information very carefully before performing the indicated procedure.
Need help?
Do you have a question about the KEITHLEY AFG31000-RMK and is the answer not in the manual?
Questions and answers