Tektronix DPO2000 series Instructions Manual
Rack mount kit for oscilloscopes
Hide thumbs
Also See for DPO2000 series:
- User manual (272 pages) ,
- Service manual (67 pages) ,
- Installation manual (31 pages)
Table of Contents
Advertisement
Quick Links
DPO2000 and MSO2000 Series Rackmount Kit
xx
Instructions
ZZZ
Warning
The servicing instructions are for use by qualified personnel
only. To avoid personal injury, do not perform any servicing
unless you are qualified to do so. Refer to all safety summaries
prior to performing service.
www.tektronix.com
*P071233200*
071-2332-00
Advertisement
Table of Contents

Related Manuals for Tektronix DPO2000 series


Summary of Contents for Tektronix DPO2000 series
- Page 1 Instructions Warning The servicing instructions are for use by qualified personnel only. To avoid personal injury, do not perform any servicing unless you are qualified to do so. Refer to all safety summaries prior to performing service. www.tektronix.com *P071233200* 071-2332-00...
- Page 2 Copyright © Tektronix. All rights reserved. Licensed software products are owned by Tektronix or its subsidiaries or suppliers, and are protected by national copyright laws and international treaty provisions. Tektronix products are covered by U.S. and foreign patents, issued and pending. Information in this publication supersedes that in all previously published material.
-
Page 3: Table Of Contents
Table of Contents Service Safety Summary................... Kit Description...................... Products......................Kit Parts List ....................Clearance Requirements ..................Installation Instructions .................... Minimum Tool and Equipment List ................. Install......................Rackmount the Rack-Adapted Instrument without rack slides ........... Rackmount the Rack-Adapted Instrument using rack slides ..........RMD2000 Rackmount Kit... -
Page 4: Service Safety Summary
Service Safety Summary Service Safety Summary Only qualified personnel should perform service procedures. Read this Service Safety Summary and the General Safety Summary before performing any service procedures. Do Not Service Alone. Do not perform internal service or adjustments of this product unless another person capable of rendering first aid and resuscitation is present. -
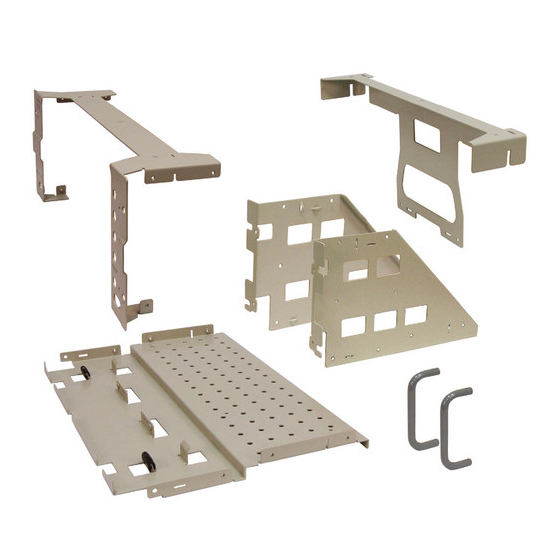
Page 5: Kit Description
This introduction describes the rackmount kit for your standard bench-top instrument. The rackmount kit is a collection of parts that, once installed, configure the instrument for mounting into a standard 19-inch equipment rack. Products DPO2000 Series All serial numbers MSO2000 Series All serial numbers Kit Parts List NOTE. - Page 6 Kit Description Table 1: Kit parts list, (cont.) Circuit/figure number Quantity Part number Description Not shown 4 each 211-0538-xx SCREW, MACHINE; 6-32 X 0.312, FLH, 100 DEG, 410 SS PASSIVATED, Not shown 4 each 211-1218-xx M6 X 16MM PHIL OVAL HEAD, 410 SS, PASSIVATE Not shown 4 each 211-1219-xx...
-
Page 7: Clearance Requirements
Kit Description Table 2: Optional accessories (must be ordered separately) Circuit/figure number Quantity Part number Description 1 pair 351-1095-00 SLIDE ASSY; PAIR, W/STD HARDWARE KIT AND REAR BRACKET Figure 2: Optional accessories NOTE. The rack slides are not part of this kit. They are optional, and must be ordered separately. - Page 8 Kit Description Figure 3: Instrument with rack adapter installed RMD2000 Rackmount Kit...
-
Page 9: Installation Instructions
If you need further details for disassembling or reassembling the product, refer to the appropriate product manual. Contact your nearest Tektronix Service Center or Tektronix Factory Service for installation assistance. WARNING. To prevent the rackmounted instrument from tipping forward onto the operator, install the instrument so that the operator will be able to access all of its rear-panel connectors without pushing down on the instrument. -
Page 10: Install
Installation Instructions Install Equipment Required: Torque driver with #2 Pozidriv tip. This section describes mounting the rackmount adapter parts to the instrument. Install the left and right side brackets onto the bottom bracket using three of the 6-32 x 0.312 inch pan head Pozidriv screws on each side. - Page 11 Installation Instructions Place the oscilloscope handle in the straight-back position and install the top bracket, aligning the cutouts in the bracket as shown. You will have to pull the bottom of the bracket out a little, to clear the rear panel connectors, as you slide the bracket into position.
- Page 12 Installation Instructions Attach the front panel bracket to the sides with three of the 6-32 x 0.312 inch pan head Pozidriv screws on each side. Tighten these screws to 8 in-lb. Attach the front panel bracket to the top bracket with three of the 6-32 X 0.312 flat head Pozidriv screws.
-
Page 13: Rackmount The Rack-Adapted Instrument Without Rack Slides
Installation Instructions NOTE. The bottom bracket has holes to facilitate mounting optional accessories. Optional accessories may be mounted with screws, or you can use nylon straps to secure them. These screws and nylon straps are not included in the kit. Rackmount the Rack-Adapted Instrument without rack slides If you did not order the optional rackmount slides, you may install the rack-adapted instrument into an equipment rack by following this procedure:... -
Page 14: Rackmount The Rack-Adapted Instrument Using Rack Slides
Installation Instructions Standard equipment racks utilize one of two mounting hole spacing methods. Both methods use mounting holes spaced 0.5 inch apart, separated by a 1.25 inch gap. One method (A) places an additional mounting hole in the middle of the 1.25 inch gap (at 0.625, or 5/8, inch);... - Page 15 Installation Instructions WARNING. To prevent the rackmounted instrument from tipping forward onto the operator, install the instrument so that the operator will be able to access all of its rear devices without pushing down on the instrument. Verify that the rack does not become unstable with the instrument fully extended. Do not leave the instrument extended when finished accessing the rear panel.
- Page 16 Installation Instructions WARNING. To ensure that the rackmount track locks, make sure the track button latches are oriented correctly: the right-side latch is located toward the bottom of the rackmount panel and the left-side latch is located toward the top of the rackmount panel. Assemble the slide-out track: Measure the distance between the front and rear rail of the equipment rack.
- Page 17 Installation Instructions Mount the slide-out track assemblies: Select the mounting position in the rack: Select two 0.5 inch-spaced holes in the front rail, and verify that there is a 3.25 inch clearance above and below those mounting holes. RMD2000 Rackmount Kit...
- Page 18 Installation Instructions 8. Select the mounting method according to the rack type: To mount the slide-out tracks with their front and rear flanges outside of the front and rear rails, use the mounting method A. (See Figure 4.) Add a bar nut to the installation only if the rails have untapped holes.
- Page 19 Installation Instructions Mount the instrument in the rack: WARNING. To prevent the instrument from tipping or falling onto the installers, two or more people should install this instrument into the rack cabinet. After completing the installation procedure, the installers should verify that the instrument and rack cabinet will not tip forward while the instrument is in the extended position.
- Page 20 Installation Instructions Finishing the Installation It is recommended that you secure the instrument to the rack. WARNING. To prevent the rackmounted instrument from sliding forward and causing personal injury or instrument damage, always secure the instrument to the rack if the rack is moved (for example, if the rack is repositioned or relocated to another room).
Need help?
Do you have a question about the DPO2000 series and is the answer not in the manual?
Questions and answers