Table of Contents
Advertisement
Advertisement
Table of Contents

Related Manuals for PerkinElmer chemagic 360-D


Summary of Contents for PerkinElmer chemagic 360-D
- Page 1 360-D 2024-0010 INSTRUMENT MANUAL...
-
Page 3: Table Of Contents
Logging into the system..............................8 Login and Rod Head Selection............................9 The main program window............................9 Loading and unloading the chemagic 360-D instrument with racks and/or consumables........10 Switching off procedure...............................11 Starting a protocol with the chemagic 12 Rod Head......12 Running a protocol with the chemagic Dispenser installed..................12 Running a protocol without the chemagic Dispenser installed.................14... - Page 4 Changing the chemagic Rod Heads..........................41 End-user maintenance and controls........................... 41 Checking and priming of the dispenser manifolds....................42 Cleaning and disinfection of the chemagic 360-D instrument.................. 42 Cleaning of the chemagic Rod Heads......................... 42 Cleaning of the drop cover............................43 Moving the instrument..............................
-
Page 5: General Information
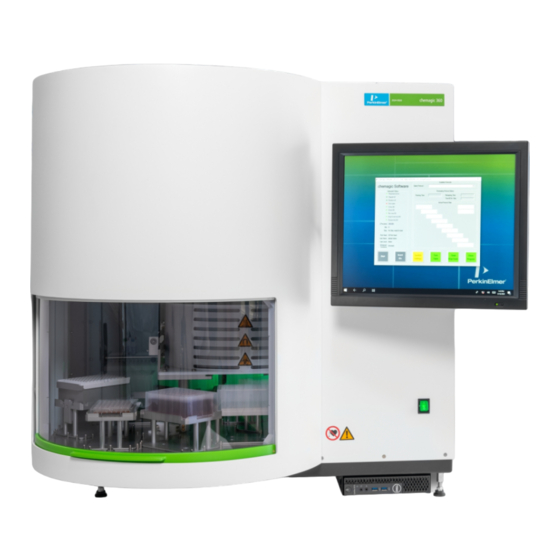
360-D General information General information The chemagic 360-D system can be used with broad variety of sample material and sample volumes. Figure 1: Overview of the chemagic 360-D instrument and its main components 1. panel with monitor and power switch 2. -
Page 6: Intended Purpose
General information Intended purpose The chemagic 360-D is an IVD instrument intended to be used for DNA and RNA extraction. The instrument is automated and intended to be used by trained laboratory personnel. The instrument can be used in combination with an IVD assay if the instrument is listed as a compatible device in the instructions for use of that particular assay. -
Page 7: Principles Of Operation
360-D General information Symbol Description Serial number Consult instructions for use Certificate from SGS testing laboratory This way up Fragile, handle with care Keep dry WEEE, follow local guidelines when disposing of the instrument Principles of operation The instrument is used in combination with various chemagic Kits delivering high yield of pure DNA/RNA. Protocols can be added to the system by loading the appropriate protocol in to the PC controlling the instrument. -
Page 8: Safety Information
Caution: For a safe and reliable operation of the chemagic 360-D instrument, it is a prerequisite to follow the cleaning and maintenance intervals as described in Service and maintenance on page 40. -
Page 9: Electrical Safety Precautions
Caution: Only the PC that is delivered with the chemagic 360-D instrument including the original chemagic Software may be used to control the chemagic 360-D instrument. The chemagic Software also needs to be licensed for the use in combination with a liquid handling system. Extraction protocols must not be changed by operators or anyone else who has not been trained and authorized in these matters by PerkinElmer. -
Page 10: Safety When Using The Equipment
360-D Safety information Safety when using the equipment Caution: When operating inside the instrument, wear safety goggles, protective clothing, and gloves. Warning: Touching hot parts may lead to severe injuries. Warning: Serious injury may occur if body parts get pinched between moving parts. -
Page 11: Installation And Calibration
360-D Installation and calibration Installation and calibration The chemagic 360-D instrument installation and calibration is only to be performed by personnel trained and authorized by PerkinElmer. Note: Instrument needs to be connected to grounded electrical outlet. Note: The instrument needs to placed on clean, dry, level, and stable surface able to bear the weight of 140kg. -
Page 12: The Chemagic Software
Figure 2: Splash screen with software information Logging into the system Access to the chemagic 360-D instrument user interface is restricted to users with login credentials. The credentials are system-wide. Important: The temporary password provided by your administrator cannot be used to log into the system. Before logging in for the first time, you need to log into the LifeCycle program using the temporary password provided by the administrator and then create your own password. -
Page 13: Login And Rod Head Selection
Subsequent to the selection/detection of the chemagic Rod Head the main program window will open and both axes of the chemagic 360-D instrument will move into their reference positions. If this process finishes without any complications, the red lights in the "Instrument Status" panel next to the X- and Z-axis become green and the text changes from "Failure"... -
Page 14: Loading And Unloading The Chemagic 360-D Instrument With Racks And/Or Consumables
In the event of using "external steps" the computer monitors the estimated time until the next external step has to be carried out. During external steps the chemagic 360-D instrument will pause the running protocol e.g. allowing you to access the rack carrier to add a buffer, take out a rack for a heating step etc. Some protocols require an external step. -
Page 15: Switching Off Procedure
360-D The chemagic Software Unloading: After the finished extraction protocol the before placed items need to be removed from the tracking system. Open the door and press the Turn Table button to have access to any position on the tracking system... -
Page 16: Starting A Protocol With The Chemagic 12 Rod Head
Program Window and click the green Insert IDs button. Figure 6: Instructions for connecting the buffers Depending on the individual configuration of your chemagic 360-D system, you will have different setup steps to follow: Running a protocol with the chemagic Dispenser installed... - Page 17 360-D Starting a protocol with the chemagic 12 Rod Head...
-
Page 18: Running A Protocol Without The Chemagic Dispenser Installed
360-D Starting a protocol with the chemagic 12 Rod Head Figure 7: Setting up the chemagic Dispenser for the chemagic 12 Rod Head Please read these instructions carefully and make sure that all buffer containers contain sufficient amounts of buffer. - Page 19 360-D Starting a protocol with the chemagic 12 Rod Head Figure 8: Entering the Sample IDs (chemagic 12 Rod Head) The process of sample registration is started subsequently to entering the lot number of the kit to be used. A new window which is separated into 4 different areas will open.
-
Page 20: Reading Ids From A File
360-D Starting a protocol with the chemagic 12 Rod Head Figure 9: Entering the Sample IDs To enter the Sample IDs click on the sample position you want to start with. A new window will open with the sample position preselected (A). -
Page 21: Assigning Ids To The Tube Racks
360-D Starting a protocol with the chemagic 12 Rod Head Figure 10: Option to apply the Sample IDs as Elution IDs If you select Yes the Sample IDs are automatically copied to their respective Elution ID positions. In case you want... -
Page 22: Starting The Isolation Procedure
To start the isolation process, click the Start button and the chemagic 360-D instrument will immediately start working. During the run the Main Program Window will be active showing the progress of the running protocol - e.g. - Page 23 360-D Starting a protocol with the chemagic 12 Rod Head Figure 13: The main program window during an Isolation Procedure A running process can be aborted anytime by clicking the Stop button (C). Opening one of the doors during a running process will be indicated by turning the 'Door closed' light to red.
- Page 24 360-D Starting a protocol with the chemagic 12 Rod Head Figure 15: Final message on completion of a run...
-
Page 25: Starting A Protocol With The Chemagic 24 Rod Head
(Figure 13: The main program window during an Isolation Procedure on page 19) and click the green Insert IDs button. Depending on the individual configuration of your chemagic 360-D system, you will have different setup steps to follow: Running a protocol with the chemagic Dispenser installed... - Page 26 360-D Starting a protocol with the chemagic 24 Rod Head...
- Page 27 360-D Starting a protocol with the chemagic 24 Rod Head Figure 18: Setting up the chemagic Dispenser for the chemagic 24 Rod Head If you have a number of samples that is not divisible by 6 you can select the exact number of samples from the drop-down menu (C).
-
Page 28: Running A Protocol Without The Chemagic Dispenser Installed
360-D Starting a protocol with the chemagic 24 Rod Head Running a protocol without the chemagic Dispenser installed Without the chemagic Dispenser you have to pipette the buffers manually into their respective wells/tubes on the different plates/racks. Please refer to the individual protocol of the kit you are using for detailed information about the pipetting scheme. -
Page 29: Reading Ids From A File
360-D Starting a protocol with the chemagic 24 Rod Head Figure 21: Entering the Sample IDs You can directly start entering your Sample IDs with the barcode scanner or by typing them into the provided input field. After entering the Sample ID (and clicking ID entered or hitting Enter for the manual input) the color changes from red to green and the ID appears in the adjacent text field. -
Page 30: Assigning Ids To The Plates Or Tube Racks
360-D Starting a protocol with the chemagic 24 Rod Head If you select Yes the Sample IDs are automatically copied to their respective Elution ID positions. In case you want to assign IDs to the eluates different from the Sample IDs click No and a window similar to the one for entering the Sample IDs will open allowing you to enter the Elution IDs. - Page 31 Figure 24: Final instructions before starting a run To start the isolation process, click the Start button and the chemagic 360-D instrument will immediately start working. During the run the Main Program Window will be active showing the progress of the running protocol - e.g.
- Page 32 360-D Starting a protocol with the chemagic 24 Rod Head Figure 26: Error message after opening a door The isolation procedure can be resumed after closing the door and clicking the Retry button. Please keep in mind that the protocol step that has been interrupted will be restarted.
-
Page 33: Starting A Protocol With The Chemagic 96 Rod Head
(Figure 4: The main program window on page 10) and the Insert IDs button will turn green. Depending on the individual configuration of your chemagic 360-D system you will have different setup steps to follow: Running a protocol with the chemagic Dispenser installed... - Page 34 360-D Starting a protocol with the chemagic 96 Rod Head Figure 29: Setting up the chemagic Dispenser for the chemagic 96 Rod Head If you have a number of samples that is not divisible by 12 you can select the exact number of samples from the drop-down menu.
-
Page 35: Running A Protocol Without The Chemagic Dispenser Installed
360-D Starting a protocol with the chemagic 96 Rod Head After entering the sample positions for automated buffer dispensing click OK and a new input window opens asking you to enter the lot number of the kit to be used during the isolation run (B). By default this window shows the last entered kit lot number. -
Page 36: Reading Ids From A File
360-D Starting a protocol with the chemagic 96 Rod Head To enter the Sample IDs click on the sample position you want to start with. A new window will open with the sample position preselected. Alternatively you can click on the Enter Sample IDs button which will open the window mentioned above, but without preselecting the first sample position. -
Page 37: Assigning Ids To The Plates
360-D Starting a protocol with the chemagic 96 Rod Head Figure 33: Option to use Sample IDs as Elution IDs If you select Yes the IDs are automatically copied to their respective Elution ID positions. In case you want to assign IDs to the eluates different from the Sample IDs click No and a window similar to the one for entering the Sample IDs will open allowing you to enter the Elution IDs. -
Page 38: Starting The Isolation Procedure
Figure 35: Final instructions before starting a run To start the isolation process, click the Start button and the chemagic 360-D instrument will immediately start working. During the run the Main Program Window will be active showing the progress of the running protocol - e.g. - Page 39 360-D Starting a protocol with the chemagic 96 Rod Head Figure 36: The Main Program Window during an isolation run A running process can be aborted anytime by clicking the Stop button (C). Opening one of the doors during a running process will be indicated by turning the 'Door closed' light to red.
-
Page 40: System Settings
System Settings In the System Settings window you can set up the chemagic Software as well as the chemagic 360-D instrument. To have access to all functions, please ensure that the chemagic Software is running without any warnings and that the chemagic 360-D instrument is switched on and has successfully finished the calibration process of its axes. -
Page 41: Edit User Settings
360-D System Settings Figure 40: System Settings Menu Whenever you do not have sufficient rights to access a certain function a warning window will open, in which you can choose to change to a user account with Admin privileges - always provided that you know the corresponding login data. -
Page 42: Display Log Files
Admin : Users belonging to the Admin group can additionally edit the Parameters and the User Settings and have access to the Jog Mode which allows calibrating the axes and thus the setup of the chemagic 360-D instrument. Admin users cannot edit protocols. - Page 43 360-D System Settings Figure 43: Displaying log files To view log files, open the System Settings Menu from the main program window and click on the [Display Log Files] button.
-
Page 44: Service And Maintenance
Service and maintenance Service and maintenance This section includes information on the service and maintenance of the chemagic 360-D instrument. Cleaning of the chemagic Dispenser For routine cleaning cycles or in case of irregular buffer dispensing the tubes and manifolds can be cleaned and rinsed. -
Page 45: Changing The Chemagic Rod Heads
Changing the chemagic Rod Heads The chemagic 360-D instrument usually comes with an installed chemagic Rod Head. To remove a chemagic Rod Head from the system, open the front door and loosen the 4 screws by ½ turn only - this ensures that the head can only be removed and reattached in a straight angle without the risk of tilting. -
Page 46: Checking And Priming Of The Dispenser Manifolds
Caution: During operation, the temperature in the operating room should be between +18° celsius and +35° celsius. Do not clean the chemagic 360-D instrument with aggressive agents such as acetone or hypochlorite solution, since this can corrode the material. A wipe disinfectant with a 4% solution of Kohrsolin FF (Bode Chemie, Hamburg) is recommended. -
Page 47: Cleaning Of The Drop Cover
360-D Service and maintenance Usually the chemagic Rod Heads do not need cleaning, unless any unanticipated contamination with sample material or reagent(s) has occurred. If this is the case, wipe the affected areas/parts of the head with a lint free cloth moistened with the appropriate disinfectant/cleaning agent. -
Page 48: Specifications
360-D Specifications Specifications Technical specifications Width: 900mm (1500mm with display attached and door open) Depth: 820mm (1000mm with door open) Height: 900mm Weight: 140kg Input voltage: 100 - 120 / 200 - 240 V Power frequency: 50/60 Hz Power consumption: 1700 VA Noise: <... -
Page 49: Error Messages
360-D Error messages Error messages Error messages during startup of software Error number 001: The Program is already running • The program is already running and has not been closed yet. Error number 002: Unable to open Parameter File. - Page 50 360-D Error messages • Error while reading data from protocol file in line ---, one or more parameters are missing for the step type read at last. Error number 041: Error reading Data from Pattern File. The File contains no Parameter Sets.
- Page 51 360-D Error messages Error number 061: Error read Rack/Plate Data from Protocol. • The rack data (Rack ID, description...) from the info text area of the protocol file is invalid. Warning number 061: Rack/Plate Data could not be read from Protocol.
- Page 52 360-D Error messages • Log-In of user with level 'SuperAdmin' but no valid license key for SuperAdmin Level found. The user level will be set to 'Admin'. Warning number 094: Function not allowed for actual User Level. Logon with new User Name? •...
- Page 53 360-D Error messages Error messages / warnings Protocol file during production run Error number 220: The Pattern File contains no Steps. Cannot continue with Program. • During production run: the protocol file does not contain any protocol step. Error number 221: The Pattern File contains an invalid Transport Slot. Cannot continue with Program.
- Page 54 360-D Error messages Error number 250: Axis ---: Axis disabled while moving to position. • Axis --- was disabled while moving to position (e.g. cover opened while moving to position). Error number 251: Axis ---: Start axis in continuous mode, error ---.
- Page 55 360-D Error messages Error number 303: A Communication Error occurred in Communication to Motorcard with Address --- (Result = ---). • Communication timeout during communication with motor card (PR0112 / PR0125) • Address 3 = motor card #1 (Drop Cover / Rotation Needles) •...
-
Page 56: Troubleshooting
Possible Reason Solution Make sure the power chord is The chemagic 360-D instrument The power chord is not connected to connected to the chemagic 360-D cannot be switched on the chemagic 360-D instrument instrument and plugged into the power socket... -
Page 57: Warranty
Warranty Warranty The enclosed instrument comes with a limited warranty (the “Warranty”) from Wallac Oy (“Wallac”), a PerkinElmer company. This is only a summary of the warranty on the enclosed instrument and shall not be deemed to alter or amend the terms of the Warranty. Consult the terms and conditions, and rental or purchase agreement for a full explanation of the Warranty. -
Page 58: Weee Instructions For Perkinelmer Products
Customer Care Rest of the World: call (+1) 203-925-4602 Products from other manufacturers may also form a part of your PerkinElmer system. These other producers are directly responsible for the collection and processing of their own waste products under the terms of the WEEE Directive. -
Page 59: Index
Index Loading the chemagic 360-D with racks and/or consumables Actions and Controls Login End-User Automated isolation procedure Main Program Window Maintenance Changing the chemagic Rod Heads Service and chemagic 12 Rod Head starting a Protocol with the chemagic 24 Rod Head... - Page 62 2024-9010-04 April 26, 2022 Manufacturer: Wallac Oy Mustionkatu 6, FI-20750 Turku, Finland. Tel: 358-2-2678 111. Fax: 358-2-2678 357 www.perkinelmer.com...
Need help?
Do you have a question about the chemagic 360-D and is the answer not in the manual?
Questions and answers