Table of Contents
Advertisement
Quick Links
Advertisement
Table of Contents

Related Manuals for Elation Cyber Pak


Summary of Contents for Elation Cyber Pak
- Page 1 Cyber Pak User Manual Revised 11/10/2022...
- Page 2 Elation Professional B.V. | Junostraat 2 | 6468 EW Kerkrade, The Netherlands +31 45 546 85 66 | +31 45 546 85 96 fax | www.elationlighting.eu | info@elationlighting.eu Elation Professional Mexico | AV Santa Ana 30 | Parque Industrial Lerma, Lerma, Mexico 52000...
-
Page 3: Table Of Contents
C O N T E N T S General Information Limited Warranty (USA Only) Safety Guidelines Maintenance Guidelines Overview Installation Guidelines Control Panel System Menu Operation Specifications Dimensional Drawings... -
Page 4: General Information
Please recycle whenever possible. BOX CONTENTS Power Cable (x1) CUSTOMER SUPPORT Contact ELATION Service for any product related service and support needs. Also visit forums.elationlighting.com with questions, comments, or suggestions. ELATION SERVICE USA - Monday - Friday 8:00am to 4:30pm PST 323-582-3322 | Fax 323-832-9142 | support@elationlighting.com... -
Page 5: Limited Warranty (Usa Only)
It is the owner’s responsibility to establish the date and place of purchase by acceptable evidence, at the time service is sought. B. For warranty service, send the product only to the Elation Professional factory. All shipping charges must be pre-paid. If the requested repairs or service (including parts replacement) are within the terms of this warranty, Elation Professional will pay return shipping charges only to a designated point within the United States. -
Page 6: Safety Guidelines
S A F E T Y G U I D E L I N E S This fixture is a sophisticated piece of electronic equipment. To guarantee smooth operation, it is important to follow all instructions and guidelines in this manual. Elation Professional is not responsible for injury and/or damages resulting from the misuse of this fixture due to the disregard of the information printed in this manual. - Page 7 S A F E T Y G U I D E L I N E S For Your Own Personal Safety, Please Read and Understand This Manual Completely Before You Attempt To Install Or Operate This Unit! • Do not shake the device, and avoid using brute force when installing and/or operating. •...
-
Page 8: Maintenance Guidelines
Regular inspections are recommended to insure proper function and extended life. There are no user serviceable parts inside this device. Please refer all other service issues to an authorized Elation service technician. Should you need any spare parts, please order genuine parts from an authorized Elation dealer. -
Page 9: Overview
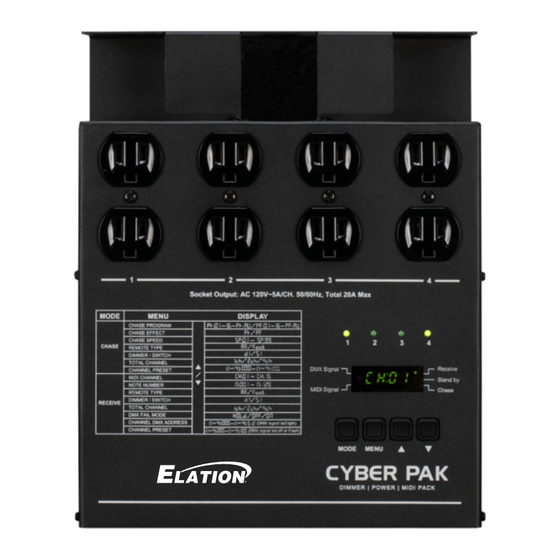
O V E R V I E W FRONT PANEL Channel Outputs (5A per channel, total 20A max) Channel LEDs Loading: 5A/CH, Total 20A Max. CHANNELS MONI TOR M EN U M ODE DISPLAY M idi Channel Display Screen Note number Remote type RECEIVE Dimmer / Switch... -
Page 10: Installation Guidelines
I N S TA L L AT I O N G U I D E L I N E S FLAMMABLE MATERIAL WARNING Keep device minimum 5.0 feet (1.5m) away from flammable materials and/or pyrotechnics. ELECTRICAL CONNECTIONS A qualified electrician should be used for all electrical connections and/or installations. - Page 11 I N S TA L L AT I O N G U I D E L I N E S WALL MOUNTING The device can be easily wall mounted by using the wall mount holes on the mounting bracket (see illustration below for locations). Screws of the proper size and weight rating should be threaded into appropriately rated anchors in the mounting surface (mounting hardware is not included).
- Page 12 I N S TA L L AT I O N G U I D E L I N E S CLAMP MOUNTING The device can be mounted to a truss by using the clamp mount hole on the top of the mounting bracket (see illustration below).
-
Page 13: Control Panel
C O N T R O L PA N E L The device features an easy to use control panel located on the front panel (see image below), which provides access to the main system menu, where all necessary system adjustments are made to the fixture. -
Page 14: System Menu
S YS T E M M E N U MODE MENU UP / DOWN DESCRIPTION CH:xx 01 - 16 Midi channel n:xxx 001 - 128 Note number RF control RF / Foot Foot Foot control Dimmer dI / SI Switch 1 channel mode x ch 2 channel mode... -
Page 15: Operation
O P E R AT I O N RECEIVE MODE This function allows you to activate and control the intensity of the fixture with the use of a DMX controller or MIDI sequencer. On, off, and dimming functions can be performed through this pack. - Page 16 O P E R AT I O N 1Ch/2Ch/4Ch Dimmer Pack: 1. When the device is in Receive mode, tap MENU until the display screen shows channel output mode. This mode allows you to set your dimmer pack to function as a 1, 2, or 4 channel DMX dimmer pack.
- Page 17 O P E R AT I O N CHASE MODE This unit can be used as a 4 channel chaser when it has been set to 4 channel output. This function allows you to select any of these 16 built-in programs or set the pack to chase as desired to get a more dramatic light show.
- Page 18 O P E R AT I O N Dimmer Pack / Switch Pack 1. When the device is in Chase mode, tap MENU until the Segment Display shows “DI” or “SI”. 2. Tap UP/DOWN to change between “DI” and “SI”. •...
-
Page 19: Specifications
S P E C I F I C AT I O N S FEATURES: • 4-Channel Dimmer/Relay/MIDI Pack • Individual DMX Address for each Channel • Selectable Modes (Dimmer or Switch Pack) • (16) Internal Chase Macros with Fade In/Out •... -
Page 20: Dimensional Drawings
D I M E N S I O N A L D R AW I N G S 8.28in (210.25mm) - Page 21 This page intentionally left blank.
Need help?
Do you have a question about the Cyber Pak and is the answer not in the manual?
Questions and answers