Advertisement
Quick Links
Soundbar Wall Mount
Instruction Manual
CAUTION AND MAINTENANCE:
Don't allow children to climb, stand, hang, or play on any part of mount.
◆
This product is intended for indoor use only. Using this product outdoors could lead to product failure
◆
and personal injury.
Incorrect installation may result in product damage or body injury.
◆
Check that the bracket is secure and safe to use at regular intervals (at least every three months).
◆
WARNING:
This product contains small items that could be a choking hazard if swallowed.
Before starting assembly, verify all parts are included and undamaged. If any parts are missing or
damaged, do not return the damaged item to your dealer; please contact our customer service team.
Never use damaged parts!
If you have any questions, please feel free to contact us via Amazon.
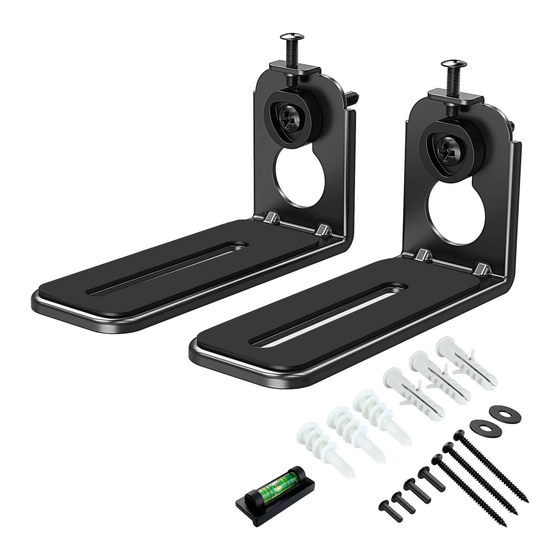
Supplied Parts and Hardware
For Drywall installations ONLY
Bracket with Pad
DO NOT use in concrete or wood
1
×2
Drywall Anchor
Bubble level
5
×1
Leveling Screws
Lag Bolt ST3.8x50mm
M4 x 20mm
7
×3
×2
8
Note:Not all hardware included will be used.
For Concrete installations ONLY
DO NOT use in drywall or wood
Concrete Anchor
2
×3
3
×3
0
Hanging Template
0
Template
×1
6
Soundbar Screws
M5 x 16mm
M4 x 16mm
M6 x 16mm
A
qty. 2 each
1
Installation Tools (Not Included)
Stud
Awl
Finder
Determine your install method
1:
Bottom Mounted
With threaded inserts
YZ-A01_US1.0
Step 1 Install plastic washers
Option A For drywall
A-1
Plastic
Washers
4
×3
A-2
Soundbar
Washers
Ø 6 mm
B
×2
2M
5/16"
(8mm)
Band
Masonry
Pencil
Tape
Drill Bit
Min. 3/4 in
(19mm)
1. Please expand the Template
on the drywall.Then mark the position you want
according to the width of the previous step.
2. Install the drywall anchors
and screwdriver.
3. Install the plastic washers
with screwdriver,NO Electro drill.
6
Note:The facet of
washer should
be upward
2
7
Note:Don't over-tighten
the lag bolt
2
Electro drill
Screwdriver
2:
Shelf-style
(threaded inserts on the back
or no threaded inserts)
, level the template
6
with the hammer
2
using the lag bolts
4
7
4
7
A-3
Advertisement

Related Manuals for Mountup MU9101B


Summary of Contents for Mountup MU9101B
- Page 1 Installation Tools (Not Included) Soundbar Wall Mount Instruction Manual 5/16" (8mm) Band Masonry Pencil Electro drill Stud Screwdriver Tape Drill Bit Finder Determine your install method Shelf-style Bottom Mounted (threaded inserts on the back or no threaded inserts) With threaded inserts YZ-A01_US1.0 CAUTION AND MAINTENANCE: Don't allow children to climb, stand, hang, or play on any part of mount.
- Page 2 Step 1 Continue Step 2 Install bracket Option B For wood studs (12” or 16” or 18” or 24”) Note:Don’t touch the washer Note:The facet of washer should 12”(305mm)/16”(406mm) be upward 1. Attach the bracket on the 18”(457mm)/24”(610mm) plastic washer by keyhole.
Need help?
Do you have a question about the MU9101B and is the answer not in the manual?
Questions and answers