Table of Contents
Advertisement
Quick Links
Advertisement
Table of Contents

Related Manuals for Kidzone Ride On SUV w/ Personalize License Plate


Summary of Contents for Kidzone Ride On SUV w/ Personalize License Plate
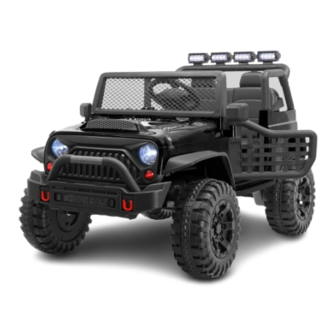
- Page 1 Ride On SUV w/ Personalize License Plate (12V) 060-ROT-05 Owner’s Manual *Product appearance and colors may vary from the photo. WARNING: This product should only be assembled by an adult. Suitable Ages: 37-72 Months Maximum User Weight : 110 lb / 50 kg...
- Page 2 Little ones have a blast riding our toys at home, in the park, or on the sidewalk. At Kidzone, our goal is to make playtime more fun for kiddos, while ensuring comfort and safety. Our ride-ons help create joyful moments for the entire family that’ll turn into forever memories!
-
Page 3: Table Of Contents
Table of Contents Safety Instruction Product Speci cation Parts and Accessories Assembly Instruction User’s Instruction User’s Instruction Control Panel User’s Instruction Remote Control User’s Instruction Charging Care and Maintenance Troubleshooting Warrenty Information... -
Page 4: Safety Instruction
Safety Instruction When using electrical product, basic safety precaution should always be followed including the following: Failure to follow the safety instructions may result in property damage, serious injury or death. WARNING DISCLAIMER • Manufacturer and seller expressly disclaim any and all liability for personal injury, property damage or losses, whether direct, indirect, or incidental, resulting from the incorrect attachment, improper use, BASIC SAFETY •... - Page 5 ver. 08282023 CAUTION Failure to follow these instruction may result in permanent damage to the product or parts. CELL BATTERY AND RECHARGEABLE BATTERY HANDLING • Do not mix old and new batteries. Do not mix alkaline, standard (carbon-zinc), or re-chargeable batteries. •...
- Page 6 Model no. 060-ROT-05 Battery 12 V 7 Ah x1 Charger input 120V AC, 0.25 A, 60 Hz Charger output 12 V 900 mA Battery Charge Time 8 - 12 hours Dimension 45.08” x 28.54” x 28.74” (1145 mm x 725 mm x 730 mm) Speed 1.56- 3.8 mph (2.5-6.0 km/h) Suitable Age...
-
Page 7: Parts And Accessories
ver. 09012023 Parts and Accessories... - Page 8 Parts and Accessories Part No. Part Name Vehicle Body Gear Box Wheel Hub Wheel Ø12 Washer Ø10 Washer Lock Nut Wheel Cover Rear Axle Housing Rear Axle Front Axle Ø4 x 12 Screw Side Mirror 1 Pair Steering Wheel M5 x 45 Machine Screw Ø5 Nut Wideshield Seat...
-
Page 9: Assembly Instruction
ver. 09012023 Assembly Instruction WARNING This product should only be assembled by an adult. Children can be harmed by small parts, sharp edges and points or by electrical items. Care should be taken when unpacking and assembling the vehicle. Tools required (not included) •... - Page 10 Assembly Instruction Rear Fender Installation Front Fender Installation • Click the front fenders (23) to the front of the vehicle body and the rear fenders (24) to the rear of the vehicle body. Secure each front fender with three Ø4 x 12 screws (12). •...
- Page 11 ver. 09012023 Assembly Instruction • Rotate and align the steering column on the vehicle body to the front axle linkage(11). Secure the front axle (11) on the vehicle body with eight Ø4 x 12 screws (12). •...
- Page 12 Assembly Instruction Slide Ø12 washer (5), wheel (4), Ø10 washer (6) to the front axle (11). • • Secure the wheel in place with lock nut (7). • Snap the wheel cover (8) to the wheel. • Repeat the same step on the other side of the vehicle. Assemble the rear axle housing (9) to the vehicle body with eight Ø4 x 12 screws (12).
- Page 13 ver. 09012023 Assembly Instruction • Insert the rear axle (10) into the rear axle housing (9). Assemble the wheel hub (3) to the wheel (4) with four Ø4 x 12 screws (12). • Slide the gear box (2), a wheel (4), a Ø10 washer (6) to the rear axle. •...
- Page 14 Assembly Instruction • Connect the cable from the light bar (20) to that in the right light bar support (21). • Assemble the light bar between the light bar supports. • Connect the cable from the right light bar support to that in the vehicle body. •...
- Page 15 ver. 09012023 Assembly Instruction • Connect the cable from steering wheel (14) to that in the vehicle body. • Insert the steering wheel to the steering column and secure in place with a M5 x 45 machine screw (15) and a Ø5 nut (16). •...
- Page 16 Assembly Instruction • Insert the side mirrors (13) to the vehicle body. • Connect the cables on the seat well. Plug the red connector on the vehicle • body into the red connector on the battery. • Plug the two white connectors from the motor into the white connectors on both side of the vehicle body.
- Page 17 ver. 09012023 Assembly Instruction • Align and insert the tabs on the backrest (19) to the vehicle body. Assemble the seat (18) to the vehicle body and secure in place with two Ø4 x 12 screws (12). •...
-
Page 18: User's Instruction
User’s Instruction Next Track / Volume + Horn Button / Volume - Control Panel Shift Lever Foot Pedal Control the vehicle Control Panel Control the functions of the car. (See page 19 for detail instruction) Shift Lever Push / Pull the lever to choose the vehicle forward and backward direction. CAUTION Do not change direction until the vehicle comes to a complete stop. -
Page 19: User's Instruction Control Panel
Bluetooth connection To connect your mobile device to the vehicle, turn on Power Indicator the Bluetooth and select "Kidzone Ride-on". You can hear Indicator shows the estimate power level of the a voice message of connected successfully from vehicle battery. -
Page 20: User's Instruction Remote Control
User’s Instruction (Remote Control) Speed Indicator • High • Normal • Forward Button Brake Button Speed Select Button Right Button Reverse Button Left Button Connection Button Using the remote control The remote control should only be used by an adult. Pairing the remote control •... -
Page 21: User's Instruction Charging
ver. 09012023 User’s Instruction (Charging) WARNING The battery should only be charged by an adult. Charging the battery 1. Connect the charger to the charging port. 2. Plug the charger into a wall outlet. The battery will start charging. • The vehicle must be OFF when charging. -
Page 22: Care And Maintenance
Care and Maintenance • Check the product regularly and make sure there is no missing or loose parts. Re-tighten any loose parts if necessary. • Make sure there is no cracked or broken plastic parts. • Store the product away from heat source when not using, cover it with a tarp and away from wet weather. -
Page 23: Troubleshooting
ver. 09012023 Troubleshooting Problem Possible Reason Solution Low Battery Fully charge the battery Fuse will reset automatically in Fuse Protection about 20 seconds Vehicle does not move Disconnected / Badly connected Reconnect the battery battery Failed battery / engine Contact Customer Service Low Battery Fully charge the battery Vehicle does not run very long... - Page 24 Troubleshooting Problem Possible Reason Solution Check if the battery connectors Poor wire connection Contact Customer service if Vehicle needs a push to go necessary forward “Dead spot” on motor Contact customer service Loud grinding sound or clicking Damaged motor or gear box Contact customer service sound from the motor or gear box Disconnected / Badly connected...
- Page 25 It is the retailer’s responsibility consumer, or other parties not authorized by to contact KIDZONE with a claim. We will not KIDZONE will void this warranty. handle claims from consumers directly; all 3.
- Page 26 Model: 060-ROT-05 This device complies with part 15 of the FCC rules. Operation is subject to the following two conditions: (1) This device may not cause harmful interference, and (2) this device must accept any interference received, including interference that may cause undesired operation.
- Page 27 09012023 Enjoy ! © All copyright of this document belongs to KIDZONE. This document may not be printed, translated, reproduced, or distributed in whole or in part without written permission from KIDZONE.
- Page 28 www.kidzonetoys.com...
Need help?
Do you have a question about the Ride On SUV w/ Personalize License Plate and is the answer not in the manual?
Questions and answers