Table of Contents
Advertisement
Instruction Manual
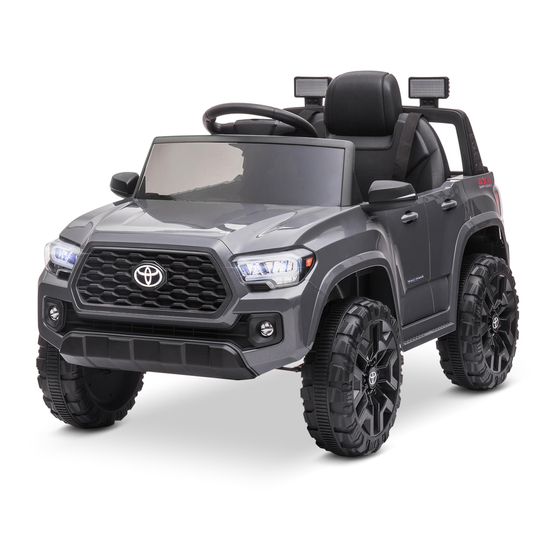
Licensed Toyota Tacoma Ride On (12V)
Item number: 060-ROT-18L
*Product appearance and colors may vary from the photo.
ATTENTION
This vehicle is packed with the battery disconnected. Connect
the battery before use.
This manual contains important safety, performance and
maintenance information. Read the manual thoroughly before
allowing your child to ride your new electric ride-on toy. Failure
to read the user manual can result in property damage or bodily
injuries. Keep this user manual for future reference.
Advertisement
Table of Contents

Related Manuals for Kidzone Licensed Toyota Tacoma Ride On


Summary of Contents for Kidzone Licensed Toyota Tacoma Ride On
- Page 1 Instruction Manual Licensed Toyota Tacoma Ride On (12V) Item number: 060-ROT-18L *Product appearance and colors may vary from the photo. ATTENTION This vehicle is packed with the battery disconnected. Connect the battery before use. This manual contains important safety, performance and maintenance information.
-
Page 2: Safety Instruction
Safety Instruction When using electrical product, basic safety precaution should always be followed including the following: Failure to follow the safety instructions may result in property damage, serious injury or death. This owner’s manual contains assembly, use and maintenance instruction, and child safety warning. Adult /guardian supervising children should read and understand this manual before allowing any child to use the product. - Page 3 WARN • RISK OF FIRE. Do not bypass. Replace only with original size and type. • Do not use this product in any slippery conditions including rain, snow, and ice, or at any potential dangerous places. Always drive the vehicle on smooth surface, and do not drive the vehicle on the tall grass or rugged ground.
-
Page 4: Prevent Fire
WARNING WARNING Manufacturer and seller expressly disclaim any and all liability for personal injury, property damage or losses, whether direct, indirect, or incidental, resulting from the incorrect attachment, improper use, inadequate maintenance, unapproved modi cation, or neglect of this product. CHOKING HAZARD - Small parts. - Page 5 WARN FAILURE TO FOLLOW THE SAFETY INSTRUCTIONS LISTED BELOW MAY RESULT IN SERIOUS INJURY OR DEATH. Child Safety Warnings • Adults supervising children must read and understand this entire manual before allowing any child to use this product. • Adults must evaluate their own children as to maturity, strength, judgment and ability to follow safety rules.
- Page 6 WARN 5• If necessary, adults and supervisors are always responsible for setting up gates and barriers to ensure a safe riding environment for the child rider. 6• Be aware that this ride-on toy does not have braking capabilities. Allowing use of this ride-on toy in areas that require braking may cause rolls, crashes, serious injury, or death to the child rider.
- Page 7 WARN Battery and Charging Warnings The following safety hazards may result in serious injury or death to the user of the ride-on: Do not mix old and new batteries. • Do not mix alkaline, standard (carbon-zinc), or rechargeable • Corrosive Material Warnings Battery posts, terminals and related accessories contain lead and lead •...
-
Page 8: Assembly Warnings
WARN • Regularly check charger, supply cord and connector for wear and damage. Look for frayed or kinked wires, any exposed inner wires, any missing insulation. If any damage is observed do not plug in the charger and do not charge the battery. -
Page 9: Product Speci Cation
Product Speci cation Model No.: 060-ROT-18L Drive Motor: DC 12V x 2 Steering Motor: DC 12V x 1 Battery: 12V 4.5AH x 1 Charger input: 100 - 240V AC Charger output: DC 12V 500MA Speed: 1.2 - 2.5 mph (2 - 4 km/h) Suitable Ages: 37 - 72 months Maximum User Weight: 66 lb / 30 kg Battery Charge Time: 8 - 12 hours... - Page 10 Parts and Feature A. Rear Axle B. M8 Socket Wrench C. Wheel D . Wheel Cover E. Front Axle F. Steering Wheel H. Rearview Mirror I. Seat 1 pair J. Self-Tapping Screw K. Backrest L. Rear Lamp 1 pair M. Tail Frame Lamp Holder N.
-
Page 11: Assembly Instruction
Assembly Instruction WARNING! This product should only be assembled by an adult. Children can be harmed by small parts, sharp edges and points or by electrical items. Care should be taken when unpacking and assembling the vehicle. M8 Nut M8 Nut Washer Washer •... - Page 12 Assembly Instruction Washer M8 Nut M8 Nut Washer • Assemble wheel (C) to the rear axle and secure with a washer and M8 nut. • Attach the wheel cover (D) on the wheel. • Repeat the same step on the other side. M8 Nut •...
- Page 13 Assembly Instruction M8 Nut M8 Nut • Remove the M8 nut from the front axle (E) using a M8 socket wrench. M8 Nut M8 Nut M8 Nut • Attach the front axle (E) to the underbody frame and the steering axle and put back the M8 nuts then secure them.
- Page 14 Assembly Instruction Keep this one, not need to remove. Washer M8 Nut Washer M8 Nut Remove washers and M8 nuts from the front axle. M8 Nut M8 Nut Washer Washer Washer Washer • Assemble wheel (C) to the front axle and secure with a washer and M8 nut. •...
- Page 15 Assembly Instruction • Unscrew the screw on steering wheel cover. • Detach the steering wheel cover from the steering wheel, and attach 2 AA batteries into the battery slot. • Secure the steering wheel cover back on the steering wheel. WARNING: •...
- Page 16 Assembly Instruction Screw Screw • Detach the screw and nut from the steering wheel (F). • Attach the steering wheel to the steering axle, and secure the steering wheel in place using the screw and nut removed previously. •...
- Page 17 Assembly Instruction • Attach rear view mirror (H) to the car body. • Align and insert the seat (I) to the slots of the car body. • Secure the seat in place with 2 self-tapping screws (J). Remark: Please open the doors in order to have more enough space for easily assemble the seat.
- Page 18 Assembly Instruction • Attach the backrest (K) to the car body using 2 self-tapping screws (J). • Attach the rear lamp (L) to the tail frame lamp holder (M).
- Page 19 Assembly Instruction • Attach the tail frame lamp holder (M) to the car body.
- Page 20 Assembly Instruction WARNING! The battery should only be connected by an adult. • Locate the terminal cover in front of the seat. • Connect the battery terminal to the car terminal. • Close the cover.
-
Page 21: User Instruction
User Instruction Control the vehicle 1 /2 . Horn Button Press once to play the horn sound. 3. Control Panel Control panel contains buttons for power, light, directional controls, and media player. 4. Foot Pedal Step on the foot pedal to move the car forward / reverse. Release the pedal to slow down and stop the car. - Page 22 Press the button to enter FM radio mode. 3. Mode Button Press the button to toggle between engine sound, ash drive, bluetooth(Kidzone Ride-on), and AUX mode. 4. Forward Button Press the forward button and step on the foot pedal to drive the car forward.
- Page 23 NOTE: Next / Previous track button on the control panel cannot be used to control your device. Bluetooth connection To connect your mobile device to the vehicle, turn on the Bluetooth and select " Kidzone Ride-on ". Music can be played from the vehicle speaker according to the user preferences. To disconnect your...
- Page 24 User Instruction (Remote Control) Forward Button Stop Button Right Button Reverse Button Left Button Speed Selection Button LED Indicator Using the remote control The remote control should only be used by adult or supervisor. Make sure the rider on the ride-on toy has securely fastened the seat belt and wear protective gear before using the remote control.
- Page 25 Note: The remote control will override all control input from the vehicle. “P” stop button: move function either by controller or manual control from the vehicle. Press the button again, indicator change to solid light, vehicle back to operation mode. Change Battery 1.Remove the cover on the back of the remote control.
- Page 26 User Instruction (Charging) WARNING! The battery should only be charged by an adult. The battery is not replaceable. Charging the battery 1. Locate the terminals cover in front of the seat. 2. Disconnect the battery terminal from the car. 3. Connect the battery terminal to the charger and plug the charger into a wall outlet. The battery will start charging.
- Page 27 User Instruction Protective Fuse • automatically. WARNING: RISK OF FIRE. Do not bypass fuse. This may overload and damage the electrical system. Replace only with original size and type. Low power protection: If the voltage below 9V lasting for 1 second, it will be prompted “Battery is low, please recharge in time”. After the 1st alarm, if the voltage is still below 9V, give a second alarm after lasting for 10 seconds “Battery is low, please recharge in time”.
-
Page 28: Care And Maintenance
Care and Maintenance • Check the product regularly and make sure there is no missing or loose parts. Re-tighten any loose parts if necessary. • Make sure there is no cracked or broken plastic parts. • Store the product away from heat source when not using, cover it with a tarp and away from wet weather. - Page 29 Troubleshooting Problem Possible Reason Solution Check if the battery connectors are firmly connected. Poor wire connection Contact Customer service if Vehicle needs a push to go necessary forward “Dead spot” on motor Contact customer service Loud grinding sound or clicking Damaged motor or gear box Contact customer service sound from the motor or gear box...
- Page 30 Model: 060-ROT-18L / CST-1A FCC ID: 2ARLM-CST-1A This device complies with part 15 of the FCC rules. Operation is subject to the following two conditions: (1) this device may not cause harmful interference, and (2) this device must accept any interference received, including interference that may cause undesired operation.
-
Page 31: Warranty Terms
It is the retailer’s responsibility consumer, or other parties not authorized by to contact KIDZONE with a claim. We will not KIDZONE will void this warranty. handle claims from consumers directly; all 3.
Need help?
Do you have a question about the Licensed Toyota Tacoma Ride On and is the answer not in the manual?
Questions and answers
My truck will not turn on. It seems battery is fine cause when charging to goes from yellow to green. But the control panel won’t turn on the car. Inside the battery box is clean. With nothing eroding. Is there a fuse I need to check?
The manual states that the vehicle has fuse protection, which will reset automatically in about 60 seconds. However, it does not mention a fuse that needs to be manually checked if the truck does not turn on.
This answer is automatically generated