
Related Manuals for Moxa Technologies RKP Series


Summary of Contents for Moxa Technologies RKP Series
- Page 1 RKP Series Quick Installation Guide Version 1.0, September 2023 Technical Support Contact Information www.moxa.com/support 2023 Moxa Inc. All rights reserved. P/N: 1802001100001 *1802001100001*...
-
Page 2: Package Checklist
Overview The RKP series rackmount computers are powered by an Intel Atom®, 11th Gen Intel® Celeron®, or Intel® Core™ i5/i7 processor. The computers come with a rich set of interface options including up to 10 software-selectable RS-232/422/485 serial ports, up to 12 Gigabit Ethernet ports, and 8 digital inputs and 8 digital outputs. - Page 3 RKP-A110-E2-8L-T/RKP-A110-E4-8L-T Models RKP-A110-E2-8C-T/RKP-A110-E4-8C-T Models RKP-A110-E2-2L4C-T/RKP-A110-E4-2L4C-T Models RKP-C110-C1-T/RKP-C110-C5-T/RKP-C110-C7-T Models RKP-C110-C1-8L-T/RKP-C110-C5-8L-T/RKP-C110-C7-8L-T Models - 3 -...
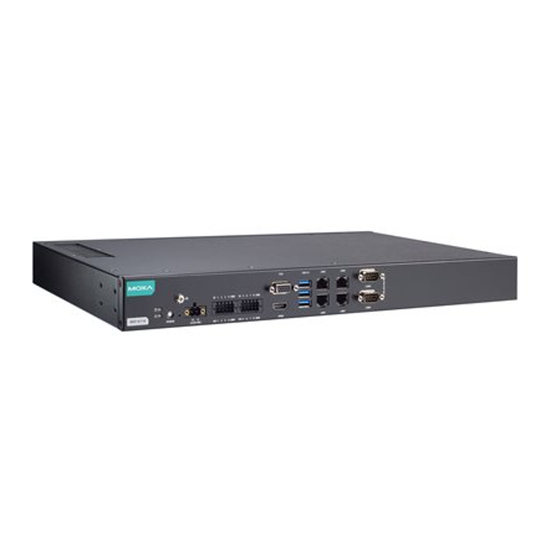
- Page 4 RKP-C110-C1-8C-T/RKP-C110-C5-8C-T/RKP-C110-C7-8C-T Models RKP-C110-C1-2L4C-T/RKP-C110-C5-2L4C-T/RKP-C110-C7-2L4C-T Models Rear View RKP-A110 Series RKP-C110 Series - 4 -...
-
Page 5: Led Indicators
Dimensions RKP-A110/RKP-C110 Series LED Indicators The following table describes the function of the LED indicators located on the front panel of the RKP computers. LED Name Status Function Power Green Power is ON No power input or any other power error Ethernet Green Steady ON: 10/100 Mbps Ethernet link... - Page 6 Step 1: If the mounting ears are not installed, use four screws each to attach the mounting ears on both sides of the computer. Step 2: Place the RKP on a rack and use another four screws to secure the rack-mount ears to the rack.
- Page 7 ATTENTION This product is intended to be supplied by a Listed Power Supply with output marked LPS and rated to deliver 12 VDC at a maximum of 5.4 A, or 24 VDC at a maximum of 2.6 A, and minimum Tma=60˚C. If you need assistance with purchasing a power adapter, contact the Moxa technical support team.
-
Page 8: Communication Connections
Communication Connections Ethernet Ports The 10/100/1000 Mbps Ethernet ports use RJ45 connectors. The pin assignments are shown below: 10/100 Mbps 1000 Mbps ETx+ TRD(0)+ ETx- TRD(0)- ERx+ TRD(1)+ – TRD(2)+ – TRD(2)- ERx- TRD(1)- – TRD(3)+ – TRD(3)- NOTE For reliable Ethernet connections, we recommend enabling the ports in standard temperatures and keeping them enabled in high/low temperature environment. - Page 9 For the wiring method, refer to the following diagram: For additional details, refer to the RKP Series Hardware User Manual. Installing a Storage Drive The RKP computer is provided with two storage slots on the rear panel for storage expansion.
-
Page 10: Replacing The Battery
4. Reverse the storage tray and fasten four screws to secure the storage drive to the tray. 5. Insert the storage tray into the slot and fasten secure the tray in place with two screws. 6. Use the same method to install a storage drive in the other slot. Replacing the Battery The RKP computer comes with one slot for a battery on the bottom panel of the computer. - Page 11 5. Place a new battery in the battery holder, replace the metal plate, and fasten the two screws on to the frame to secure the battery. 6. Plug in the connector of the battery-cover assembly to the internal wire of the slot. 7.
- Page 12 限用物質含有情況標示聲明書 RKP-A110-E2-T RKP-A110-E2-T-Win10 RKP-A110-E4-T RKP-A110-E4-T-Win10 RKP-A110-E2-8L-T RKP-A110-E4-8L-T RKP-A110-E2-8C-T RKP-A110-E4-8C-T RKP-A110-E2-2L4C-T RKP-A110-E4-2L4C-T RKP-A110-T RKP-A110-L-T RKP-A110-C-T - 12 -...
Need help?
Do you have a question about the RKP Series and is the answer not in the manual?
Questions and answers