Table of Contents
Advertisement
Quick Links
Advertisement
Table of Contents

Subscribe to Our Youtube Channel
Related Manuals for EK Pro RTX A5000 Rack


Summary of Contents for EK Pro RTX A5000 Rack
- Page 1 EK-Pro RTX A5000 Rack - Ni + Inox GPU WATER BLOCK USER GUIDE...
- Page 2 GPU and/or graphics card circuit board (PCB). The EK Fittings require only a small amount of force to screw them firmly in place since the liquid seal is ensured by the rubber O-ring gaskets.
-
Page 3: Table Of Contents
TABLE OF CONTENTS BOX CONTENTS WATER BLOCK DIMENSIONS WATER BLOCK SPECIFICATIONS AND MAIN PARTS PREPARING THE GRAPHICS CARD CLEANING THE PCB CUTTING AND PLACING THERMAL PADS CUTTING AND PLACING THERMAL PADS UNPACKING AND REASSEMBLYING INSTALLING THE WATER BLOCK MOUNTING PCB ON THE WATER BLOCK ATTACHING THE BACKPLATE TO THE GRAPHICS CARD MOUNTING BACKPLATE ON PCB CHECKING FOR CONTACT... -
Page 4: Box Contents
M2.5x7 AX1 Screw (6x) M2.5x10 AX1 Screw (4x) Thermal Grizzly Hydronault M2.5x4 AX1 Screw (5x) 3830046998477 (1x) EK-Pro RTX A5000 Rack Polyamid Washer M2.5 x 0.7mm Polyamid Washer M2.5 x 0.5 mm selfglued (4x) (5x) Allen Key 2 mm (1 x) -
Page 5: Water Block Dimensions
WATER BLOCK DIMENSIONS 19.7 mm 299.7 mm 23.5 mm 311.1 mm - 5 -... -
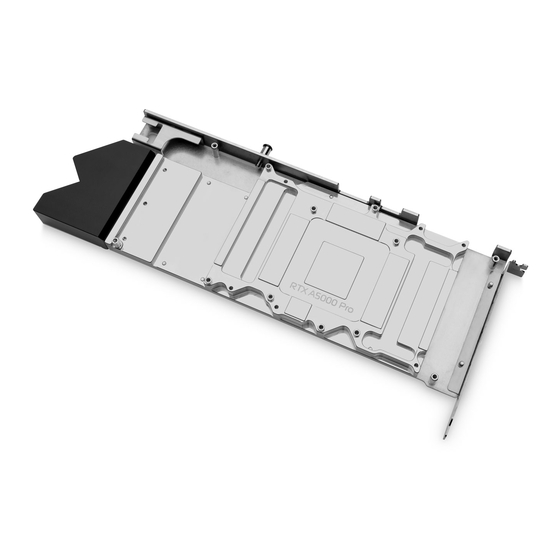
Page 6: Water Block Specifications And Main Parts
RTX A5000 Backplate - rack 104956 RTX A5000 Top - rack 102696 Standoff M3.5/M2.5 x 2.5 101436 Standoff M3/M2.5 x 12.0 3831109861042 EK-FC Pro Terminal Angled 45 deg 105106 Power adapter 103698 RTX A5000 bracket 102697 Standoff M3.5/M2.5 x 6.60... -
Page 7: Preparing The Graphics Card
Place your graphics card on the flat surface and carefully remove the stock cooler. Do not forget to unplug all fan connectors. Pay attention to the following steps when installing the EK-RTX A5000 Rack water block onto your graphics card. -
Page 8: Cutting And Placing Thermal Pads
Once cut to size, thermal pads should be placed on the PCB, as Thermal Pad F 1.0 mm illustrated below. EK made sure to provide you with more than an adequate quantity of thermal pads to complete this Step. For this Step, you will need: Thermal Pad F 1.0 mm (5x) -
Page 9: Cutting And Placing Thermal Pads
CUTTING AND PLACING THERMAL PADS STEP 1 Apply the enclosed EK-TIM Ectotherm thermal grease (thermal compound) on the GPU heat spreader – IHS – as shown in the image. The layer of the thermal compound must be thin and even over the entire surface of the IHS. -
Page 10: Installing The Water Block
INSTALLING THE WATER BLOCK This procedure is the same for all full-cover water blocks. STEP 1 MOUNTING PCB ON THE WATER BLOCK SCREW AX1 M2.5 x 4 (4x) Firstly, stick three (3) Washer POLYAMID M2.5 0.7 mm selfglued, on the top of 3 WASHER M2.5 x 0.5mm (4x) the biggest standoffs. -
Page 11: Attaching The Backplate To The Graphics Card
MOUNTING BACKPLATE ON PCB Again, cut thermal pads to needed size. Thermal pads should be placed on the back of PCB, as illustrated below. EK made sure to provide you with more than an adequate quantity of thermal pads to complete this Step. -
Page 12: Checking For Contact
CHECKING FOR CONTACT If necessary, temporarily remove the water block to check for uniform surface contact between the block and components. Pay special attention to the VRM section of the graphics card. Check whether the water block makes contact with the intended integrated circuit. Then repeat Steps from the previous section to re-attach the block. -
Page 13: Testing The Loop
TESTING THE LOOP To ensure the installation of EK components was successful, we recommend you perform a 24-hour leak test. When your loop is complete and filled with coolant, connect the pump to a PSU outside your system. Do not connect power to any of the other components. -
Page 14: Support And Service
SPECIFICATIONS AND MAIN PARTS” where you can find the EAN number of each part you might need. Include the EAN number with quantity in your request. Mounting Mechanism EAN can be found under “BOX CONTENTS” Thermal pads are readily available in the EK shop SOCIAL MEDIA EKWaterBlocks @EKWaterBlocks...
Need help?
Do you have a question about the Pro RTX A5000 Rack and is the answer not in the manual?
Questions and answers