
Related Manuals for ZOSI C696


Summary of Contents for ZOSI C696
- Page 1 Quick Start Guide C696 Wireless IP Camera This guide will get you going with your camera. For more details and information of the camera, please visit our official website: www.zositech.com V6.W.02.Z...
- Page 2 CONTENTS English...
-
Page 3: What's In The Box
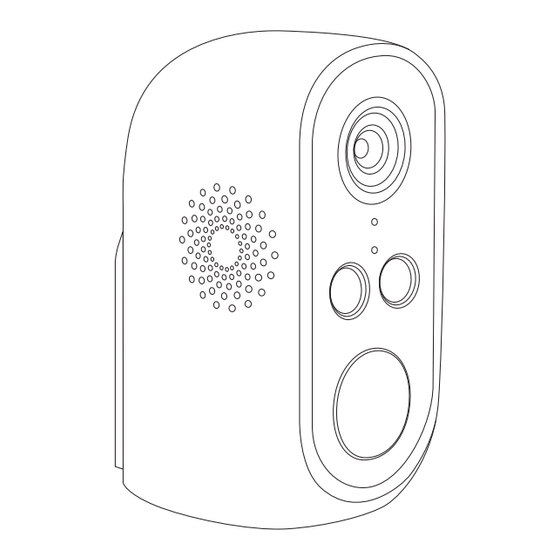
What’s in the Box Camera USB Cable Mounting Screws Mounting Bracket Reset Needle Warning Sticker Quick Start Guide NOTE: 01 English... - Page 4 Gallery & Specs IR LEDs HD Lens Status Indicator Microphone Spotlights PIR Sensor Speaker Wall Mount Magnetic Mount Power Switch DC 5V Power Port Charge Indicator Micro SD Card Slot Reset Hole NOTE: Hold 3-5 seconds Turn ON/OFF Power Switch Reset Button Hold 3-5 seconds Device Reset Status Indicator...
-
Page 5: Battery Charging
Power-ON Press and hold the power switch on the back of the camera for 3 seconds, the network indicator lights blink red. Power on the NVR, the camera network indicator’s blinking red lights will turn into solid blue lights, and the NVR will automatically connect and display video. NOTE: It is recommended to test that each camera can work normally before installation, if not, please contact us. - Page 6 Add Extra Devices NOTE: The camera system has been matched before shipment. After the camera is powered on, the system will automatically connect and display video. If you want to add or reset a camera, follow the steps below. • Press and hold the power switch on the back of the camera for 3 seconds, and you will hear "Device is waiting to connect", and the network indicator light will flash red slowly.
- Page 7 • Use your mobile browser to scan the QR code above to download Zosi Smart (both iphone and Android phone can scan and download. iOS users can use your mobile camera to scan QR code or directly search for "Zosi Smart"...
- Page 8 6.2 Add Device via QR Code 1. Press and hold the camera switch, and you will hear "Device is waiting to connect", and the network status indicator light start flashing red slowly. 2. Tap the Scan QR Code button and scan the QR Code on the camera.
-
Page 9: Camera Installation
4. Confirm if there are firewall restrictions on your home network. It may be due to network reasons that the equipment cannot be connected to our server normally in result the device is not online. 5. If you cannot identify the cause, please reset the device and reconfigure the device network. - Page 10 Attach the Bracket to the Base Adjust the Camera Angle 7.3 Installation Environment Height: Install the camera 6-9 ft (2-3m) above the ground. Distance: Best accuracy for objects within 5-50 ft (1.5-15 m). Angle: Tilt the camera down about 30°-60°from the horizontal position. It is suggested to adjust the angle between camera and detected object larger than 10°.
-
Page 11: Installation Precautions
Installation Precautions • Do not face the camera to any light source. • Do not point the camera at glass windows or reflective objects. Otherwise, it may result in poor image performance due to reflections from infrared LEDs, ambient lights or status lights. •... -
Page 12: Notification Of Compliance
Notification of Compliance CE Simplified EU Declaration of Conformity ZOSI declares that product is in compliance with the essential requirements and other relevant provisions of Directive 2014/53/EU. Correct Dispose of this product This marking indicates that this product should not be disposed with other household waste throughout the EU. - Page 13 NOTE: This equipment has been tested and found to comply with the limits for a Class B digital device, pursuant to part 15 of the FCC Rules. These limits are designed to provide reasonable protection against harmful interference in a residential installation. This equipment generates, uses and can radiate radio frequency energy and, if not installed and used in accordance with the instructions, may cause harmful interference to radio communications.
- Page 14 This device contains licence-exempt transmitter(s)/receiver(s) that comply with Innovation, Science and Economic Development Canada’s licence-exempt RSS(s). Operation is subject to the following two conditions: (1) This device may not cause interference. (2) This device must accept any interference, including interference that may cause undesired operation of the device. L’émetteur/récepteur exempt de licence contenu dans le présent appareil est conforme aux CNR d’Innovation, Sciences et Développement économique Canada applicables aux appareils radio exempts de licence.
- Page 15 No part of this publication may be reproduced in any way without the written permission of ZOSI. The information in this publication is believed to be accurate in all respects. ZOSI assumes no responsibility for any consequences resulting from their use. As our products require...
Need help?
Do you have a question about the C696 and is the answer not in the manual?
Questions and answers