Table of Contents
Advertisement
Available languages
Available languages
Advertisement
Table of Contents

Subscribe to Our Youtube Channel
Related Manuals for ZOSI C190


Summary of Contents for ZOSI C190
- Page 1 WiFi IP Camera Quick Start Guide 该PDF文档使用Icecream PDF编辑器编辑。 Please read the Quick Start Guide carefully before using the product and keep it properly. 升级到专业版,删除水印。 Scan the QR code on the device via ZOSI Smart App V2.I.01.Z...
- Page 2 Contents 1 - 11 Enlish 12 - 22 Español 23 - 33 Français 34 - 44 Deutsch 45 - 55 Italiano 该PDF文档使用Icecream PDF编辑器编辑。 56 - 66 Nederlands 升级到专业版,删除水印。...
-
Page 3: What's In The Box
What’s in the Box 1 x Camera 1 x DC12V 1A Power Adapter Quick Start Guide 1 x Waterproof 1 x Mounting 1 x Mounting 1 x Quick Screw Bag Hole Start Template 该PDF文档使用Icecream PDF编辑器编辑。 Guide 升级到专业版,删除水印。... -
Page 4: Product Appearance
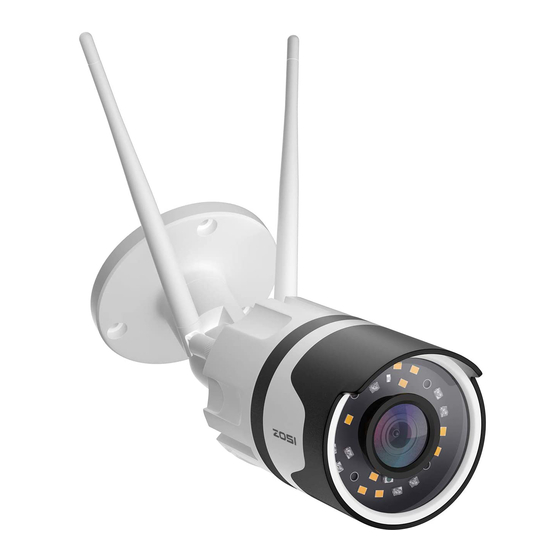
Product Appearance Antenna Micro SD Card Slot (Please log in ZOSI App and initialize after inserting the card) Microphone Speaker Indicator LED IR-LEDs Warm Reset Button White LED RJ45 Port Power Port 该PDF文档使用Icecream PDF编辑器编辑。 升级到专业版,删除水印。... - Page 5 Download ZOSI Smart App Connect your smartphone to WiFi network, scan the QR code below, and download and install the App to finish registration according to the instructions. Scan the QR code via smartphone to download ZOSI Smart App. 该PDF文档使用Icecream PDF编辑器编辑。 升级到专业版,删除水印。...
-
Page 6: Connect To Power Supply
Connect to Power Supply Connect the power port of the camera to outlet using the power adapter. AC100-240V Power Outlet 12V/1000mA 该PDF文档使用Icecream PDF编辑器编辑。 升级到专业版,删除水印。... - Page 7 When the indicator remains solid green, it means the camera is activated. Indicator LED Solid green light: Startup is complete, please configure Wi-Fi. Flickering green light: network is connected successfully. 该PDF文档使用Icecream PDF编辑器编辑。 升级到专业版,删除水印。...
-
Page 8: Quick Configuration
Quick Configuration Log in ZOSI App on your smartphone, scan the QR code on the camera or on the cover of the Quick Start Guide, and follow the prompts to connect to WiFi and connect to the camera. Reset Button... -
Page 9: Camera Installation
Camera Installation The mounting wall should have a certain thickness which can bear at least 3 times the weight of the camera. 1.Mount the Camera Follow the steps to mount the camera as shown in the below figure. Mounting Hole Template Mounting M3x20mm Hole... - Page 10 2.Adjust the Angle Loosen the adjusting screw to adjust the angle of the camera. Tighten the adjusting screw after the adjustment. 0-180° Rotate to adjust 该PDF文档使用Icecream PDF编辑器编辑。 升级到专业版,删除水印。...
- Page 11 FAQs 1.Q: Why can't I add a device by using local search? A: Please make sure the device and mobile phone are in the same LAN. If you can't make both of them in the same LAN, please manually enter the UID of the device to add a device.
-
Page 12: Customer Service
If you have any problems with our products, you can call our service hotline, contact online customer service or visit our official website. You can log in ZOSI official website to check the after-sales service site. Official Website: zositech.com Statement This product is an IP camera, you can get a better user experience by upgrading to the latest official App version. -
Page 13: Warranty Card
Camera purchased from ZOSI (based on the valid purchase receipt). During the warranty period, any failure caused by the quality of the product itself under normal use will be repaired free of charge by ZOSI. 2.Warranty is void in the following situations: Any malfunction or damage caused by improper working environment or conditions;... - Page 14 Lista de paquete 1x Cámara 1x 3m Adaptador de corriente Quick Start Guide 1x Bolsa de tornillos 1x Guía de operación rápida 该PDF文档使用Icecream PDF编辑器编辑。 升级到专业版,删除水印。 1x Tapa protectora impermeable 1x Plantilla de orificio de montaje...
- Page 15 Apariencia de la cámara Antena Ranura para tarjeta micro SD Después de insertar la tarjeta micro SD, inicie sesión en la aplicación "Zosi Smart" para formatear la tarjeta. Micrófono Altavoz Luz indicadora Luz blanca Luz cálida Botón de reinicio Puerto de Ethernet Puerto de alimentación...
- Page 16 Descargar la aplicación “Zosi Smart” Conecte el teléfono móvil a red Wi-Fi, escanee el código QR a continuación para descargar la aplicación. Luego instale la aplicación y complete el registro de la cuenta con las indicaciones. Zosi Smart 该PDF文档使用Icecream PDF编辑器编辑。...
- Page 17 Alimenta la cámara Alimenta la cámara con el adaptador de corriente. AC100-240V Toma de corriente 12V/1000mA 该PDF文档使用Icecream PDF编辑器编辑。 升级到专业版,删除水印。...
- Page 18 Si la luz indicadora permanece verde, la cámara está encendida. Luz indicadora Verde continuo: la cámara está encendida y está esperando la configuración de WLAN. Verde parpadeante: la cámara se ha conectado correctamente a la WLAN. 该PDF文档使用Icecream PDF编辑器编辑。 升级到专业版,删除水印。...
- Page 19 Configurar la cámara Inicie sesión en la aplicación ''ZOSI Smart'' en su móvil, escanee el código QR de la cámara y siga las instrucciones para conectar la cámara a WLAN y agregarla a la aplicación.
-
Page 20: Instalar La Cámara
Instalar la cámara Monte la cámara en una pared lo suficientemente gruesa como para soportar al menos 3 veces el peso de la cámara. 1.Instalar la cámara Siga los pasos a continuación para montar la cámara. Plantilla de orificio de montaje 3x 20mm Taco para Tornillo... - Page 21 2.Ajustar el ángulo de la cámara Afloje el tornillo de ajuste, ajuste la cámara al ángulo que quiera. Después del ajuste, apriete el tornillo de ajuste nuevamente. 0-180° Tornillo de ajuste 该PDF文档使用Icecream PDF编辑器编辑。 升级到专业版,删除水印。...
-
Page 22: Preguntas Frecuentes
Preguntas frecuentes Pregunta: ¿Por qué el dispositivo no se puede buscar al añadir? Respuesta: Asegúrese de que el dispositivo y el móvil estén en la misma LAN; de lo contrario, introduzca la ID del dispositivo manualmente. Pregunta: ¿Por qué el dispositivo no puede conectarse al Internet? Respuesta: por favor revise ·Si el dispositivo está... -
Page 23: Servicio Post-Venta
Servicio post-venta Si tiene problemas durante el uso, puede contactar al servicio al cliente o visitar el sitio web oficial de ZOSI. Sitio web oficial: www.zositech.com Tips : Este producto es un dispositivo de internet. El software de la última versión, le brindará... -
Page 24: Tarjeta De Garantía
Muchas gracias por su compra de producto de Zosi Technology Co.,Ltd ZOSI le recomienda leer cuidadosamente esta tarjeta de garantía antes de usar el producto: 1. Esta garantía cubre un período de 12 meses a partir de la primera fecha de compra del cliente("Fecha de compra"... - Page 25 Ce produit contient : 1 caméra IP 1 adaptateur secteur Quick Start Guide 1 matière 1 vis 1 adhésif 1 mode imperméable d’installation d’emploi 该PDF文档使用Icecream PDF编辑器编辑。 升级到专业版,删除水印。...
- Page 26 Présentation de caméra Antenne Fente de la carte microSD (Formatez la carte dans l’application Zosi Smart après son insertion) Microphone Haut-parleur Voyant LED LED Infrarouge Bouton de LED Blanche réinitialisation Interface de réseau Power Interface 该PDF文档使用Icecream PDF编辑器编辑。 升级到专业版,删除水印。...
- Page 27 Téléchargez l’application Zosi Smart Téléchargez et installez l’application Zosi Smart sur votre smartphone et créez un compte pour vous connecter. 该PDF文档使用Icecream PDF编辑器编辑。 升级到专业版,删除水印。...
- Page 28 Démarrez la caméra Connectez la caméra à l’adaptateur secteur et connectez l’adapteur secteur à la prise de courant. AC100-240V Prise de courant 12V/1000mA 该PDF文档使用Icecream PDF编辑器编辑。 升级到专业版,删除水印。...
- Page 29 Lorsque le voyant de la caméra est vert, cela signifie que le démarrage est terminé. Voyant Le voyant est vert: le démarrage est terminé, veuillez configurer le Wi-Fi. Le voyant clignote: la connexion de réseau est bien établie. 该PDF文档使用Icecream PDF编辑器编辑。 升级到专业版,删除水印。...
-
Page 30: Configuration Rapide
Configuration rapide Vous vous connectez à l’application Zosi Smart, et puis scannez le code QR de la caméra, ensuite terminez la configuration du wifi et l’ajout de la caméra en suivant les indications de l’application. Bouton de réinitialisation... - Page 31 Installez la caméra Le mur de montage doit avoir une certaine épaisseur et peut supporter au moins 3 fois du poids de la caméra. 1.Installez la caméra Schéma de l’installation: Installez l’adhésif. Dimension:M3x20mm Filière Installez les filières Installez les vis 该PDF文档使用Icecream PDF编辑器编辑。...
- Page 32 2.Ajustez l’angle de la caméra Desserrez la vis de réglage pour ajuster l'angle de la caméra. Une fois le réglage terminé, resserrez la vis de réglage. 0-180° Vis pour ajuster et tourner la caméra 该PDF文档使用Icecream PDF编辑器编辑。 升级到专业版,删除水印。...
-
Page 33: Foire Aux Questions
Foire aux questions Question: Pourquoi je ne peux pas ajouter un appareil à l'aide de la recherche locale? Réponse: Veuillez vous assurer que l'appareil et le téléphone portable sont connectés dans le même réseau local. S'ils ne sont pas connectés dans le même réseau local, veuillez saisir manuellement l'UID de l'appareil pour terminer l'ajout. -
Page 34: Service Après-Vente
Service Après-Vente Pour plus d’informations et de détaillés, veuillez visiter notre site web ou nous contacter. Nos informations de contact : Email: service@zositech.com Site web: www.zositech.com Foire aux questions: www.support.zositech.com Facebook : @ZosiTechnology You Tube : youtube.com/c/ZosiTechnology Déclaration Ce produit est une caméra IP, et la mise à jour logicielle vers la dernière version officielle vous permettra d'obtenir la meilleure expérience d’utilisation. -
Page 35: Carte De Garantie
1.Cette garantie couvre une période de 24 mois à compter de la première date d’achat du client final (“Date d’achat” de la facture). Si le produit tombe en panne pendant la période de garantie, ZOSI s’engage à réparer ou à remplacer les pièces défectueuses ou le produit par des pièces neuves ou utilisables. - Page 36 Was ist enthalten Kamera X 1 Netzteil mit 3M Netzkabel X 1 Quick Start Guide Montageschrauben X 1 Kurzanleitung X 1 该PDF文档使用Icecream PDF编辑器编辑。 升级到专业版,删除水印。 Wasserdichte Schutzkappe X 1 Montagelochschablone X 1...
- Page 37 Übersicht Antenne microSD Kartenslot Nach Einstecken der Speicherkarte bitte melden Sie sich in die App ein, um die Karte zu formatieren. Mikrofon Lautsprecher Kontrolllampe IR-LEDs Weiß-LEDs Reset-Taste Netzwerkanschluss Stromanschluss 该PDF文档使用Icecream PDF编辑器编辑。 升级到专业版,删除水印。...
- Page 38 App herunterladen Verbinden Sie Ihr Smartphone mit WLAN und laden Sie die ZOSI-APP durch Scannen des folgenden QR-Codes oder Suche nach „ZOSI SMART“ im App Store herunter. Folgen Sie die Anweisungen in der App um ein Konto zu registrieren. QR-Code scannen um die „ZOSI Smart“-App herunterzuladen.
- Page 39 Kamera mit Netzteil verbinden Schließen Sie das Netzteil an die Kamera und die Steckdose an. AC100-240V Steckdose 12V/1000mA 该PDF文档使用Icecream PDF编辑器编辑。 升级到专业版,删除水印。...
- Page 40 Wenn die Kontrolllampe grün bleibt, ist die Kamera eingeschaltet. Kontrolllampe Grün: Die Kamera ist eingeschaltet und wartet auf WLAN-Einstellung. Blinkt grün: Die Kamera ist erfolgreich mit WLAN verbunden. 该PDF文档使用Icecream PDF编辑器编辑。 升级到专业版,删除水印。...
-
Page 41: Kamera Einrichten
Kamera einrichten Melden Sie sich in die ZOSI-App auf Ihrem Smartphone ein, scannen Sie den QR-Code auf der Kamera und folgen Sie die Anweisungen um die Kamera mit dem WLAN zu verbinden und in die App hinzuzufügen. Reset- Taste... -
Page 42: Kamera Montieren
Kamera montieren Montieren Sie die Kamera an eine Wand, die dick genug ist um mindestens dem 3-fachen Gewicht der Kamera standzuhalten. 1.Kamera montieren Folgen Sie die folgenden Schritte um die Kamera zu montieren. Montagelochschablone kleben Schrauben Dübel Dübel montieren Schrauben befestigen 该PDF文档使用Icecream PDF编辑器编辑。... - Page 43 2.Kamera ausrichten Lockern Sie die Einstellschraube um die Kamera auszurichten. Nach der Ausrichtung ziehen Sie die Einstellschraube an. 0-180° Einstellschraube 该PDF文档使用Icecream PDF编辑器编辑。 升级到专业版,删除水印。...
- Page 44 F: Warum kann ich die Kamera nicht bei LAN-Suche hinzufügen? A: Stellen Sie sicher, dass sich Ihr Smartphone und die Kamera mit demselben Netzwerk verbinden. Wenn die beiden Geräte nicht in demselben Netzwerk sind, geben Sie die UID der Kamera manuell ein, um die Kamera hinzuzufügen.
- Page 45 Kundenservice Wenn Sie während des Gebrauchs auf Probleme stoßen, können Sie die Service-Hotline anrufen, den Online-Kundendienst kontaktieren oder die offizielle Website von ZOSI besuchen. Offizielle Website: www.zositech.com Erklärung Bei diesem Produkt handelt es sich um ein Internetgerät. Durch ein Upgrade auf die neueste offizielle Softwareversion erhalten Sie eine bessere Benutzererfahrung.
- Page 46 Produktgarantiekarte Sehr geehrte Benutzer: Vielen Dank, dass Sie sich für die Produkte von ZOSI entschieden haben. Bitte lesen Sie die folgenden Bedingungen sorgfältig durch, bevor Sie dieses Produkt installieren und verwenden: 1. Die Garantiezeit für dieses Produkt beträgt zwei Jahre ab Kaufdatum (basierend auf dem gültigen Kaufnachweis).
- Page 47 Elenco dei pacchetti 1x Fotocamera 1x 3m Adattatore di alimentazione Quick Start Guide 1x Cappuccio 1x Sacchetto 1x Dima 1x Guida protettivo di viti per fori di rapida 该PDF文档使用Icecream PDF编辑器编辑。 impermeabile montaggio all'utilizzo 升级到专业版,删除水印。...
- Page 48 Aspetto della fotocamera Antenna Slot per scheda micro SD (Dopo aver inserito la scheda micro SD, accedi all'app "Zosi Smart" per formattare la scheda) Microfono Altoparlante Indicatore luminoso Luce bianca Luce calda Pulsante di reset Porta Ethernet Porta di alimentazione 该PDF文档使用Icecream PDF编辑器编辑。...
- Page 49 Scarica l'applicazione "Zosi Smart" Collega il telefono cellulare alla rete Wi-Fi, scansiona il codice QR qui sotto per scaricare l'app. Quindi installare l'applicazione e completare la registrazione dell'account con le istruzioni. Zosi Smart 该PDF文档使用Icecream PDF编辑器编辑。 升级到专业版,删除水印。...
- Page 50 Alimenta la fotocamera Alimentare la fotocamera con l'alimentatore. AC100-240V Presa di corrente 12V/1000mA 该PDF文档使用Icecream PDF编辑器编辑。 升级到专业版,删除水印。...
- Page 51 Se la spia rimane verde, la fotocamera è accesa. Indicatore luminoso Verde fisso: la fotocamera è accesa e in attesa di configurazione WLAN. Verde lampeggiante: la fotocamera si è connessa correttamente alla rete WLAN. 该PDF文档使用Icecream PDF编辑器编辑。 升级到专业版,删除水印。...
- Page 52 Configura la videocamera Accedi all'app '' ZOSI Smart '' sul tuo telefonino, scansiona il codice QR della videocamera e segui le istruzioni per connettere la videocamera alla rete WLAN e aggiungerla all'app. Pulsante di reset...
- Page 53 Installa la videocamera Montare la videocamera su una parete abbastanza spessa da supportare almeno 3 volte il peso della videocamera. 1.Installa la videocamera Seguire i passaggi seguenti per montare la videocamera. Dima per fori di montaggio Tappo a vite 3x 20mm Vite Installare il tappo Installare la vite a vite...
- Page 54 2.Regolare l'angolazione della telecamera Allentare la vite di regolazione, regolare la videocamera sull'angolazione desiderata. Dopo la regolazione, serrare nuovamente la vite di regolazione. 0-180° Vite di regolazione 该PDF文档使用Icecream PDF编辑器编辑。 升级到专业版,删除水印。...
- Page 55 FAQs Domanda: Perché non riesco ad aggiungere il dispositivo con la ricerca locale? Risposta: assicurarsi che il dispositivo e il cellulare siano sulla stessa LAN; in caso contrario, inserire l'ID dispositivo manualmente. Domanda: Perché il mio dispositivo non può connettsi alla rete? Risposta: Si prega di controllare ·Il dispositivo è...
-
Page 56: Servizio Post-Vendita
Servizio post-vendita In caso di problemi durante l'uso, è possibile contattare il servizio clienti o visitare il sito Web ufficiale ZOSI. Sito ufficiale: www.zositech.com Suggerimenti: Questo prodotto è un dispositivo Internet. L'ultima versione del software ti offrirà un'esperienza utente migliore. -
Page 57: Scheda Di Garanzia
1.La presente garanzia copre un periodo di 12 mesi dalla prima data di acquisto del cliente ("Data di acquisto" sulla fattura). Se il prodotto non funziona durante il periodo di garanzia, ZOSI si impegna a riparare o sostituire le parti difettose o il prodotto. -
Page 58: Wat Is Inbegrepen
Wat is inbegrepen Camera X 1 Voeding met 3M stroomkabel X 1 Quick Start Guide Montageschroeven X 1 Korte instructies X 1 该PDF文档使用Icecream PDF编辑器编辑。 Waterdichte beschermkap X 1 Sjabloon voor montagegaten X 1 升级到专业版,删除水印。... - Page 59 Overzicht Antenne micro sd (microSD-kaartsleuf: log na het plaatsen van de geheugenkaart in op de app om de kaart te formatteren.) Microfoon Sprekers Indicatielampje IR-LEDs Witte-LEDs Reset-knop Netwerkinterface Machtsinterface 该PDF文档使用Icecream PDF编辑器编辑。 升级到专业版,删除水印。...
- Page 60 App downloaden Verbind je smartphone met wifi en download de ZOSI APP door de volgende QR-code te scannen of te zoeken naar "ZOSI SMART" in de App Store. Volg de instructies in de app om een account te registreren. Scan de QR-code om de "ZOSI Smart" -app te downloaden.
- Page 61 Sluit de camera aan op de voeding Sluit de AC-adapter aan op de camera en het stopcontact. AC100-240V Contactdoos 12V/1000mA 该PDF文档使用Icecream PDF编辑器编辑。 升级到专业版,删除水印。...
- Page 62 Als het indicatielampje groen blijft, is de camera ingeschakeld. Indicatielampje Groen: de camera is ingeschakeld en wacht op de WLAN-instelling. Groen knipperend: de camera is succesvol verbonden met WLAN. 该PDF文档使用Icecream PDF编辑器编辑。 升级到专业版,删除水印。...
- Page 63 Stel de camera in Log in op de ZOSI-app op je smartphone, scan de QR-code op de camera en volg de instructies om de camera te verbinden met het WLAN en deze toe te voegen aan de app. Reset- knop...
- Page 64 Monteer de camera Bevestig de camera aan een muur die dik genoeg is om minimaal 3 keer het gewicht van de camera te dragen. 1.Monteer de camera Volg onderstaande stappen om de camera te monteren. Lijm de montagegatmal Schroeven Deuvels Monteer de pluggen Draai de schroeven vast 该PDF文档使用Icecream PDF编辑器编辑。...
- Page 65 2.lijn de camera uit Draai de stelschroef los om de camera uit te lijnen. Draai na het uitlijnen de stelschroef vast. 0-180° Stelschroef 该PDF文档使用Icecream PDF编辑器编辑。 升级到专业版,删除水印。...
- Page 66 Veel voorkomend probleem Vraag: Waarom kan ik niet naar apparaten zoeken tijdens het toevoegen? Antwoord: Zorg ervoor dat het apparaat en mobiele apparaat zich in hetzelfde LAN bevinden, anders voert u de apparaat-ID handmatig; Vraag: Waarom kan mijn apparaat geen verbinding maken met het netwerk? Antwoord: Controleer dit alstublieft ·...
- Page 67 Klantenservice Als u problemen ondervindt tijdens het gebruik, kunt u de servicehotline bellen, contact opnemen met de online klantenservice of de officiële ZOSI-website bezoeken. Officiële website: www.zositech.com Toelichting Dit product is een internetapparaat. Door naar de nieuwste officiële softwareversie te upgraden, krijgt u een betere gebruikerservaring.
- Page 68 3. Als het geretourneerde product niet aan de voorwaarden van deze beperkte garantie voldoet, berekenen we de bijbehorende reparatiekosten. 4. Het reparatieproces hoeft alleen de defecte apparaten te retourneren, 该PDF文档使用Icecream PDF编辑器编辑。 geen SD-kaart of voeding bij zich. Bij verlies van de accessoires is ZOSI niet 升级到专业版,删除水印。 verantwoordelijk.
- Page 69 All rights reserved. No part of this publication may be reproduced by any means without written permission from ZOSI. The information in this publication is believed to be accurate in all respects. ZOSI cannot assume responsibility for any consequences resulting from the use thereof.
Need help?
Do you have a question about the C190 and is the answer not in the manual?
Questions and answers