Table of Contents
Advertisement
Quick Links
Advertisement
Table of Contents

Related Manuals for Timeguard E269H-Synchronous


Summary of Contents for Timeguard E269H-Synchronous
- Page 1 20 Amp Electronic 24 Hour/7 Day Time Controller Model: E269H – Synchronous...
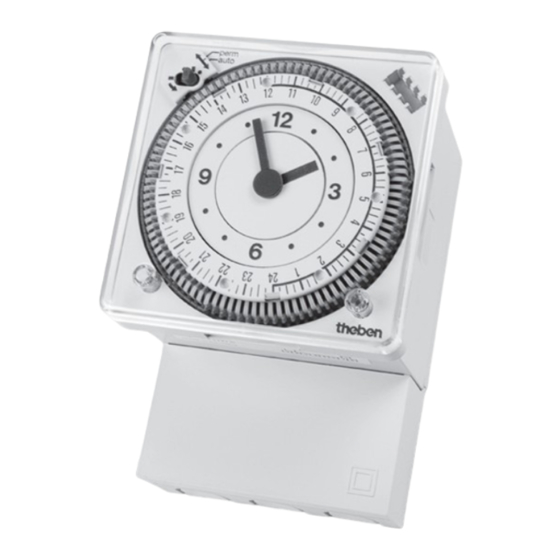
- Page 2 1 Fixing Instructions 2 Surface Mounting Lift the transparent cover off and remove the two screws. Pull the clock body and then the terminal cover from the base. Mount the base and connect from the diagram. Flush Mounting Cut panel opening 66 x 66mm, remove switch from base as above connect from diagram.
- Page 3 3 Circuit Diagrams – E269H 4 Set Clock Turn the hands of the clock either clockwise or anticlockwise to the correct time. 9.00 21.00...
- Page 4 5 24 Hour Operation SET SWITCHING TIME – lift off transparent cover and insert the switching riders to the required position using red for ON and blue for OFF. 6 24 Hour ➔ 7 Day Programme...
- Page 5 7 7 Day Programme 8 7 Day Operation 1 Lift off transparent cover and the outer ring to expose the yellow and green circumferential bands around the clock face. The yellow refers to 7 day movement, 2 Turn the clock hand either clockwise or anticlockwise to line up the slots between the green and yellow bands.
- Page 6 10 Programme Auto Manual 3.43.236 (Red) 3.43.237 (Blue)
- Page 7 11 Manual Control (Override) The manual control is automatically annulled by the following counteracting command of the automatic program sequence. Permanent ON/OFF 12 Permanent Control ON/OFF Set the hand lever to “Perm” = permanent control; turning the control axis 1 in direction of arrow, the required permanent control ON and OFF can now be adjusted.
- Page 8 Note: A proof of purchase is required in all cases. For all eligible replacements (where agreed by Timeguard) the customer is responsible for all shipping/postage charges outside of the UK. All shipping costs are to be paid in advance before a replacement is sent.
Need help?
Do you have a question about the E269H-Synchronous and is the answer not in the manual?
Questions and answers