Table of Contents
Advertisement
Quick Links
Advertisement
Table of Contents

Related Manuals for Timeguard TRT039N


Summary of Contents for Timeguard TRT039N
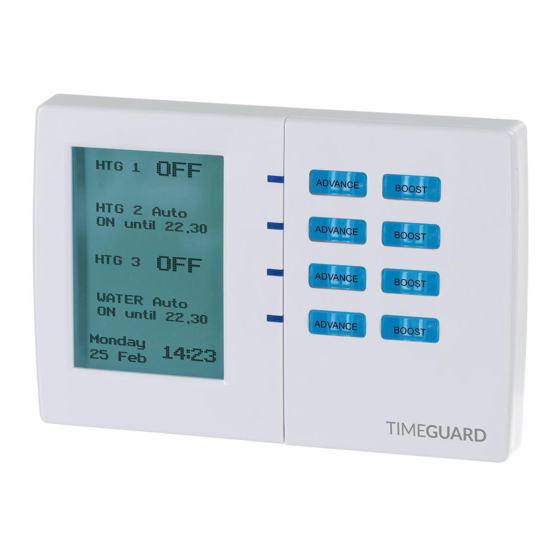
- Page 1 7 Day Digital Programmer 4 Channel – Surface Mount Model: TRT039N...
-
Page 2: General Information
1. General Information These instructions should be read carefully and retained for further reference and maintenance. 2. Safety • Before installation or maintenance, ensure the mains supply to the programmer is switched off and the circuit supply fuses are removed or the circuit breaker turned off. - Page 3 Blue LED illuminated on setting for button surrounds and display • CE Compliant • Dimensions (H x W x D): 90 x 135 x 30mm TRT039N Front View Output LED’s for channel Advance button 1 and 2 hour boost for central switch status...
-
Page 4: Installation
4. Siting • The TRT039N should be located at a position which eases wiring runs and gives good access for programming. • It should be mounted approximately 1.5m above floor level. 5. Installation 5.1 Ensure the mains supply is switched off and the circuit supply fuses are removed or the circuit breaker turned off. - Page 5 TRT039N Wall Plate Alternate mounting holes Retaining tabs Mounting holes Wall plate retaining screws...
-
Page 6: Connection Diagram
6. Connection Diagram Connect the 230V 50Hz mains supply and load cables to the terminal block which are marked as follows; • Note: Check boiler instructions before connecting. 230V 50Hz 230V 50Hz P1 ON = P2 COM = P3 ON = P4 ON = P5 COM = P6 ON =... -
Page 7: Setting The Time And Date
7. Reset from Power-up 7.1 Restore mains to the unit after making sure to check all system wiring is complete. 7.2 Press the reset button located beneath the flip down cover on the front of the unit, the screen will fade and then reappear showing all available channels as well as the default time and date at the bottom of the display. - Page 8 8.3 The hour will be highlighted on the display. Use the advance buttons marked beside the + and – indicators to alter the hour. Press enter once to confirm. 8.4 The minutes will now be highlighted on the display. Use the advance buttons marked bedside the + and –...
-
Page 9: Daylight Saving
Daylight Saving 8.9 Automatic summer/winter times (BST+1/BST) can be selected or deselected. It is on by default. 8.10 Select the daylight savings option from the settings menu. Set this value either ON or OFF using the advance buttons marked beside the + and –... - Page 10 9. Programme Preparation (Headings) 9.1 Decide which heading suits best for the channels to be displayed. They can be set as channels being channel 1, 2, 3 and 4, split as heating and hot water being heating 1, heating 2, heating 3 and water as the fourth channel as well as having an option for heating on the first 2 channels (1 &...
- Page 11 10. Programme Entry Please read the following notes on programming before proceeding. • PROGRAMMES FOR DIFFERENT CHANNELS ARE ENTERED AND CAN BE EDITED SEPARATELY. • TIMES CAN ONLY BE SET IN 10 MINUTE INCREMENTS. • THE COPY FUNCTION CAN BE USED TO DUPLICATE ON AND OFF TIMES FOR DIFFERENT DAYS OF THE WEEK, AS DETAILED FURTHER IN THE INSTRUCTIONS (READ IN FULL BEFORE YOU BEGIN).
- Page 12 10.3 The OFF time will be highlighted for period 1. Use the advance buttons marked beside the + or – indicators to increase or decrease the value of the OFF time by 10 minute increments. Once the OFF time has been set press enter.
-
Page 13: Operation
10.8 The periods for the day being copied will be shown on the display briefly. The next day of the week will be on the display (Friday for example), press the copy button again to copy the period settings from Thursday to Friday. - Page 14 11.3 The next subsequent day will be displayed; again the copy button can be used to apply the settings to this day. If an alternative day is required, used the advance buttons marked beside the + or – indicators to select an alternative day of the week and then press copy to apply the settings from the day originally copied.
-
Page 15: Boost Function
Boost Function 11.5 Pressing the boost button from the OFF position will give a 1 hour boost. A second press will give a two hour boost; pressing the boost button a third time will cancel the boost operation. 11.6 Pressing the boost button from the ON position adds a 1 hour boost. A second press will add a 2 hour boost to the next off time. - Page 16 11.9 The advance button can also be used for the opposite, e.g. if a programme is due to switch OFF at 22:00, pressing the advance button would switch OFF the programme ahead of time. This would result in the unit displaying the next programme ON time which in this case would be 06:00.
-
Page 17: Holiday Mode
Holiday Mode 11.15 Holiday mode suspends all programmes from mid-day of the start date and will reinstate the programmes mid-day of the return date. To enable this mode press the menu button, then use the advance buttons marked beside the + or – indicators to select ‘set holiday mode’... -
Page 18: Year Guarantee
020 8450 0515. Note: A proof of purchase is required in all cases. For all eligible replacements (where agreed by Timeguard) the customer is responsible for all shipping/postage charges outside of the UK. All shipping costs... - Page 20 If you experience problems, do not immediately return the unit to the store. Telephone the Timeguard Customer Helpline; HELPLINE 020 8450 0515 or email helpline @ timeguard.com Qualified Customer Support Co-ordinators will be on-line to assist in resolving your query.
Need help?
Do you have a question about the TRT039N and is the answer not in the manual?
Questions and answers