Advertisement
Quick Links
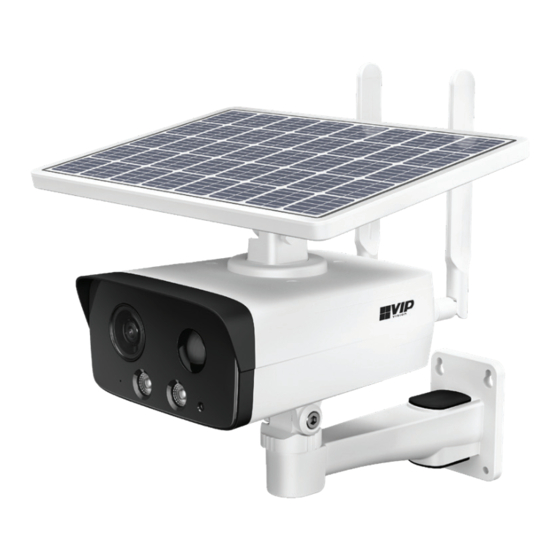
VIP Vision Solar Series 4.0MP 4G Bullet Camera
VSIPSLR-A41 Quick Start Guide
Installation Information
• The camera will come with a small amount of
charge. If the camera has gone flat from storage,
connect the camera with a Micro USB cable and
5V 2A charger for a minimum of 2 hours (not
included) or place the camera in the sun.
• This camera needs to be positioned in a location
that the solar panel will receive 4-5 hours of
sunlight per day to function correctly.
• When installing the camera, be sure to
waterproof all cable connections to ensure
water will not damage the camera cabling.
• See the above diagram as a reference during the
configuration of your VSIPSLR-A41, taking note
of the indicator light.
Further Information
• This guide covers the basic steps to get the camera
connected to the mobile application and mounted
correctly.
• Further information can be found by scanning
the QR code on this page or by visiting
https://help.c5k.info/VSIPSLR-A41
• We strongly recommend visiting our knowledge base
for configuration assistance and troubleshooting.
INDICATOR
LIGHT
MicroSD: Insert
Contacts Up
During installation, check indicator light, located
behind the flap, on the bottom of the camera:
• Constant green: successful network connection
• Flashing green: no network connection
• Constant red: Booting or device is abnormal
• No light: Camera is sleeping or without power
This package includes:
• 1 x Solar camera with 2 x 4G antennas
• 1 x Allen key, mounting bracket & bolts
• 1 x Waterproof RJ45 boot
Required components not included in this package
are a 4G microSIM card and microSD card (up to
256GB) for footage recording/storage.
help.c5k.info
Visit
MicroSIM: Insert
Contacts Down
for more information and support
Advertisement

Related Manuals for Vip-Vision Solar Series


Summary of Contents for Vip-Vision Solar Series
- Page 1 VIP Vision Solar Series 4.0MP 4G Bullet Camera VSIPSLR-A41 Quick Start Guide INDICATOR LIGHT MicroSD: Insert MicroSIM: Insert Installation Information Contacts Up Contacts Down During installation, check indicator light, located • The camera will come with a small amount of charge.
- Page 2 VIP Vision Solar Series 4.0MP 4G Bullet Camera VSIPSLR-A41 Quick Start Guide It is strongly recommended to configure the camera first before mounting it to the install location. 1. Download the “DMSS” application on your iOS 8. On connecting, you will be prompted to set (Apple) or Android (Google) smart device.
Need help?
Do you have a question about the Solar Series and is the answer not in the manual?
Questions and answers