
Related Manuals for VORON ERCF v2


Summary of Contents for VORON ERCF v2
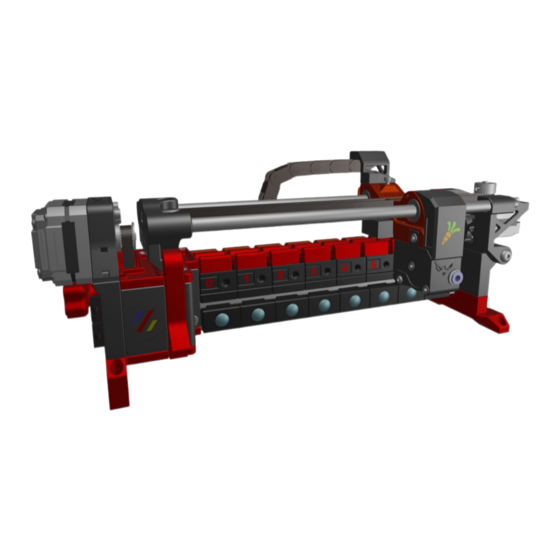
- Page 1 ERCF v2 BUILD GUIDE COMMUNITY EDITION We build space shuttles with gardening tools so anyone can have a space shuttle of their own. VERSION 2023-11-21...
- Page 2 Before you begin on your journey, a word of caution. This machine can maim, burn, and electrocute you if you are not careful. Please do not become the first VORON fatality. There is no special Reddit flair for that. Please, read the entire manual before you start assembly.
-
Page 3: Table Of Contents
ERCF v2 WWW.VORONDESIGN.COM TABLE OF CONTENTS Introduction Wiring Gearbox Filament Blocks End Block Selector Encoder Linear Axis Final Assembly CottonTail Buffer CAD version: ERCF V2... -
Page 4: Introduction
PART PRINTING GUIDELINES The Voron Team has provided the following print guidelines for you to follow in order to have the best chance at success with your parts. There are often questions about substituting materials or changing printing standards, but we recommend you follow these. - Page 5 STL FILE KEY FILE NAMING By this time you should have already downloaded our STL files from the Voron GitHub. You might have noticed that we have used a unique naming convention for the files. This is how to use them.
- Page 6 Nut that can be inserted into the slot of Nut that can be inserted into the slot of an aluminium 2020 profile. an aluminium profile. Used exclusively for panel mounting, all other Often also called “roll-in t-nut.” components use T-Slot nuts. CAD version: ERCF V2...
- Page 7 INTRODUCTION WWW.VORONDESIGN.COM HARDWARE REFERENCE 625 BEARING WASHER A ball bearing used on the Voron Z Metric fastener with a domed shape head drives. and hex drive. Most commonly found in locations where M5 fasteners are used. ISO 7380-1 PULLEY IDLER...
- Page 8 A quality driver is strongly recommended. Refer to the sourcing guide for suggestions. ADDITIONAL TOOLS We provide additional tool recommendations in our sourcing guide. Visit https://vorondesign.com/ sourcing_guide and switch to the “Voron Tools” tab at the bottom of the page. CAD version: ERCF V2...
- Page 9 CAD Pro. You can use the free edition of damaging the bearings. Fusion360, or your choice of CAD program such PRINTED PART TRACKER SPREADSHEET as TinkerCAD or FreeCAD. There is a helpful interactive Printed Part Tracker for ERCFv2 here: Printed Parts Tracker Google Sheet CAD version: ERCF V2...
- Page 10 This project aims to bring multi material capabilities to 3D printers using a single Direct Drive toolhead. While this project is mainly designed to be used on VORON printers, it can also be used (or adapted) on any 3D printer that runs Klipper.
- Page 11 SturdyBunny, TripleDecky, Springy, Binky and other strange names appeared. It was then that Moggieuk, the author of Happy Hare, rounded up these project authors and created the beginnings of the ERCF v2 community release. As the project developed, Kinematicdigit developed and contributed CottonTail, Sorted developed and contributed Filametrix and we were joined by some awesome talent that polished, tested and documented to complete the project.
- Page 12 HOW TO GET HELP If you need assistance with your build you can head over the VORON Discord group and post your questions in the ercf_questions channel. It is the primary medium to help people with their ERCF build and tuning! You can also check the Github page for the latest releases.
- Page 13 Discord. Many common issues have likely been encountered and resolved before, so assistance is readily available. Enjoy the process of building as much as utilizing your Enraged Rabbit Carrot Feeder (ERCF)! CAD version: ERCF V2...
- Page 14 To check the Top_Hat, insert the arm of a Tophat into the slot. It should insert without much force. Once inserted, the Tophat should be able to move up and down easily. To remove the Tophat, pull it up while rotating it. CAD version: ERCF V2...
- Page 15 Page 27 • Page 32 • Page 41 • Page 84 • Page 85 • Page 86 • Page 96 • Page 106 Optionally, for the ERCT / CottonTail Buffer: • Page 133 • Page 139 CAD version: ERCF V2...
- Page 16 The CAD file is organized into folders based on the instructions in this manual. First hide all the parts, and then reveal the parts up to the step you are on in this manual, and the CAD should match what you are building. All of the non-printed parts are in each section’s Hardware folder. CAD version: ERCF V2...
- Page 17 Belt_Tensioner.stl † ERCF_v2 / STLs / Supports / V1_V2 Drag_Chain_Anchor.stl † [a]_Support_Feet_4mm_x4.stl † [a]_Support_Feet_5mm_x4.stl † ERCF_v2 / STLs / Supports / Adjustable_Mount [a]_Screw_x3.stl † ERCF_v2 / STLs / Tools Junction_Plate_Flat_x2.stl † Pulley_Tool_NEMA14.stl † Junction_Plate_Gear_Box.stl † Pulley_Tool_NEMA17.stl † CAD version: ERCF V2...
-
Page 18: Wiring
CONNECTION TO THE SELECTOR MOTOR When using a remote MCU, it is recommended to finish the selector motor connection later in the assembly, for ease of assembly and to ensure the crimps are done with the proper wire length CAD version: ERCF V2... - Page 19 Double-check. You’re supposed to skip this page if you’re using a local MCU (“buddy board” like EASY BRD or BTT MMB). You wouldn’t want to cut your wires too short! Trim your Gear Motor wires to 85mm, then crimp and add the 4-pin Molex Microfit connector. That’s it! Gear Motor Molex Microfit 3 – 4 pins 85mm CAD version: ERCF V2...
- Page 20 It is recommended to finish the Servo and Encoder connections later in the assembly, for ease of assembly and to ensure the crimps are done with the proper wire length. This should be a 6-wire bus with a wire to control the Apron LEDs, but we added them late in development for RC1 release! CAD version: ERCF V2...
- Page 21 Trim your Gear Motor wires to 500mm, then crimp and add the 4-pin Molex Microfit connector. Selector Motor Molex Microfit 3 – 4 pins Gear Motor 200mm Molex Microfit 3 – 4 pins 500mm (Not to scale) CAD version: ERCF V2...
- Page 22 There is an LED circuit board that is in development for later release, if you would rather wait and skip the soldering. Route through Encoder cable chain to Gate #0 Gate #N Neopixel selector (Optional) Apron LEDs CAD version: ERCF V2...
- Page 23 WIRING WWW.VORONDESIGN.COM Consistent with the ethos of the Voron community, the ERCF is open-source. This means its designs and software are freely available for anyone to use, modify, and improve, fostering a collaborative and innovative environment What do you call an ERCF MMU on a coffee break? A "retract-relaxer."...
- Page 24 GEARBOX WWW.VORONDESIGN.COM OVERVIEW CAD version: ERCF V2...
- Page 25 GEARBOX WWW.VORONDESIGN.COM OVERVIEW CAD version: ERCF V2...
- Page 26 1x 2020 Extrusion 2x M2x8mm SHCS 4x M3 Roll In Nuts 13x M3 Threaded Inserts 1x M3x6mm SHCS 4x M3x8mm SHCS 1x M3x12mm SHCS 2x M3x20mm SHCS 1x Microswitch 2x MR85ZZ Bearings [a]_Side_Latch_x2.stl † 1x Gear_Box_Back.stl 1x Gear_Box_Front.stl CAD version: ERCF V2...
- Page 27 Pull these inserts using the soldering iron from the side and take your time to make them flush with the surface and aligned with the screw path. You can use a long M3 screw, inserted from the left, to hold and pull the heat insert in their slot. CAD version: ERCF V2...
- Page 28 If you are using a levered micro switch, install it as shown, with the lever opening to the bottom. In case you are using a micro switch without a lever, invert it so the button is on the bottom and will line up with the Encoder M3 SHCS end stop. CAD version: ERCF V2...
- Page 29 2020 PREPARATION ADD M3 T-NUTS Slide the 4 M3 T-Nuts onto the 2020 extrusion in preparation to mount the gearbox. Note the correct orientation, with the mounting hole toward the end of the extrusion. M3 Roll-in Nuts CAD version: ERCF V2...
- Page 30 GEARBOX WWW.VORONDESIGN.COM 2020 INSTALLATION Gear_Box_Front CHECK POINT Make sure the 2020 extrusion is fully seated against the stop built into Gear_Box_Front. CAD version: ERCF V2...
- Page 31 Start each of the 4 M3x8 screws into the M3 T nuts that you inserted earlier. Once all four are started, take care the 2020 extrusion remains seated against Gear_Box_Front while tightening the M3x8 screws. It it important for the alignment of the Gearbox. M3x8 SHCS CAD version: ERCF V2...
-
Page 32: Gearbox
M5 bolt. HEAT SET INSERTS The list of pages with heat set inserts is on Page CAD version: ERCF V2... - Page 33 GEARBOX WWW.VORONDESIGN.COM LATCH PREPARATION [a]_Side_Latch_x2 † HINGE UNLOCK Use a small tool (like an allen key) inserted into the hinge hole to free the print-in-place mechanism and ensure it rotates freely. Do this for both latches. CAD version: ERCF V2...
- Page 34 Screw the top screw all the way in, then screw in the bottom M3x20mm screw. With both screws in place, close the latch. Don’t over tighten the two screws; you should be able to lock and unlock the latch M3x20 SHCS without trouble. CAD version: ERCF V2...
- Page 35 GEARBOX WWW.VORONDESIGN.COM EXPLODED VIEW GEARBOX SUB-BOM FOR STEP 2 1x 5mm D-Cut Rod 1x GT2 Belt Loop, 188mm 2x GT2 Pulley 20-tooth 5x M3x8mm BHCS [a]_Bearing_Spacer_x2.stl † [a]_Knob.stl † [a]_M4_80T_Wheel.stl † CAD version: ERCF V2...
- Page 36 Add 5 M3x8 BHCS to secure the wheel in place. Gently tighten the screws in a star pattern (skipping every other screw) until the hub is snug. Don’t overtighten, you’ll strip the plastic, or worse, the pulley! CAD version: ERCF V2...
- Page 37 12.7mm from the D-Cut shaft end. There is no need to be very precise here, the D cut shaft has a few millimeters of extra length. Check Bearing_Spacer orientation; the small edge needs to face towards the bearings. CAD version: ERCF V2...
- Page 38 Drive Shaft back out of the Gearbox and wrap the belt around the wheel before re-inserting the Drive Shaft. If you pull out either of the bearings, make sure they re-seat correctly. It may be necessary to fully remove the Drive Shaft to re-seat the bearings. CAD version: ERCF V2...
- Page 39 14 version with the connectors, but suit yourself! 2x M3 Washers 2x M3x12mm SHCS 2x M3x16mm SHCS 1x M3x25mm SHCS 2x M3x40mm SHCS 2x Microfit 4-pin** 1x Microfit 5-pin** 1x MR85ZZ Bearing 1x NEMA14 Motor** [a]_Logo_Plate.stl † [a]_Side_Latch_x2.stl † 1x Motor_Arm_NEMA14.stl †** CAD version: ERCF V2...
- Page 40 GT2 20T gear. If you are using a NEMA 17 motor for the gear axis, assembly is the same but you’ll need to use Pulley_Tool_NEMA17 † and print a different Motor Arm to mount it. CAD version: ERCF V2...
- Page 41 M3 Washers M3x16 SHCS M3x12 SHCS M3 Heat Set Insert MOTOR WIRES Make sure the wires of the motor come out this side. HEAT SET INSERTS The list of pages with heat set inserts is on Page CAD version: ERCF V2...
- Page 42 M5 bolt. BEARING POSITION MR85ZZ Bearing Once installed, the bearing will not be flush and will stick out as shown. CAD version: ERCF V2...
- Page 43 Molex Microfit 3 – 4 pins Motor_Arm_NEMA14_EASYBRD † GEAR MOTOR CONNECTOR Crimp the gear motor wiring into a 4-pin MicroFit 3 female connector as shown. Push the connector into the top left slot of the motor arm, marked G. CAD version: ERCF V2...
- Page 44 Insert the two microfit connectors from the wire bundles into their dedicated holes in the Motor_Arm_NEMA14.stl † (shown) or Motor_Arm_NEMA17.stl † For picture clarity, only the microswitch wires are shown for the 5-pin connector (but the other wires are assumed present). CAD version: ERCF V2...
- Page 45 CABLE MANAGEMENT Make sure the wires are routed in the channel between the 2020 extrusion and the Gear_Box_Back. If you route the wires through the other opening, you won’t be able to connect the wires later! CAD version: ERCF V2...
- Page 46 Insert the Knob into the 5mm D-Cut shaft (beware of the D-Cut position). It shouldn’t [a]_Knob † quite touch the motor arm. Add the bottom M3x40mm screw for the latch and close the latch. M3x40 SHCS CAD version: ERCF V2...
- Page 47 You want the D-Cut shaft to spin freely. If it is still rubbing after Gearbox alignment, you may need to disassemble and refit the motor mount to get everything adjusted correctly. CAD version: ERCF V2...
- Page 48 GEARBOX WWW.VORONDESIGN.COM EXPLODED VIEW GEARBOX SUB-BOM 6x M3x8mm SHCS [a]_Gear_Box_Bottom_Panel.stl [a]_Gear_Box_Top_Panel.stl CAD version: ERCF V2...
- Page 49 Gear_Box_Top_Panel and out though the bottom near the 2020 extrusion. Take care to align the Logo_Plate with the recess in the bottom of the Gear_Box_Top_Panel. Secure the motor cable with a zip tie. CAD version: ERCF V2...
- Page 50 For clarity, only the motor wires are shown but the end stop wiring is assumed to be present. After final assembly, make sure the drive shaft continues to spin freely without any obvious binding or rubbing. M3x8 SHCS [a]_Gear_Box_Bottom_Panel CAD version: ERCF V2...
- Page 51 One of the most groundbreaking applications of 3D printing is in the field of bioprinting, where cells and biomaterials are used to print tissues and organs. This could revolutionize the field of organ transplantation and medical research CAD version: ERCF V2...
- Page 52 FILAMENT BLOCKS WWW.VORONDESIGN.COM OVERVIEW CAD version: ERCF V2...
- Page 53 FILAMENT BLOCKS WWW.VORONDESIGN.COM OVERVIEW CAD version: ERCF V2...
- Page 54 1x 3mm x 20mm pin 2x 6x3x2mm Magnets 1x BMG Idler Gear & Bearings 1x ECAS-M4 Adapter 1x M3 Set Screw 1x M3x8mm SHCS 1x M3x16mm SHCS 1x MR85ZZ Bearing [a]_Base_Trap_M3_xN.stl [a]_Tophat_xN.stl [a]_Latch_xN.stl [a]_Tag_plates_N_x2.stl 1x Base_xN.stl 1x Filament_Path_xN.stl 2x Tag_plates_DigitN_x2.stl CAD version: ERCF V2...
-
Page 55: Filament Blocks
Please take care that you don’t accidentally damage the part or yourself especially the Tophat and the upper Bondtech idler pin mount. Repeat for all of the Bases, Filament_Paths, and Tophats. Filament_Path_xN Remove Tophat_xN Remove Remove CAD version: ERCF V2... - Page 56 Otherwise, please clean up the highlighted surfaces with a small file or hobby knife. Make sure that the print in place supports didn’t leave any stuck bits behind and interfere. Repeat for all of the Bases, Filament_Paths, and Tophats. Filament_Path_xN Tophat_xN CAD version: ERCF V2...
- Page 57 Tophat_xN Bondtech Idler Assembly INSTALL BONDTECH IDLER GEAR Lightly grease the bearings before inserting the pin (EP1/EP2 or Superlube). Once assembled, make sure the Bondtech idler spins freely. Repeat for all Tophats. 3mm x 20mm pin CAD version: ERCF V2...
- Page 58 If you want to use dual magnets, hold off installing the second magnet into the other recess until you finish attaching all Bases to the 2020 as we need access to the bolt. Repeat for all of the Bases. Tag_plates_N CAD version: ERCF V2...
- Page 59 2, 5, 6 2, 5, 7 2, 5, 8 2, 5, 8, 9 2, 5, 8, 10 2, 5, 8, 11 2, 5, 8, 11, 12 2, 5, 8, 11, 13 2, 5, 8, 11, 14 CAD version: ERCF V2...
- Page 60 Base. The screw taps directly into the plastic, so don't overtighten or it will strip! Once the screw is in, you can close Latch with a satisfying click. Repeat for all of the Bases. M3x16mm SHCS CAD version: ERCF V2...
- Page 61 CA TAG PLATES glue to hold them in place but usually isn’t Don’t forget to number your required. Filament_Paths and Bases, starting with 0! Repeat for all of the Filament_Paths. CAD version: ERCF V2...
- Page 62 Squeeze gently until they snap together. Close the Latch. Repeat assembly of all of the parts into Filament Blocks. To separate, pull apart at a slight angle, but be careful not to break the hinge. Press Together CAD version: ERCF V2...
- Page 63 Depending on how well calibrated your printer is, you might also need to lightly sand or file the sides of the Base_Trap to improve fit until the the parts move freely. Remove the Filament_Path and and set it aside. Repeat for all Filament Blocks. CAD version: ERCF V2...
- Page 64 If you have trouble with the fitment process and can’t get the Tophat to lock in place, there are two alternate Filament_Path parts provided with additional clearance built in (+0.1mm & +0.2mm). These can be found in the following folder: ERCF_v2/Stls/Filament_Blocks/Clearance_Options/ CAD version: ERCF V2...
- Page 65 Bondtech Gear M3 T-Nut M3x8mm SHCS 2. FILAMENT BLOCK INSERTION Attach the Base labelled 0 to the T Nut with an M3x8mm screw. Leave it loose enough that the Base can still slide on the 2020. CAD version: ERCF V2...
- Page 66 Snug the Bondtech gear’s set screw in a central location. We will do fine adjustment later, but we need the gear to rotate smoothly for the array alignment step. Repeat these 4 steps for all of the Bases and Filament_Paths. CAD version: ERCF V2...
- Page 67 Shaft to make sure it’s still aligned. If it starts rubbing or doesn’t spin freely, loosen the M3x8mm screw and re-seat the Filament Block. Once all the Filament Blocks are tightened and the Drive Shaft runs smoothly, you’re done with this step. CAD version: ERCF V2...
- Page 68 If you do, clean it immediately, because thread locker degrades ABS. Repeat this process for all the Filament Blocks. View from the top of the ERCF. CAD version: ERCF V2...
- Page 69 FILAMENT BLOCKS WWW.VORONDESIGN.COM REPLACE TOPHATS REPLACE THE TOPHATS Place the Tophats hinge-first into the Filament_Paths. You don’t need to undo the Latches to push the Tophats into place. CAD version: ERCF V2...
- Page 70 "Why don't scientists trust atoms? Because they make up everything!" "I'm reading a book on anti-gravity. It's impossible to put down." "I have a joke about time travel, but you didn't like it." Enough! Back to building… CAD version: ERCF V2...
- Page 71 END BLOCK WWW.VORONDESIGN.COM OVERVIEW CAD version: ERCF V2...
- Page 72 END BLOCK WWW.VORONDESIGN.COM OVERVIEW CAD version: ERCF V2...
- Page 73 EXPLODED VIEW END BLOCK AND FOOT SUB-BOM 1x ECAS-M4 Adapter 5x M3 Roll-In T Nut 5x M3x8mm SHCS 1x M5 Locking Nut** 1x M5x30 BHCS** [a]_End_Bypass_Foot.stl 1x End_Bypass.stl ** Depicted for completeness, but used in later steps. CAD version: ERCF V2...
- Page 74 END BLOCK WWW.VORONDESIGN.COM FILAMENT END BLOCK FILAMENT END BLOCK Insert 4 M3 T Nuts into the side channels of the 2020 extrusion as shown. M3 T Nuts CAD version: ERCF V2...
-
Page 75: End Block
END FILAMENT BLOCK ECAS ADAPTER Insert an ECAS-M4 adapter into the End_Bypass Block. ECAS-M4 Adapter End_Bypass M3x8 SHCS INSTALL END FILAMENT BLOCK Slide the End_Bypass Block onto the 2020 and secure with 4 M3x8 SHCS screws. CAD version: ERCF V2... - Page 76 Insert an M3 T Nut into the bottom channel of the 2020 extrusion as shown. M3 T Nut M3x8 SHCS ATTACH THE FOOT Align End_Bypass_Foot dimples with the End_Bypass block and secure it with an M3x8 SHCS screw. [a]_End_Bypass_Foot CAD version: ERCF V2...
- Page 77 END BLOCK WWW.VORONDESIGN.COM FILAMENT BLOCK END FOOT WHAT ABOUT THE M5x30 SCREW AND M5 NUT? We’ll use these later in the Final Assembly steps. M5 Nut M5x30 SHCS CAD version: ERCF V2...
- Page 78 GEARBOX WWW.VORONDESIGN.COM Why did the ERCF MMU go to school? Because it wanted to learn about multi-"filament"ary education! CAD version: ERCF V2...
- Page 79 SELECTOR WWW.VORONDESIGN.COM OVERVIEW CAD version: ERCF V2...
- Page 80 SELECTOR WWW.VORONDESIGN.COM OVERVIEW CAD version: ERCF V2...
- Page 81 1x Drag_Chain_Anchor.stl † 1x Selector_Door.stl 1x Selector_Spring_Cap.stl 1x Servo, MG90S or Savox SH0255MGP (shown) 1x Servo_Mount_Savox.stl*** 1x Piece of Filament WHAT ABOUT THE ENCODER? The Encoder will get its own ***Or Servo_Mount_MG90S.stl if using MG90S. sub-BOM later. CAD version: ERCF V2...
-
Page 82: Selector
SELECTOR WWW.VORONDESIGN.COM SELECTOR CART PREPARATION [a]_Selector_Cart Remove Remove REMOVE BUILT-IN SUPPORTS Use a small tool, like a small flat screwdriver, to carefully remove the built-in supports. CAD version: ERCF V2... - Page 83 WWW.VORONDESIGN.COM SELECTOR CART BEARINGS BEARING INSERTION Using a soft jaw vice or flat object, carefully press-fit the bearings into their holes. They should be flush with the print bed side of the Selector_Cart. LM8UU or RJ4JP-01-08 CAD version: ERCF V2...
- Page 84 SELECTOR WWW.VORONDESIGN.COM SELECTOR CART HEAT SET INSERTS HEAT SET INSERTS The list of pages with heat set inserts is on Page M3 Heat Set Inserts CAD version: ERCF V2...
- Page 85 If you wind up melting the spring hole, either reprint the piece and try again, or clean up the hole with a drill bit. The bore size is 6.6mm, so use 6mm, ¼”, or 17/64” sized bits. CAD version: ERCF V2...
- Page 86 SELECTOR WWW.VORONDESIGN.COM DRAG CHAIN ANCHOR HEAT SET INSERTS HEAT SET INSERTS The list of pages with heat set inserts is on Page Drag_Chain_Anchor † M3 Heat Set Inserts CAD version: ERCF V2...
- Page 87 DRAG CHAIN AND MAGNET Slide the Drag_Chain_Anchor † into the dovetail groove on the Selector_Cart and install with an M3x8 SHCS screw. Add a drop of CA glue and Insert the 3x2mm magnet into its slot. 3x2mm Magnet CAD version: ERCF V2...
- Page 88 The Towerpro MG90S version has 4 supports. If the inner supports don’t break out cleanly, you may need to clean up the slot with a file or hobby knife to get a good fit. CAD version: ERCF V2...
- Page 89 MG90S Savox SH0255MGP SERVO SCREWS Use the 2 mounting screws from the servo kit. They tap directly into the selector cart plastic, so don't overtighten. If the screws strip or weren’t provided, use M2x8mm SHCS instead. CAD version: ERCF V2...
- Page 90 Compression Spring Selector_Spring_Cap so the cap stays inserted into the spring. Insert the spring and cap into the hole in the selector and make sure its not obstructed. Shorter 10mm springs can be used as well. Selector_Spring_Cap CAD version: ERCF V2...
- Page 91 Push the Servo_Mount into place and temporally secure it with an M3x20 screw used for mounting the encoder. M3x20 SHCS SAVOX SH-0255MGP servo option shown, installation is identical for the Towerpro MG90S servo. CAD version: ERCF V2...
- Page 92 SELECTOR WWW.VORONDESIGN.COM TENSION SCREW INSTALLATION M3x12 SHCS SPRING TENSION SCREW INSTALLATION Install the servo spring tension screw. Only tighten until it touches the Selector_Spring_Cap - we will adjust and tension it later. CAD version: ERCF V2...
- Page 93 SELECTOR WWW.VORONDESIGN.COM SERVO WIRES Zip Tie SERVO WIRES Secure the servo wires using a zip tie. Make sure the wires lie flat against the side of the servo as shown. CAD version: ERCF V2...
- Page 94 1x BMG Idler Gear (without set screw) 2x BMG Needle Bearings 1x ECAS-M4 Adapter 1x M2x8 or 10mm Self-Tapping Screw 1x M3x8mm SHCS 3x M3x20mm SHCS 3x M3 Threaded Insert **Or 623ZZ 1x [black]_Encoder_Slotted_Wheel.stl 1X Encoder_Left.stl 1x Encoder_Right.stl CAD version: ERCF V2...
- Page 95 Bondtech gear. Make sure its undamaged, isn’t cracked and doesn’t move easily. NOTE Encoder_Slotted_Wheel must be printed in black to prevent light shining through the vanes of the wheel to avoid false BMG Idler Gear readings! CAD version: ERCF V2...
- Page 96 Encoder_Flat_Bearing_Option M3 Heat Set Inserts We will show the V623ZZ version of the Encoder. Installation is virtually identical for the MR623ZZ option. HEAT SET INSERTS The list of pages with heat set inserts is on Page CAD version: ERCF V2...
- Page 97 Encoder housing or Binky optical sensor. Insert and secure the Binky PCB with an M2x8 or 10mm screw. The sensor should fit snugly in the cutout provided. CAD version: ERCF V2...
- Page 98 Encoder body or Binky PCB Optical Sensor. If you notice any issues, disassemble the Encoder & recheck. Adjust the position of the Encoder_Slotted_Wheel, being careful not to damage it or its vanes. CAD version: ERCF V2...
-
Page 99: Encoder
ENCODER INSTALLATION M3x20 SHCS M3x20 SHCS ENCODER INSTALLATION Remove the M3x20 SHCS that you inserted on page 91 to hold the servo mount. Then secure the Encoder Encoder to the Selector_Cart with two M3x20 SHCS screws. CAD version: ERCF V2... - Page 100 Add a drop of CA glue and install the 3x2mm magnet into the door recess so that it attracts the door as a magnetic latch. Attach the Selector_Door to the Selector_Cart using piece of 1.75mm Accent filament & trim to length. CAD version: ERCF V2...
- Page 101 DOOR AND BELT TENSIONER TENSIONER INSTALLATION Insert the Belt_Tensioner into the side of the Selector and fasten it with a M3x20 screw. We don’t need to tighten it all the way yet. M3x20 SHCS Belt_Tensioner † CAD version: ERCF V2...
- Page 102 GEARBOX WWW.VORONDESIGN.COM The first 3D printer was invented in 1986 by Chuck Hull, who called the process "stereolithography". CAD version: ERCF V2...
- Page 103 LINEAR AXIS WWW.VORONDESIGN.COM OVERVIEW CAD version: ERCF V2...
- Page 104 LINEAR AXIS WWW.VORONDESIGN.COM OVERVIEW CAD version: ERCF V2...
- Page 105 LINEAR AXIS HINGE SUB-BOM 2x 8mm rods 1x GT2 20T pulley 6x M3 Heatset Inserts 6x M3x8mm SHCS 2x M3x12mm SHCS 1x M5x30mm BHCS 1x M5 Nylock nuts 1x NEMA17 Pancake Motor [a]_Drag_Chain_Anchor_Bottom.stl † [a]_Motor_Lock.stl † 1x Linear_Axis_Selector_Motor_Support.stl CAD version: ERCF V2...
- Page 106 LINEAR AXIS WWW.VORONDESIGN.COM SELECTOR MOTOR SUPPORT HEAT SET INSERTS The list of pages with heat set inserts is on Page [a]_Drag_Chain_Anchor_Bottom † M3 Heat Set Inserts M3 Heat Set Inserts Linear_Axis_Selector_Motor_Support M3x8 SHCS CAD version: ERCF V2...
-
Page 107: Linear Axis
LINEAR AXIS WWW.VORONDESIGN.COM SELECTOR MOTOR SUPPORT M3x8 SHCS [a]_Motor_Lock † NEMA 17 Pancake Motor MOTOR WIRES Make sure the wires of the motor are coming out from this side. CAD version: ERCF V2... - Page 108 LINEAR AXIS WWW.VORONDESIGN.COM LINEAR AXIS IDLER EXPLODED VIEW LINEAR AXIS IDLER SUB-BOM 1x GT2 20T toothed idler 1x M5x16mm BHCS 1x M5 Nylock nuts 1x Linear_Axis_Idler_Block.stl CAD version: ERCF V2...
- Page 109 LINEAR AXIS WWW.VORONDESIGN.COM IDLER BLOCK Linear_Axis_Idler_Block M5x16 BHCS GT2 20T Idler 6 mm M5 Nylock Nut CAD version: ERCF V2...
- Page 110 Carefully insert the 8mm Smooth Rods through the LM8UU / RJ4JP-01-08 Selector_Cart bearings and fully into the Linear_Axis_Idler_Block until they bottom out. There are holes at the end to allow you to check if the rods are fully seated. M3x12 SHCS CAD version: ERCF V2...
- Page 111 Selector_Cart. Mark the belt length with a paint pen or marker. Now measure an additional 10mm of length, and cut the belt to the new mark. This ensures room for adjustment in a later step. Channels Approx Belt Length (mm) 165 + 46N CAD version: ERCF V2...
- Page 112 The first 3D printer in space was installed on the International Space Station in 2014 and used by astronauts to create tools and parts, demonstrating the potential of this technology for long-duration space missions and even interplanetary travel. CAD version: ERCF V2...
- Page 113 FINAL ASSEMBLY WWW.VORONDESIGN.COM OVERVIEW CAD version: ERCF V2...
- Page 114 FINAL ASSEMBLY WWW.VORONDESIGN.COM OVERVIEW CAD version: ERCF V2...
- Page 115 FINAL ASSEMBLY WWW.VORONDESIGN.COM EXPLODED VIEW FINAL ASSEMBLY SUB-BOM 1x Drag Chain 4x M3x8mm FHCS 2x M5 Locking Nut 2x M5x30mm SHCS CAD version: ERCF V2...
- Page 116 FINAL ASSEMBLY WWW.VORONDESIGN.COM ADDING THE LOCKING NUTS M5 Locking Nut CAD version: ERCF V2...
- Page 117 FINAL ASSEMBLY WWW.VORONDESIGN.COM ADDING THE LOCKING NUTS M5 Locking Nut CAD version: ERCF V2...
- Page 118 FINAL ASSEMBLY WWW.VORONDESIGN.COM JOINING THE TWO BLOCKS M5x30 SHCS CAD version: ERCF V2...
- Page 119 FINAL ASSEMBLY WWW.VORONDESIGN.COM JOINING THE TWO BLOCKS M5x30 SHCS CAD version: ERCF V2...
-
Page 120: Final Assembly
8mm rods in so they’re still in contact with the screws. The locating bumps on the Linear_Axis_Idler_Block must line up to the Gear_Box_Top_Panel. Once the tuning is done, lock the linear axis using the two Side_Latches. CAD version: ERCF V2... - Page 121 Repeat for the other screw. BELT TENSION Once the set screws are tightened, adjust the belt tension by tightening the belt tensioner M3x20. Now you can trim your belt to its final length. CAD version: ERCF V2...
- Page 122 Pass all the wires in the channel, then connect the Encoder and close the Selector_Door. SERVO WIRES Cut excess wires and connect the Servo (you can use a Dupont connector for example). Secure both the Servo and Encoder wires using a zip tie. Zip Tie CAD version: ERCF V2...
- Page 123 M3x8 FHCS Wires DRAG CHAIN Pass the Servo and Encoder wires in the drag chain and then fix both of its ends to the ERCF with 2 M3x8mm FHCS screws at each end (total of 4 FHCS) CAD version: ERCF V2...
- Page 124 Encoder Wires Servo Wires SELECTOR MOTOR You can now crimp and add the connector to the Selector Motor wire. To MCU Zip Tie Selector Motor Wires WIRING Secure the drag chain wires using a zip tie. CAD version: ERCF V2...
- Page 125 Connect the Selector Motor and Gear Motor wires. Wiring color order may vary between manufacturers for stepper motors. Keep a few cms of wires in the MMB box, it will be helpful in case you have to disassemble//reassemble. CAD version: ERCF V2...
- Page 126 THE END! … OR ALMOST :D NEXT STEPS The ERCF is now fully assembled, except, as you probably have noticed, for the Servo_Arm! Its installation on the ERCF will be done as part of the setup and calibration. CAD version: ERCF V2...
- Page 127 COTTONTAIL BUILD GUIDE Even the smallest one can change the world. –Peter Rabbit VERSION 2023-12-21...
- Page 128 COTTON TAIL BUFFER ASSEMBLY WWW.VORONDESIGN.COM Enraged Rabbit Cotton Tail...
-
Page 129: Cottontail Buffer
COTTON TAIL BUFFER ASSEMBLY WWW.VORONDESIGN.COM OVERVIEW Endcap Arm Buffer Wheel Support Arm Knut Coupler Block Axle Arm Mount Electronics Box Enraged Rabbit Cotton Tail... - Page 130 ARM GROUPS WWW.VORONDESIGN.COM EXPLODED VIEW ARM GROUP BOM (PER CHANNEL) 4x M3x8mm SCHS 1x 608ZZ Bearing 1x M3x5x4 Heat Insert 1x M3 Roll-in T-Nut 1x M3x16mm SCHS ARM GROUP PRINTED PARTS (PER CHANNEL) 1x [a]_Support_Arm_Mount_xN.stl 2x Tag_Plates 1x [a]_Support_Arm_xN.stl 1x Buffer_Wheel_xN.stl 1x Axle_Spacer_Standard_xN.stl Enraged Rabbit Cotton Tail...
- Page 131 COUPLER BLOCKS WWW.VORONDESIGN.COM EXPLODED VIEW COUPLER BLOCK BOM (PER CHANNEL) 1x 48mm OD4.0mmxID3.0mm PTFE Tubing 2x ECAS Coupler (2 piece - remove rubber gasket) 4x M2x8mm or M2x10mm Self Tapping Screws 1x Omron D2F-5L or D2F-01L Micro Switch 1x Neopixel 1x 5.5mm Steel Ball Bearing COUPLER BLOCK PRINTED PARTS (PER CHANNEL)
- Page 132 ENDCAP ARM WWW.VORONDESIGN.COM EXPLODED VIEW END CAP ARM BOM 1x BTT MMB Controller Board 4x M3x5x4 Heat Insert (3 not pictured) 5x M3x8mm SCHS END CAP ARM PRINTED PARTS Axle_N_Double_Thread.stl [a]_BTT_MMB_Support_Arm_Endcap.stl Knut_x2.stl [a]_BTT_MMB_Box_Lid.stl Enraged Rabbit Cotton Tail...
- Page 133 Heat Set into the Support_Arm_Mount second hole. This will be used to hold HEAT SET INSERTS the Support_Arm_Endcap. The list of pages with heat set inserts is on Page CAD version: ERCF V2...
- Page 134 Preload MR608ZZ Bearing to Buffer_Wheel, and press firmly to seat on bottom (two thumbs on flat table). Slide the wheel (with flat side towards the Support_Arm) onto Axle_N_Double_Thread Axle_Spacer to the Axle and Tag_Plate Support_Arm MR608ZZ Bearing Knut Axle_N_Double_Thread Axle_Spacer Support_Arm Buffer_Wheel CAD version: ERCF V2...
- Page 135 PTFE Tube. Insert into the sprung ECAS coupler. Make sure it’s seated all the way in and the natural curve of the tube is curling downwards. Coupler_Block Repeat for all Coupler_Blocks. ECAS 4 OD/3 ID PTFE Tube CAD version: ERCF V2...
- Page 136 Coupler_Block’s upper sprung section. This takes into account extra length so you can trim the wire to be as tidy as possible. Use cable ties to keep bundles together. CAD version: ERCF V2...
- Page 137 Drop a 5.5mm ball bearing into each Coupler and install each of the microswitches with 2x M2x8 or Trim extra wiring 10mm SHCS. before crimping and plugging them into the BTT Microswitch Microswitch 5.5mm Ball Bearing M2x10mm SHCS BTT MMB CAD version: ERCF V2...
- Page 138 Alternatively you can align the arm to the T-nuts without the Coupler_Block unattached. After it’s aligned, add the Coupler_Block with Support_Arm & Mount the PTFE Tube. Repeat these steps with each arm. M3 x 8mm SHCS M3 Roll-in T-Nuts CAD version: ERCF V2...
- Page 139 Add (4) M3 x 8mm SHCS screws to secure the board. Set aside Box_Lid for snap installation after wiring is completed. M3 X 8mm SHCS M3 Heat Set Inserts HEAT SET INSERTS The list of pages with heat set inserts is on Page BTT MMB CAD version: ERCF V2...
- Page 140 Connect the Selector Motor and Gear Motor wires. Wiring color order may vary between manufacturers for stepper motors. Keep a few cms of wires in the MMB box, it will be helpful in case you have to disassemble/reassemble. CAD version: ERCF V2...
- Page 141 Add the second Knut, but don’t over tighten. It only needs to hold the axle from wiggling back and forth. Knut M3 X 8mm SHCS CAD version: ERCF V2...
- Page 142 There is always a small amount of friction, but as long as it spins without too much restriction, it will not be affected by the light contact. (3) M3 X 8mm SHCS CAD version: ERCF V2...
- Page 143 CAD version: ERCF V2...
- Page 144 System. Additional details about the build and background on advanced topics can be found on our documentation page linked below. The software setup and other initial setup steps with your new printer can also be found on our documentation page. We recommend starting here. https://github.com/moggieuk/Happy-Ha re/blob/main/doc/ercf_v2.md CAD version: ERCF V2...
- Page 145 HOW TO GET HELP If you need assistance with your build you can head over the VORON Discord group and post your questions in the ercf_questions channel. It is the primary medium to help people with their ERCF build and tuning! You can also check the Github page for the latest releases.
- Page 146 GEARBOX WWW.VORONDESIGN.COM Enjoy your MMU. CAD version: ERCF V2...
Need help?
Do you have a question about the ERCF v2 and is the answer not in the manual?
Questions and answers