
Related Manuals for VORON STEALTHBURNER


Summary of Contents for VORON STEALTHBURNER
- Page 1 WWW.VORONDESIGN.COM VORON VORON STEALTHBURNER We build space shuttles with gardening tools so anyone can have a space shuttle of their own. VERSION 2022-08-16...
- Page 2 Please do not become the first VORON fatality. There is no special Reddit flair for that. Please, read the entire manual before you start assembly. As you begin wrenching, please check our Discord channels for any tips and questions that may halt your progress.
-
Page 3: Table Of Contents
WWW.VORONDESIGN.COM TABLE OF CONTENTS Introduction Hardware Overview ClockWork2 Tool Cartridge StealthBurner X Carriage ADXL Mount Next Steps... -
Page 4: Introduction
PART PRINTING GUIDELINES The Voron Team has provided the following print guidelines for you to follow in order to have the best chance at success with your parts. There are often questions about substituting materials or changing printing standards, but... - Page 5 INTRODUCTION FILE NAMING By this time you should have already downloaded our STL files from the Voron GitHub. You might have noticed that we have used a unique naming convention for the files. This is how to use them. PRIMARY COLOUR...
- Page 6 THIS IS JUST A REFERENCE This manual is designed to be a simple reference manual. Building a Voron can be a complex endeavour and for that reason we recommend downloading the CAD files off our Github repository if there are sections you need clarification on.
-
Page 7: Hardware
Metric fastener with a cylindrical head head and hex drive. Most commonly and hex drive. The most common found in locations where M5 fasteners fastener used on the Voron. are used. ISO 4762 ISO 7380-1 FLAT HEAD COUNTERSUNK SCREW (FHCS) - Page 8 WWW.VORONDESIGN.COM...
-
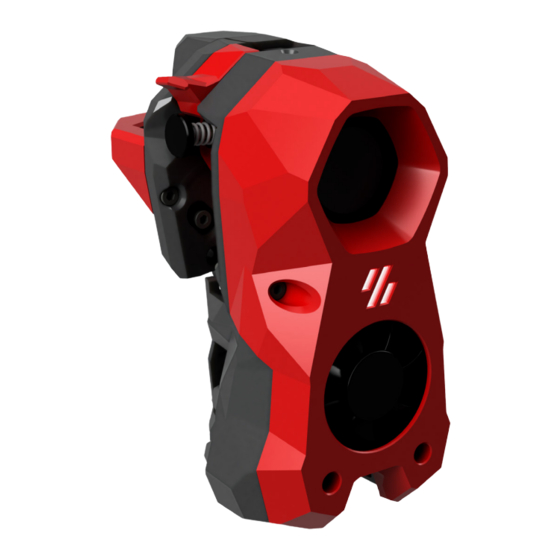
Page 9: Stealthburner
WWW.VORONDESIGN.COM OVERVIEW Voron ClockWork2 Extruder Voron StealthBurner ADXL Sensor Mount Voron StealthBurner Tool Cartridge... - Page 10 WWW.VORONDESIGN.COM VORON CLOCKWORK2...
- Page 11 Make sure you have the proper inserts (check the hardware reference for a close-up picture and Sourcing Guide for dimensions). If you’ve never worked with heat set inserts before we recommend you watch the linked guide. Heat Set Insert https://voron.link/m5ybt4d...
- Page 12 WWW.VORONDESIGN.COM HEAT SET INSERTS BELOW SURFACE The top heatset insert needs to sit below the surface of the printed part. BELOW SURFACE The bottom heatset insert needs to sit below the surface of the printed part. Mind the cutout in the part and make sure to install it straight.
- Page 13 WWW.VORONDESIGN.COM HEAT SET INSERTS OPTION: TOOLHEAD PCB If you opt to use a toolhead PCB, add additional heat set inserts into locations highlighted below. Heat Set Insert HEAT SET INSERT Be careful when inserting this heat set insert. It’s easy to accidentally touch the left side of the part with the soldering iron.
- Page 14 WWW.VORONDESIGN.COM HEAT SET INSERTS GENERIC CABLE CHAINS IGUS CABLE CHAINS The 3-hole pattern is usually IGUS chains have 2 mounting found on generic cable chains. holes. Heat Set Insert PRINTER SPECIFIC MOUNTS V2, Trident and Legacy use the same printed parts. Extra parts are included for SwitchWire.
- Page 15 HEAT SET INSERTS FLUSH WITH SURFACE ACCENT PART? The heatset insert needs to sit flush or Look for Voron heart next to the part. slightly below the surface of the printed It indicates that this is a part that is part.
- Page 16 WWW.VORONDESIGN.COM GUIDLER ARM M3x16 SHCS TOLERANCES, EXTRUSION MULTIPLIERS AND YOU The part has tight tolerances. If it doesn’t fit together well the printed parts are likely over-extruded.
- Page 17 LUBRICATE BEARINGS A lubrication film is required to ensure BMG Idler Assembly smooth operation and longevity. Refer to the Voron sourcing guide lubricant options - look for a “light grease”. MIND ORIENTATION Make sure to orient the idler assembly as shown above.
- Page 18 WWW.VORONDESIGN.COM GUIDLER ARM A NOTE ON SPRINGS Longer/shorter/stiffer springs will change the tension characteristics and have an impact on how well the tension mechanism works. Consider buying the original Bondtech part as those are known to work well. If sourced from a different vendor check if it’s roughly 12mm long with an outer diameter of 6mm and a wire thickness of 1mm.
- Page 19 WWW.VORONDESIGN.COM MOTOR PLATE CHECK BEARING FIT The bearings must slip on and off the shaft easily to allow the gear to self-centre. Pressing the bearings on the shaft will damage them. Lightly sand the shaft if required. MR85 Bearing BEARING FIT MR85 Bearing Fully seat the bearing into the plastic pocket.
- Page 20 WWW.VORONDESIGN.COM MAIN BODY M3x6 FHCS MR85 Bearing BEARING FIT Fully seat the bearing into the plastic pocket. Apply even pressure to insert them. Avoid pressing on the inner ring of the bearing.
- Page 21 WWW.VORONDESIGN.COM DRIVE ASSEMBLY A NOTE ON GEARS DRIVE GEAR Poorly made gears often cause print quality Make sure the set screw in the filament drive issues. For best performance consider gear is seated against the notch in the shaft. sourcing the original Bondtech parts.
- Page 22 WWW.VORONDESIGN.COM MAIN BODY...
- Page 23 WWW.VORONDESIGN.COM MAIN BODY M3x25 SHCS INITIAL ALIGNMENT CHECK Check if the filament path aligns with the toothed section of the drive gear. DON’T OVERTIGHTEN Tighten until the plastic bends and cracks. Back up 2 turns, discard parts, reprint and try again.
- Page 24 WWW.VORONDESIGN.COM DRIVE ALIGNMENT Filament CHECK ALIGNMENT With the filament inserted, verify if the filament path and drive gear are INSERT FILAMENT aligned. Insert a piece of 1.75mm filament into the extruder. Loosen the set screw and adjust the position of the drive gear if required. CHECK FOR CLEARANCE The drive shaft must not touch the motor housing.
- Page 25 WWW.VORONDESIGN.COM TENSION ARM M3x25 SHCS DON’T TIGHTEN The tensioning arm must move freely. Tightening the bolt may lock it in place.
- Page 26 WWW.VORONDESIGN.COM LATCH M3x25 SHCS...
- Page 27 WWW.VORONDESIGN.COM TENSION MECHANSIM TENSION KNOB ANTI SQUISH THINGYMAJIG Turning the thumb screw clockwise will increase the Softer and flexible materials will deform tension and grip on the filament. Too much tension and extrude poorly under too much tension. will result in print issues. ClockWork2 adds an adjustment feature to set the minimum distance between the drive gear and the idler, limiting the squish on the filament, and...
- Page 28 WWW.VORONDESIGN.COM STEPPER MOTOR NEMA14 Stepper M3x30 SHCS...
- Page 29 WWW.VORONDESIGN.COM STEPPER MOTOR M3x8 SHCS M3 Washer DON’T TIGHTEN The motor position will be adjusted in the next steps. Don’t fully tighten just yet. ACCESS HOLE The second motor bolt can be accessed from the front of the extruder.
- Page 30 WWW.VORONDESIGN.COM STEPPER MOTOR SET GEAR MESHING Adjust the stepper motor position so that the motor and extruder gear teeth fully mesh /overlap with each other. There should be a very small gap between the faces of the gear teeth; the gears must not press tightly against each other.
- Page 31 WWW.VORONDESIGN.COM CABLE BRIDGE M3x20 SHCS...
- Page 32 WWW.VORONDESIGN.COM CABLE BRIDGE M3x8 SHCS...
- Page 33 WWW.VORONDESIGN.COM CABLE COVER OPEN LATCH Undo the filament latch to expose the bolt pocket for the cable cover. M3x16 SHCS...
- Page 34 WWW.VORONDESIGN.COM CABLE COVER DON’T OVER-TIGHTEN The bolt is threaded directly into plastic. M3x6 BHCS ACCESS HOLE The bolt drive can be accessed from the front of the extruder.
- Page 35 WWW.VORONDESIGN.COM StealthBurner development started on 2021-04-13 with a simple: “I’m going to regret saying this but, ‘How hard could it be?’”...
- Page 36 WWW.VORONDESIGN.COM...
- Page 37 WWW.VORONDESIGN.COM PART MARKINGS IDENTIFYING PRINTED PARTS The hotend type is embossed on the printed parts. Make sure they match your hotend. MISSING CORNER? CW1? CW2? We also provide tool cartridge parts for ClockWork1, and other extruders designed as an alternative to CW1. They are identical except for an opening in the highlighted corner to help with wire routing for those designs.
- Page 38 WWW.VORONDESIGN.COM PART PREP Heat Set Insert OPTION: ADXL PCB MOUNT To use the optional ADXL PCB for Klipper’s Input Shaper calibration, add additional heat set inserts into the holes in highlighted location.
- Page 39 WWW.VORONDESIGN.COM PART PREP Revo Voron Heatsink Revo HeaterCore Revo Nozzle...
- Page 40 WWW.VORONDESIGN.COM PART PREP HOTEND WIRE ROUTING Route the wires as shown to the right. This is universal to all hotend types. BEND STRAIN RELIEF Carefully bend the strain relief to clear the printed part. Firmly hold the HeaterCore to prevent bending the Revo Nozzle.
- Page 41 WWW.VORONDESIGN.COM TOOL CARTRIDGE M3x12 SHCS...
- Page 42 WWW.VORONDESIGN.COM TOOL CARTRIDGE M3x8 SHCS M3 MOUNTING BOLTS? Cause we can, that’s why. Other hotend designs may use different mounting hardware.
- Page 43 WWW.VORONDESIGN.COM TOOL CARTRIDGE PTFE STICKOUT The PTFE tube should stick out 11mm above the surface of the printed part. PTFE Tube The stick out length might vary if you use an extruder other than the ClockWork2.
- Page 44 WWW.VORONDESIGN.COM...
- Page 45 WWW.VORONDESIGN.COM SUPPORTS REMOVE SUPPORT Remove built-in supports (highlighted in the image) with flush cutters.
- Page 46 WWW.VORONDESIGN.COM To Controller Board LOGO LED Index=1 LED WIRING Connect the “OUT” side of the LED to the “IN” side of the next LED in the chain. Solder the wires as shown on the right. Both the 120mm 3x 0.16mm²(AWG26-30) “IN”...
- Page 47 WWW.VORONDESIGN.COM LEDS LOGO LED LED DIFFUSER AND MASK The diffuser (highlighted part) is printed in a translucent filament to evenly spread the light. The mask (part to the left) is printed in an opaque filament to prevent the light from leaking, resulting in a crisp logo.
- Page 48 WWW.VORONDESIGN.COM LEDS TOOLHEAD LED LEFT TOOLHEAD LED RIGHT...
- Page 49 WWW.VORONDESIGN.COM LEDS DIFFUSER INSERTION Insert the printed parts and push them towards the front.
- Page 50 WWW.VORONDESIGN.COM LEDS...
- Page 51 WWW.VORONDESIGN.COM LED WIRE ROUTING Route the LED wires as shown; wires exit on the right side.
- Page 52 WWW.VORONDESIGN.COM SUPPORTS SUPPORT STRUCTURE The highlighted parts are build-in support structures. They are designed to break during the fan installation.
- Page 53 WWW.VORONDESIGN.COM HOTEND FAN FAN ORIENTATION Rotate the fan so that the wires exit on the top and the air is pushed “inwards”. FAN INSERTION Insert the fan at a slight angle and clip it into place. Mind the fan orientation.
- Page 54 WWW.VORONDESIGN.COM HOTEND FAN FAN WIRE ROUTING Route the fan wires as shown, exiting on the right side...
- Page 55 WWW.VORONDESIGN.COM PART COOLING FAN FAN PREPARATION Remove the front of the 5015 fan. Clip off and file down the stock mounting ears. There’s a trimming jig STL included in the release to make this task easier.
- Page 56 WWW.VORONDESIGN.COM PART COOLING FAN M3x6 FHCS...
- Page 57 WWW.VORONDESIGN.COM Yeah, it went about as expected.
- Page 58 WWW.VORONDESIGN.COM X CARRIAGE...
- Page 59 WWW.VORONDESIGN.COM PART PREP M3 Hex Nut Heat Set Insert PRINTER SPECIFIC PARTS We provide different versions of the carriage to fit our different printer designs. Be sure to pick the right one for your printer.
- Page 60 WWW.VORONDESIGN.COM X CARRIAGE FOLLOW BELTING AND X CARRIAGE INSTALLATION OUTLINED IN PRINTER MANUAL Consult the printer’s manual for instructions on how to run the belts and details on carriage mounting. M3x8 SHCS...
- Page 61 WWW.VORONDESIGN.COM X CARRIAGE M3x30 SHCS M3x12 SHCS M3x30 SHCS...
-
Page 62: Carriage
WWW.VORONDESIGN.COM X CARRIAGE OTHER PROBE TYPES The picture shows the recommended Omron TL- Q5MC probe. Other probes with a similar form factor and characteristics might work as well. Omron Style Probe M3x30 SHCS... - Page 63 WWW.VORONDESIGN.COM ADJUST PROBE POSITION The position can be fine-tuned later. Set an initial position of about 6mm below the plastic part.
- Page 64 WWW.VORONDESIGN.COM CW2 MOUNTING M3x8 SHCS...
- Page 65 WWW.VORONDESIGN.COM CW2 MOUNTING M3x8 SHCS ACCESS HOLE The bolt can be accessed from the front of the extruder.
- Page 66 WWW.VORONDESIGN.COM TOOL CARTRIDGE MOUNTING...
- Page 67 WWW.VORONDESIGN.COM SB MOUNTING 25MM BOLTS? The bolts are slightly longer than necessary. This is on purpose and a QOL feature. The longer bolts prevents the front from falling off. M3x25 SHCS M3x50 SHCS...
- Page 68 WWW.VORONDESIGN.COM ADXL345 MOUNT...
-
Page 69: Adxl Mount
WWW.VORONDESIGN.COM ADXL345 MOUNT ADXL MOUNT AND INPUT SHAPER CALIBRATION The ADXL is intended to be mounted only when doing vibration testing/input shaper calibration and should not be left on the tool head during normal printing. ADXL345 Prototype Board M2x10 Self Tapping Screws ISOLATION SPACERS Most ADXL345 prototype boards have circuit tracks close to the mounting holes. - Page 70 ASSEMBLY COMPLETED! ... NEXT STEP: SETUP & CALIBRATION This manual is designed to be a reference manual for the build process of a Voron StealthBurner toolhead. Additional details about the build and background on advanced topics can be found on our documentation page linked below.
- Page 71 If you need assistance with your build, we’re here to help. Head on over to our Discord group and post your questions. This is our primary medium to help VORON Users and we have a great community that can help you out if you get stuck. Alternatively, you can use our subreddit.
- Page 72 WWW.VORONDESIGN.COM VORON Website Github Docs Discord vorondesign www.vorondesign.com github.com/ docs.vorondesign.com discord.gg/voron...
Need help?
Do you have a question about the STEALTHBURNER and is the answer not in the manual?
Questions and answers