Advertisement
Advertisement
Table of Contents

Related Manuals for Yale Doorman L3


Summary of Contents for Yale Doorman L3
- Page 1 Installation instructions...
- Page 2 In this manual, we will explain how to safely install the product on your door. The Yale Doorman L3 smart lock can be used with the Yale Home mobile app or without the app by using the lock’s keypad and other buttons. Instructions for both use cases are included in a later section of the manual.
-
Page 3: Installation Location Requirements
LC190. If you are installing the lock on a fire door, you must consult the door’s manufacturer to verify that the door’s fire rating is retained with the Yale Doorman L3 smart lock. In this case, the lock must be installed with the separate fire door kit. - Page 4 INSTALLATION LOCATION REQUIREMENTS • The distance between the door and the strike plate must be between 1.5 and 5.5 mm. If the gap is wider than 5.5 mm, the lock may not work reliably. Adjust the door or the strike plate to reduce the gap, if necessary.
-
Page 5: Package Contents
PACKAGE CONTENTS Tools required for installation: • PH2 crosshead screwdriver • T20 Torx screwdriver • Hex key • Measuring tape • Bolt cutter or hacksaw • DO NOT USE POWER TOOLS WITH INSTALLATION! Outside and inside units 5 M4×8 screws 4 snap-off screws 2 wood screw 4x25 1 small screw... - Page 6 We recommend that you connect your Yale Doorman L3 smart lock to our free Yale Home mobile app. The app is an easy way to manage your lock and offers many useful features, such as locking delay adjustment, automatic opening, and remote control*.
-
Page 7: Prepare The Installation
If the old lock body is not listed above, the door may need to be modified and the installation will therefore differ from these instructions. In this case, we recommend that you use your local Abloy-authorised Yale Partner for installation. Visit yale.fi to find your nearest local partners. Onefit... -
Page 8: Changing The Face Plate
CHANGING THE HANDING OF THE LOCK BODY CHANGING THE FACE PLATE Side selection: Remove the anti-drill shield. Remove the side selection screw Change the face plate, if necessary. and reinstall it on the inside (Figures 1 and 2). The screw-side handle is always operated mechanically. - Page 9 PREPARE THE INSTALLATION Left-handed installation Right-handed installation Check the handing of your door by viewing it from the outside. Keep the handle uninstalled for now. Prepare the outside unit according to your door’s handing by installing an M4×8 screw as pictured.
- Page 10 PREPARE THE HANDLES Open the package and find both handles and their spindles. Measure distance K as pictured from the centre of the lock body to the inside surface of the door. Select the correct spindle size for the inside handle according to K.
- Page 11 PREPARE THE INSTALLATION The outside unit is mounted with four snap-off screws that span the depth of the door. • Cut two of the screws (A) to exceed the depth of the door by one section (groove). • Cut the other two screws (B) to match the depth of the door. •...
-
Page 12: Installation
INSTALLATION Place the anti-drill shield on the Install the BL907 lock body (included in the package) into your lower part of the lock body. door. The lock body’s wire must be on the inside of the door. - Page 13 Place the longer snap-off screws Place the outside unit with screws on the door. Thread the cable and screwheads above in the outside unit’s middle the lock body. Next, thread the wire harnesses through the opening in the insulation screw towers and screw them in block and push in the insulation block.
- Page 14 Thread the two shorter Locate the support plate on Fix the support plate in place with the included snap-off screws through the upper screws by sliding screw and make sure to leave the cables free. Now the mounting plate and the support plate downwards.
- Page 15 Connect the wire harness connectors Place the inside unit on its The inside unit is secured to to the inside unit. Install the white mounting plate bottom first. the mounting plate with four connector on the white header and the Avoid leaving any cables pinched M4×8 screws.
- Page 16 Take the prepared handles and mount them on the door. Check that both handles operate as they should and remain firmly in place. • Outside: use the square spindle. • The handles must be easy to operate. The inside • Inside: use the correct length of spindle according to door depth. handle must only open the door when the To properly install the spindle on the inside, first push the spindle handle’s button is held down.
- Page 17 SET THE ADMINISTRATOR CODE 1. Keep the door open. 2. Install the batteries in the inside unit. The lock will request a master code. • Enter a code of your choice with the keypad (6–10 numbers). Please note that the length of the lock’s user codes will be the same as the master code! •...
- Page 18 TEST THE LOCK After you have set the master code, keep the door open and test its operation as follows: 1. Press in the trigger bolt and keep it pressed in during the test. If the trigger bolt is released during the test the burglary alarm of the lock can trigger.
-
Page 19: Post-Installation Checklist
• Enter 0 and The lock can now be connected to the Yale Home app for five minutes. The function is cancelled if you close the door. Please note that any codes, tags, and settings you have programmed in the lock will be erased upon connection! -
Page 20: About Batteries
ABOUT BATTERIES MAINTENANCE INSTRUCTIONS, LOCK OWNER This product uses four 1.5 V AA alkaline batteries (note After 12 months from installation: operating temperature). Always change all four batteries • Check the tightness of the snap-off screws and adjust at the same time when you see the “battery low” warning. them, if necessary (instructions on page 14). -
Page 21: Technical Specifications
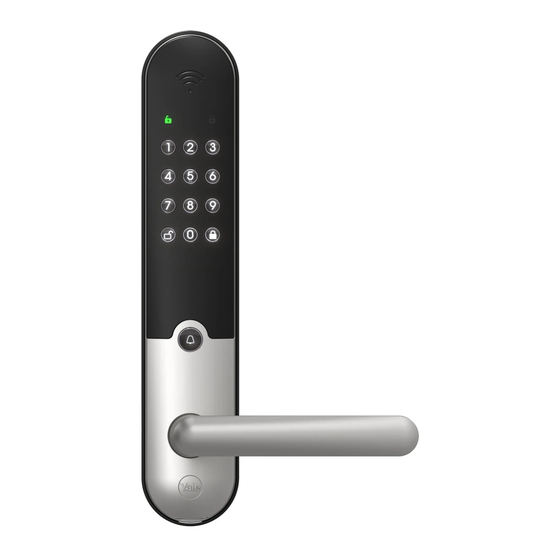
• Battery type: 4 AA alkaline batteries. If the lock is not connected to the Yale Home app, you can use the lock’s voice menu to configure its settings and users. • Surface finish: UV-resistant paint or varnish. - Page 22 Thumbturn, used to lock the door from the inside QR code, used to add and to activate security “Open” key(“OK” in menus) the lock to the Yale mode Home app “Close” key (“Cancel” in menus) Handle activation button, used to...
- Page 23 • Alternatively, use the Yale Home app. The Yale Home app also allows the automatic locking function to be activated from the lock settings menu. • If you forget your master code, you must reset the lock: •...
-
Page 24: Indicator Lights And Sound Signals
INDICATOR LIGHTS AND SOUND SIGNALS Yale Doorman features a built-in voice menu in Finnish, Swedish, English, and Russian. Light and sound indication when using the outside keypad Upon locking, Upon opening, the Errors are The burglar the keypad keypad displays... - Page 25 Emergency opening from the inside Yale Doorman L3 can be opened with the inside handle’s button even if there are no batteries installed in the product.
- Page 26 CONFIGURING LOCK SETTINGS WITHOUT THE APP The settings of the Yale Doorman L3 smart lock can be configured in “standalone” mode by using the lock’s keypad. If you do connect the lock to the Yale Home app, all settings must be configured in the app and the lock’s keypad cannot be used for this purpose.
- Page 27 Press 0 • Press 3 • Press 1 to disable doorbell The lock can now be connected to the Yale Home app for five sounds. • Press 1 to require locking minutes. The function is cancelled if you close the door.
- Page 28 Changing the master code Registering user codes Registering access control tags Erasing access control tags • The master code is the • Press , enter the master • Press , enter the master code, • Press , enter the master code you set when you first code, and press again.
- Page 29 Changes in temperature will cause the door and frame to deform, which may increase the gap. Automatic opening is delayed or The model and settings of your phone affect the reliability of the automatic opening function. Visit our support section at www.yale.fi for tips otherwise problematic.
- Page 32 YALE, with its unique global reach and range of products, is the world’s favorite lock – the preferred solution for secu- ring your home, family and personal belongings. ASSA ABLOY is the global leader in door opening solutions, dedicated to satisfying end-user needs for security, safety and convenience.
Need help?
Do you have a question about the Doorman L3 and is the answer not in the manual?
Questions and answers