Table of Contents
Advertisement
Quick Links
Technical Support and E-Warranty Certificate www.vevor.com/support
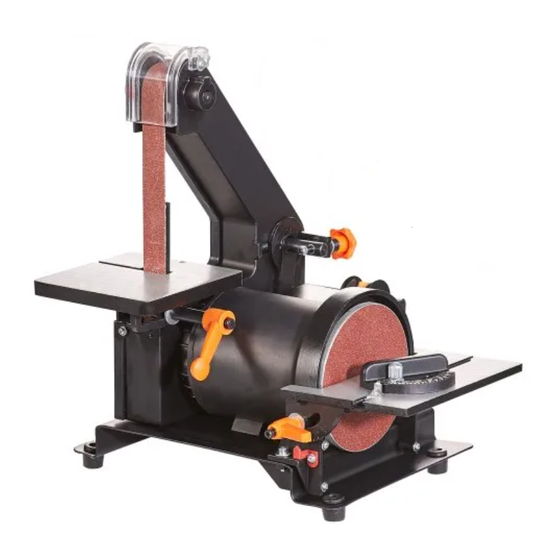
COMBINATION BELT & DISC SANDER
CARPENTRY BASIC
MODEL: MM4113
We continue to be committed to provide you tools with competitive price.
"Save Half", "Half Price" or any other similar expressions used by us only represents an
estimate of savings you might benefit from buying certain tools with us compared to the major
top brands and doses not necessarily mean to cover all categories of tools offered by us. You
are kindly reminded to verify carefully when you are placing an order with us if you are
actually saving half in comparison with the top major brands.
Advertisement
Table of Contents

Related Manuals for VEVOR MM4113


Summary of Contents for VEVOR MM4113
- Page 1 Technical Support and E-Warranty Certificate www.vevor.com/support COMBINATION BELT & DISC SANDER CARPENTRY BASIC MODEL: MM4113 We continue to be committed to provide you tools with competitive price. "Save Half", "Half Price" or any other similar expressions used by us only represents an estimate of savings you might benefit from buying certain tools with us compared to the major top brands and doses not necessarily mean to cover all categories of tools offered by us.
- Page 2 CustomerService@vevor.com This is the original instruction, please read all manual instructions carefully before operating. VEVOR reserves a clear interpretation of our user manual. The appearance of the product shall be subject to the product you received. Please forgive us that we won't inform you again if there are any technology or software updates on our product.
-
Page 3: Specifications
VEVOR GUARANTEE This VEVOR product is guaranteed against faulty manufacture for a period of 12 months from the date of purchase. Please keep your receipt as proof of purchase. This guarantee is invalid if the product is found to have been abused or tampered with in any way, or not used for the purpose for which it was intended. -
Page 4: Safety Precautions
SAFETY PRECAUTIONS As with all machinery, there are certain hazards involved with their operation and use. Exercising respect and caution will considerably lessen the risk of personal injury. However, if normal safety precautions are overlooked or ignored, personal injury to the operator or damage to property, may result. 1. - Page 5 11. ALWAYS ensure the switch is off before plugging in to mains. Avoid accidental starting. 12. ALWAYS concentrate on the job in hand, no matter how trivial it may seem. Be aware that accidents are caused by carelessness due to familiarity. 13.
-
Page 6: Important Notice
6. ALWAYS hold the workpiece firmly so that it cannot be ripped from your hands 7. ALWAYS feed the workpiece against the direction of rotation of the disc. i.e the LEFT side of the disk 8. ALWAYS keep the mains cable well away from the machine and ensure an adequate electrical supply is close at hand so that the operation is not restricted by the length of the cable. -
Page 7: Pre-Assembly Check
Unpack the Sander and lay out the components, checking to ensure that no damage was suffered during transit. Any damage should be reported to your VEVOR dealer immediately. Loose items are as follows, referring to the illustration above: A: 1 x Disk Sanding Table... -
Page 8: Belt Table
ASSEMBLY 1. Belt Table • Gently ease the table into place with the belt support entering the slot in the table. Screw the Table Locking Lever into place, • ensuring a flat washer is used on the levers ’ threads noting that the locking lever has a LEFT HAND thread, i.e. -
Page 9: Belt Table Adjustment
3. Feet The four feet may be very gently eased into the holes at the base of the machine. Alternatively, the machine may be mounted on a workbench or a wooden base, using the four holes in the base as mounting holes. In order to maintain complete stability when in use, the wooden base should be secured to a workbench using ‘G’... -
Page 10: Operation
the locking lever and positioning the table using a protractor or angle setter, then retightening the locking lever. 2. Disk Table Adjustment • Place an engineers square on the table and slacken the locking levers slightly. • Adjust the table so it is at right angles to the Disc, using the square, then tighten the locking levers. -
Page 11: Maintenance
2. Switch the machine ON by pressing the Green ON button. 3. If using the belt, check to ensure it is tracking properly adjust if necessary. 4. Holding the workpiece firmly, place it on the table and gently slide it into contact with the belt or disk. -
Page 12: Parts List & Diagrams
PARTS LIST & DIAGRAMS WARNING: The use of spare parts, other that those supplied by VEVOR International or one of its recognised dealers, may be hazardous and could invalidate the guarantee. -
Page 13: Parts Diagram
PARTS DIAGRAM - 12 -... -
Page 14: Parts List
PARTS LIST Item Description Part No Knob HTCBS1501 Cover HTCBS1502 Label HTCBS1503 Warning Label HTCBS1504 Belt HTCBS1505 Retaining Ring HTCBS1506 Bearing HTCBS1507 Driven Wheel HTCBS1508 Shaft HTCBS1509 Plastic Belt Guard HTCBS1110 Washer HTCBS1111 Screw HTCBS1112 Screw HTCBS1113 Pulley HTCBS1514 Body HTCBS1515 Adjustable Shaft HTCBS1516... - Page 15 Item Description Part No Elastic Washer HTCBS1532 Washer HTCBS1533 Wheel HTCBS1534 Insert HTCBS1535 Bolt HTCBS1536 Screw HTCBS1537 Table HTCBS1538 HTCBS1539 Washer HTCBS1540 Bolt HTCBS1541 Lever HTCBS1542 Spring HTCBS1543 Screw HTCBS1544 SCrew HTCBS1545 Motor HTCBS1546 Screw HTCBS1547 Washer HTCBS1548 Screw HTCBS1549 Washer HTCBS1550 Pointer...
- Page 16 Item Description Part No Screw HTCBS1565 Spring HTCBS1566 Lever HTCBS1567 Bolt HTCBS1568 Washer HTCBS1569 Lower Disk Cover HTCBS1570 Washer HTCBS1571 Screw HTCBS1572 Screw HTCBS1573 Rubber Pad HTCBS1574 Base HTCBS1575 Washer HTCBS1576 Elastic Washer HTCBS1577 Bolt HTCBS1578 Rubber Pad HTCBS1579 Side Cover HTCBS1580 Washer HTCBS1581...
- Page 17 Technical Support and E-Warranty Certificate www.vevor.com/support Made In China...
Need help?
Do you have a question about the MM4113 and is the answer not in the manual?
Questions and answers
This sander just shut off and won't come back on it did this once before but did restart after a while mm4113