
Related Manuals for WolfPack HDTV444K60


Summary of Contents for WolfPack HDTV444K60
- Page 1 User Manual WolfPack 4K60 18Gbps 4X4 Seamless HDMI Matrix with Video Wall &Multiviewer&Scaling and APP&IR&IP&RS-232 HDTV444K60 Version: V23.3.24...
- Page 2 Safety Reminder To protect the device and operating personnel from electrostatic discharge, you need to check and ensure that the device is grounding well before the device is powered on. Please observe the following when you install, use, maintain this equipment. Make sure the device ground connection.
-
Page 3: Table Of Contents
Contents ....................4 1. Product Introduction ......................4 2. Product Features ..................... 5 3. Technical Datasheet ......................5 4. Packing Datials ......................5 5. Panel diagram ..................7 6. Product Connection Diagram ................6 7. Product Operation and Instruction 7.1 Front Panel Switching Operation ................6 7.2 WEB Control ......................24 7.3 APP Control .......................26 7.4 IR Remote Control .......................28... -
Page 4: Product Introduction
1. Product Introduction This is advanced and powerful 4K60 18Gbps HDMI2.0 Matrix Switcher with 4 HDMI inputs and 4*HDMI Outputs. This unit can support seamless switching, video wall, multi-viewer and Scaler functions. It can be controlled by the front push-button, IR remote, TCP/IP WEB GUI or APP control, also support the RS232 control. -
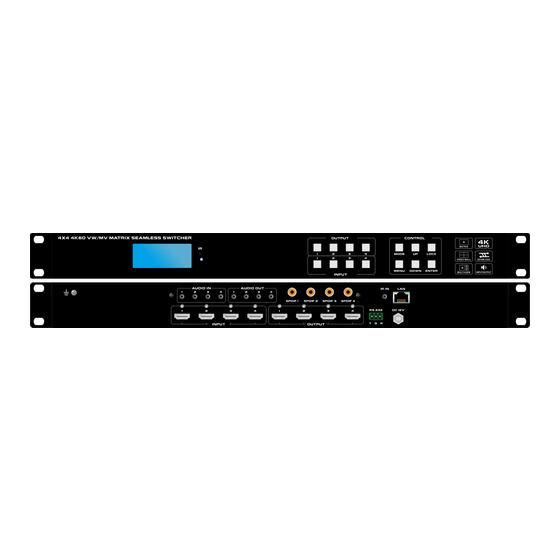
Page 5: Packing Datials
4. Packing Details Matrix switch ....................1 unit Power cord ......................1 pcs User manual ......................1 pcs Rack ears .......................1 pair 5. Panels Front Panel Name Description LCD Screen Operation information real-time Display light up after power on, it will light off after power off POWER IR remote control 4 output buttons... -
Page 6: Product Operation And Instruction
7. Equipment Operation and Instruction The LCD display screen will light up after power and turned on. It shows the current operation status, press MENU button, it will keep recycling between VIEW, SWITCH, SCENE, SETUP four different interface. The default interface is VIEW. 7.1 Front push-button control 7.1.1 MENU>OUTPUT MENU>OUTPUT>Output 1... -
Page 7: Product Connection Diagram
MENU>OUTPUT>Output 1>Control>Video to setup the output video, including video ON/OFF, switch, test pattern... - Page 8 Format: to setup the output video format, resolution, color space Default 1: 4K@60 Default 2: 4K@30 Default 3: 1080P@60hz Default 4: 720P@60hz...
- Page 9 Coord: to crop the output image It will including Crop, Zoom, Offset and Gap. Crop and Zoom image cropping or zooming Crop start from: CropX0=0, CropY0=0; Crop ends with: CropY1=6000, CropX1=6000.
- Page 10 Zoom start from: ZoomX0=0, ZoomY0=0; Zoom ends with: ZoomX1=6000, ZoomY1=6000 Offset and Gap are for the video wall bezel corrections Offset: Offeset U=0, Offeset D=0, Offeset L=0, Offeset R=0 Gap: GapX=0, GapY=0 PIP: when output is multiview to adjust the layer Wall: to set up video wall mode...
- Page 11 Rotate: only for OUTPUT1 with any degrees rotation Image: for output image hue, brightness settings MENU>OUTPUT>Output 1>Audio...
- Page 12 HDMI Onoff: HDMI Audo ON/OFF HDMI SRC: switch to different audio inputs DEC Onoff: De-embedded audio ON/OFF DEC SRC: De-embedded audio switching...
- Page 13 MENU>OUTPUT>Output 1>Power For the HDMI 5V ON/OFF 7.1.1 MENU>INPUT MENU>INPUT>Input...
- Page 14 MENU>INPUT>EDID...
- Page 15 7.1.3 MENU>SETUP MENU>SETUP>Network...
- Page 16 MENU>SETUP>RS232 MENU>SETUP>LCD...
- Page 17 MENU>SETUP>OSD MENU>SETUP>Menu Timer for Menu to back the channel time...
- Page 18 Disable means need to press Enter or OK to take action Enable means need need to press Enter or OK to run MENU>SETUP>User EDID MENU>SETUP>System...
- Page 19 Timed off for set a time to off the matrix, default with endlessness Timed on for set a time to start the matrix, default with endlessness Auto sleep means for auto sleep MENU>SETUP>System 7.1.4 MENU>Preset...
- Page 21 *Demo for the saved presets to cycling 7.1.5 MENU>Info...
- Page 22 MENU>Info>input MENU>Info>output...
- Page 23 MENU>Info>System...
-
Page 24: Web Control
7.2 WEB Control The default IP address are 192.168.1.200, Accordingly to connected LAN port, enter the corresponding IP address, (Recommend with Google Chrome) as below: Note: The default user name and password is the same: admin, click login after entering. Please make sure the control PC is at the same IP segment. - Page 25 Status: To show the current input and output info 7.2.2 Basic setting Output rename pattern, video, audio, inputs, audio source and output resolution settings Analog Audio switching: Input rename, parrent, video and audio ON/OFF, EDID Double click the Rename Rows to rename...
-
Page 26: App Control
Preset selection, rename, save, recall and clear, up to 23 presets 7.2.3 Advanced setting 7.2.4 System setting 7.3 APP Control The matrix switchers also can support the iOS and Android APP control, users can search the keyword “Matrix Control System” in Apple store or the Google Play Store. - Page 27 Step 1: Make sure the matrix well connected with the WIFI router, and the iPad/Android devices are connected to this same WIFI. Then open on the MCS(matrix control system) APP and Enter the IP address of the matrix switcher(the default IP addresses 192.168.1.200): Step 2: After Enter the IP address, it will need to login, the default user name and password both are the admin, After log in successfully, users can do the same functions as the WEB GUI operation:...
-
Page 28: Ir Remote Control
7.4 IR Remote Control 7.5 COM and TCP/IP Control Commands RS232 cable with straight-through connection(USB-RS232 can be used directly to control) Communication protocol: Baud rate: 115200 Data bit: 8 Stop bit: 1 Check bit: None The TCP port is 5000 and UDP is 4000 Commands Explanation Function description... -
Page 29: Com Control Commands
Note: Every command ends with a period “.” and it can’t be missing. The letter can be capital or small letter. Switch success will return as “OK”, and failed will return as “ERR”.’ Multiview modes: M-2×2 M-3×1 L Video Wall W-2x2... - Page 30 W-1x2 1x2 W-1x3...
- Page 31 W-1x4 How to crop and zoom: Way 1: By the front push button/IR remote with the OSD: ① 【MAIN】->【Output】->【Output 1】->【Video】->【Coord】 ② Adjust Crop and Zoom 【Crop X0】->【0】 【Crop Y0】->【0】 【Crop X1】->【3000】 【Crop Y1】->【0】 【Zoom X0】->【500】 【Zoom Y0】->【800】 【Zoom X1】->【2500】 【Zoom Y1】->【4500】...
-
Page 32: Trouble Shooting And Attention
Way2: By the WEB GUI control 8. Trouble Shooting and Attention No signal on the display? Make sure all the power code well connected Check the display switcher and make sure it’s in good condition Make sure the cables between the device and display are short than 10 meters for 4K ...
Need help?
Do you have a question about the HDTV444K60 and is the answer not in the manual?
Questions and answers