
Subscribe to Our Youtube Channel
Related Manuals for WolfPack HDTVFIX1616-HDR


Summary of Contents for WolfPack HDTVFIX1616-HDR
- Page 1 User Manual HDTVFIX1616-HDR WolfPack 4K 60 Hz 16x16 HDMI Matrix Switch with HDR Version: V22.10.13...
-
Page 2: Table Of Contents
Contents ....................4 1. Product Introduction ......................4 2. Product Features ..................... 5 3. Technical Datasheet ......................5 4. Packing Datials ......................5 5. Panel diagram ..................7 6. Product Connection Diagram ................7 7. Product Operation and Instruction 7.1 Front Panel Switching Operation ................7 7.1.1 Switch .......................7 7.1.2 Scene ........................ -
Page 3: Product Introduction
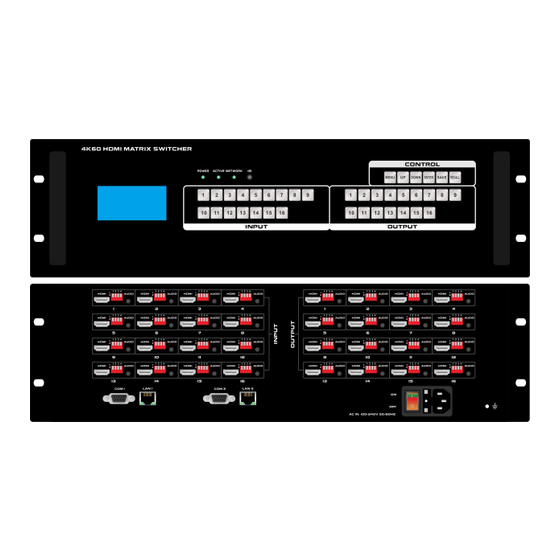
1. Product Introduction This is a WolfPack 4K 60 Hz 16x16 HDMI Matrix Switch with HDR w/16 HDMI in ports w/16* 3.5mm audio in and 16 HDMI output ports with 16* 3.5mm audio outs, the resolution can up to 4K60Hz and all ports are HDCP compliant. With the friendly user control methods: IR remote... - Page 4 4. Packing Details HDMI2.0 16x16 Matrix Switcher ..................1 unit Power cord ......................1 pcs IR Remote control....................1 pcs 5. Panels Front Panel Name Description ① LCD Screen Operation information real-time Display ② POWER light up after power on, it will light off after power off ②...
- Page 5 Name Description ① Input Port 1-16 HDMI input ports ② Output Port 1-16 HDMI output ports ③ RS232 Ports Dual RS232 ports for 3 parties control ④ LAN Ports Dual LAN ports for WEB/TCP/IP control ⑤ RS232 Ports Dual RS232 ports for 3 parties control ⑥...
- Page 6 6. Equipment Connection Diagram 7. Equipment Operation and Instruction The LCD display screen will light up after power and turned on. It shows the current operation status, press MENU button, it will keep recycling between VIEW, SWITCH, SCENE, SETUP four different interface.
-
Page 7: Switch
7.1.4 View Operation Via MENU button switch to VIEW interface, will display the current switching status 7.2 WEB Control The default IP address are 192.168.0.80(LAN1) and 192.168.1.80(LAN2). 7.2.1 Login Operation Accordingly to connected LAN port, enter the corresponding IP address, if using the LAN2, then enter 192.168.1.80 in the browse(Recommend with Google Chrome) as below: Note: The default user name and password is the same: admin, click login after entering. -
Page 8: Scene
Output buttons. Or users can use the shortcut buttons on the right for the fast switching: Switch one input to all the outputs Close one input to all the outputs Switch all inputs on all outputs Close all inputs to all outputs Switch to the scenes Save and Recall interface 7.2.3 Scene Scene Interface:... -
Page 9: Setup
7.2.5 Setup Setup interface: Users can reboot, change the IP address, set up the login user names, language and the RS232 baud rate settings here. After changed the IP address, will need to reboot the matrix switcher, then the new IP address will take effect. -
Page 10: App Control
7.2.6 More: For the more interface, users mainly can do the firmware upgrade here. Screen is for the other matrix models which with the touch screen, so users can monitor the touch screen switching status. For the upgrade, users need to check with the factory to get the firmwares, the firmware is “.zip” format. - Page 11 Step 1: Make sure the matrix well connected with the WIFI router, and the iPad/Android devices are connected to this same WIFI. Then open on the MCS(matrix control system) APP and Enter the IP address of the matrix switcher(the default IP addresses are: 192.168.0.80 or 192.168.1.80): Step 2: After Enter the IP address, it will need to login, the default user name and password both are the admin:...
-
Page 12: Com Control Commands
Step 3: After log in successfully, users can do the same functions as the WEB GUI operation: 7.4 COM Control Commands RS232 cable with straight-through connection(USB-RS232 can be used directly to control) Communication protocol: Baud rate: 115200 Data bit: 8 Stop bit: 1 Check bit: None Commands... -
Page 13: Ir Remote Control
Save current status to scene Y SaveY. Y=1,2,3,4..Eg. “Save2.” means saving current status to Scene 2 Recall the saved scene Y RecallY. Y=1,2,3,4..Eg. “Recall2.” means recall the saved Scene 2 BeepON. Buzzer on Beep sound BeepOFF. Buzzer off Check the Input Y to outputs switching status Y=1,2,3,4.. - Page 14 choose and pay for the repair of the defective product or component, the delivery of the equivalent product or component to the user for replacement of the defective item, or refund the payment which users have made. The replaced product will become the property of the Company. The replacement product could be new or repaired.
Need help?
Do you have a question about the HDTVFIX1616-HDR and is the answer not in the manual?
Questions and answers