
Related Manuals for Drive DeVilbiss Healthcare TREKKER GT


Summary of Contents for Drive DeVilbiss Healthcare TREKKER GT
- Page 1 TREKKER GT Gebrauchsanweisung - Instructions for use - Mode d’emploi - Gebruiksaanwijzing - Istruzioni per l’uso...
-
Page 2: Table Of Contents
Inhalt Vorwort ..................3 Konformitätserklärung ............. 3 Lebensdauer ................3 Entsorgung ................. 3 Typenschild................. 3 Wiedereinsatz ................3 Gewährleistung ................. 3 Teile des Produkts ..............4 Indikation | Kontraindikation ..........4 Lieferumfang ................4 Sicherheitshinweise ..............4 Gebrauchszustand herstellen ..........5 Einstellung Trekker Grundgestell ......... -
Page 3: Vorwort
Vorwort Typenschild Wir danken Ihnen, dass Sie sich für ein Produkt aus dem Hause Drive DeVilbiss entschieden haben. Das Design, die Funktionalität und die Qualität dieses Produktes werden Sie nicht enttäuschen. Bitte lesen Sie diese Bedienungsanleitung vor dem ers- ten Gebrauch sorgfältig durch. Sie erhalten wichtige Sicherheitshinweise und wertvolle Tipps zur richtigen Benutzung und Pflege. -
Page 4: Teile Des Produkts
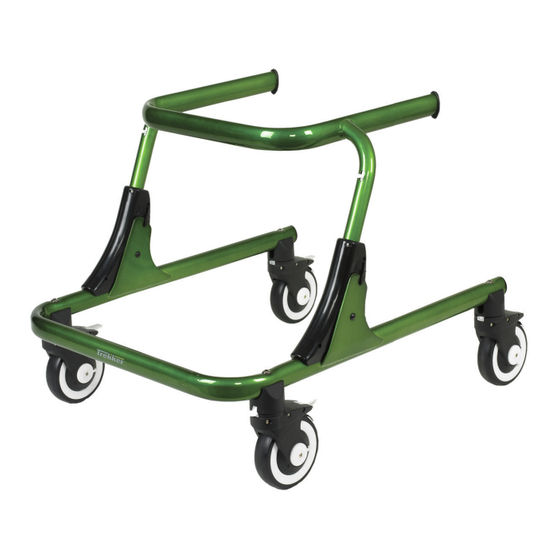
Teile des Produkts TREKKER Grundrahmen Rahmen mit Handgriff Höhenverstellung Rücklaufsperre Rad mit Bremse Um Unsicherheiten in Bezug auf Indikation und Kontra- Indikation | Kontraindikation indikation zu vermeiden, empfehlen wir, Ihren behan- delnden Arzt und/oder Therapeuten zu konsultieren. INDIKATION: Gehhilfe für Kinder und Jugendliche in 4 verschiedenen Größen für den Innenbereich zum Ausgleich bzw. -
Page 5: Gebrauchszustand Herstellen
• Produkt nur als Gehhilfe verwenden! Einstellung Trekker Grundgestell • Produkt nur auf ebenem und festem Untergrund Einstellen des Rahmen mit Handgriff verwenden. Durch Drücken und • Beachten Sie das zugelassene Maximalgewicht Halten der Hebel (J), des Benutzers. Diese Angabe fi nden Sie in den tech- kann die gewünschte nischen Daten in dieser Bedienungsanleitung sowie Höhe stufenweise... -
Page 6: Falten Zum Transport
Falten zum Transport Montage Zubehör (optional erhältlich) Der Gehtrainer Trekker (Nur Gr. M u. L) kann für den Allgemein leichteren Transport zusammengefaltet werden kann. Das Zubehör kann je nach gewünschter Therapie, den Dafür das Zubehör und den Oberrahmen auf die nied- motorischen Fähigkeiten des Nutzers und der Auswahl rigste Position stellen. -
Page 7: Einstellung Zubehör (Optional Erhältlich)
Sitzgeschirr 2. Positionieren Sie das (S = Art. Nr.: TK1070S; L = Art. Nr.: TK1070L) Klemmstück der Un- Wenn der Sitz die Neigung nach vorne unterstützen terarmauflage an den soll, montieren Sie das Zubehör mit den beiden Klemm- ovalen Oberrahmen, stücken und Verstellstangen (A) am Ende des Oberrah- die Sternschraube nach mens. - Page 8 5. Die Breite zwischen den Unterarmauflage kann durch zur zusätzlichen Höhenverstellung wie gezeigt be- Abnehmen und neu positionieren der Klemm- stücke festigen oder direkt auf dem Oberrahmen (die Kap- und Verstellstangen verstellt werden. pen am Ende verhindern ein herunterrutschen der Gurte vom Rahmen).
-
Page 9: Nutzerpositionierung
11. Einstellen der Gurte der Fußgelenkbandage zur Füh- rung der Beine (Abb. 15). 3. Durch Verschieben der Klemmfedern (H) vom Rad weg, kann die Fußgelenkbandage komplett abgenom- men werden wie in Bild 23 beschrieben. 4. Der Gurtverschluss (I) dienen der seitlichen Einstellung 12. -
Page 10: Technische Daten
Technische Daten GRÖSSE TREKKER S TREKKER M TREKKER L Farbe Blau Grün Grün Blau Grau Artikelnummer 706000100 706000110 706000200 706000210 706000300 Körpergröße (bis ca.) 114 cm 122 cm 155 cm Gesamtlänge 84 cm 80 cm 96 cm Gesamtbreite 57 cm 66 cm 70 cm Gesamthöhe... - Page 11 Inhalt Preface ..................12 Declaration of conformity ............12 Service life ................12 Disposal ..................12 Identification plate ..............12 Reuse................... 12 Warranty ..................12 Parts of the product ..............13 Indication | Contraindication ..........13 Scope of delivery ..............13 Safety instructions ..............
-
Page 12: Preface
Preface Identification plate Thank you for choosing a product from Drive DeVilbiss. You will not be disappointed by the design, functionality and quality of this product. Please read these operating instructions carefully prior to initial use. They contain important safety information and valuable tips for the proper use and care. -
Page 13: Parts Of The Product
Parts of the product TREKKER Base frame Frame with handle Height adjustment Backstop Wheel with brake Indication | Contraindication Scope of delivery INDICATION: Trekker children’s walking frame Walking aid for children and adolescents in 4 diff erent sizes Instructions for use for use indoors to compensate for or improve limited wal- king ability and for correction of body posture problems. -
Page 14: Preparing For Use
data in these instructions for use as well as on the Adjusting the Trekker base frame identifi cation plate. Adjusting the frame with • Use on escalators and the like is expressly prohibited! handle • Do not hang any bags on the handle – risk of tipping! By pressing and holding the lever (J), the desired •... -
Page 15: Folding For Transport
Forearm support Folding for transport (S = Art. no.: TK1035S; L = Art. no.: TK1035L) The Trekker gait trainer (only sizes M and L) can be fold- Mounting: ed up for easier transport. To do this, bring the accesso- 1. Open the clamp by loosening the screw and swiveling ries and upper frame into the lowest position. -
Page 16: Adjustment Of Accessories (Optionally Available)
Seat harness 2. Position the clamp of the (S = Art. no.: TK1070S; L = Art. no.: TK1070L) forearm support on the oval upper frame, swivel When the seat is intended to support a forward inclina- the star screw upwards tion, mount the accessories with both clamps and adjust- and tighten. - Page 17 5. The width between the forearm supports can be ad- justed by removing and repositioning the clamps and adjusting rods. • Step 1: Loosen the screw (K) and remove the forearm support. • Step 2: Press the button (L), pull out the adjusting rod, and rotate in the desired position.
-
Page 18: User Positioning
4. The belt fastener (I) is used for lateral adjustment of the ankle wrap (photo. 23). Usage hints User positioning Ensure that the center of gravity of the body is as 1. Operate the parking brakes to brake the gait trainer. centered as possible bet- 2. - Page 19 SIZE TREKKER S TREKKER M TREKKER L Color warrior blue magic green magic green warrior blue sword grey Article number 706000100 706000110 706000200 706000210 706000300 Height (up to approx.) 114 cm 122 cm 155 cm overall length 84 cm 80 cm 96 cm Overall width 57 cm...
- Page 20 Inhalt Avant-propos ................21 Déclaration de conformité ............. 21 Durée de vie ................21 Élimination ................. 21 Plaque signalétique ..............21 Recyclage ................... 21 Garantie ..................21 Pièces du produit ..............22 Indication I contre-indication ..........22 Contenu de la livraison ............22 Consignes de sécurité...
-
Page 21: Avant-Propos
Avant-propos Plaque signalétique Nous vous remercions d'avoir choisi un produit de Drive DeVilbiss. Le design, la fonctionnalité et la qualité de ce produit sauront vous apporter pleine satisfaction. Avant d’utiliser le produit pour la première fois, veuil- lez lire attentivement le présent mode d’emploi. Vous y trouverez des consignes de sécurité... -
Page 22: Pièces Du Produit
Pièces du produit TREKKER Châssis Cadre avec poignée Réglage de la hauteur Fonction anti-recul Roulette avec frein dications et contre-indications, parlez-en au médecin et/ Indication I contre-indication ou au thérapeute compétent. INDICATION : En cas d’incertitudes en ce qui concerne les indica- „Aide à... -
Page 23: Consignes De Sécurité
La plupart des accessoires (proposés comme options) Consignes de sécurité sont attachés au cadre au moyen de pinces et de barres de réglage (fi g. 2). • Lire attentivement ce mode d’emploi. • Avant utilisation, vérifi er tous les éléments pour s’as- Réglage du châssis du Trekker surer qu’ils ne sont pas endommagés et ne bougent pas. -
Page 24: Pliage Pour Le Transport
Pliage pour le transport Montage des accessoires (proposés comme options) Généralités Les accessoires peuvent être attachés au cadre et réglés en fonction du traitement souhaité, de la motricité de l’utilisateur et du choix des accessoires. Plateformes d’avant-bras (S = réf. : TK1035S ; L = réf. : TK1035L) Montage : Le dispositif d’aide à... -
Page 25: Pliage Pour Le Transport
Harnais 2. Positionner la pince de la (S = réf. : TK1070S ; L = réf. : TK1070L) plateforme d’avant-bras sur le cadre ovale su- Arrière périeur, basculer la vis à poignée en étoile vers le haut et la serrer. 3. Il est recommandé de monter plateforme d’avant-bras devant les... - Page 26 4. Le brassard (N) et la sangle de poignet (O) servent à ou vers l’arrière sur le cadre ou même l’enlever entière- immobiliser le bras de l’utilisateur. La sangle de poi- ment en desserrant la vis (Y) (fig. 21). gnet empêche le bras de glisser hors de la plateforme d’avant-bras.
- Page 27 Sangle de cheville 9. Régler la largeur, la hauteur et l’angle des appui-bras (S = réf. : TK1060S ; M = réf. : TK1060M ; L = réf. : TK1060L) (fig. 20). 10. Régler la hauteur, l’angle et la longueur de la sangle 1. La fermeture de sangle (F) permet d’appliquer ou pour le guidage des jambes (fig.
-
Page 28: Accessoires Pour Le Rollator Livrables Séparément
TAILLE TREKKER S TREKKER M TREKKER L Couleur bleu vert vert bleu gris Numéro d'article 706000100 706000110 706000200 706000210 706000300 Hauteur (jusqu'à env.) 114 cm 122 cm 155 cm Longueur totale 84 cm 80 cm 96 cm Largeur totale 57 cm 66 cm 70 cm Hauteur totale... - Page 29 Inhalt Voorwoord ................30 Verklaring van overeenstemming ........30 Levensduur ................30 Verwijdering ................30 Typeplaatje ................30 Hergebruik ................30 Garantie ..................30 Onderdelen van het product ..........31 Indicatie | contra-indicatie ............. 31 Geleverd product ..............31 Veiligheidsinstructies ............32 Klaarmaken voor gebruik .............
-
Page 30: Voorwoord
Voorwoord Typeplaatje Hartelijk dank dat u hebt gekozen voor een product van het merk Drive DeVilbiss. Het ontwerp, de functionaliteit en de kwaliteit van dit pro- duct zullen u niet teleurstellen. Lees deze bedieningshandleiding voor het eerste ge- bruik aandachtig door. De handleiding bevat belangrijke veiligheidsinstructies en waardevolle tips voor verant- woord gebruik en onderhoud. -
Page 31: Onderdelen Van Het Product
Onderdelen van het product TREKKER Basisframe Frame met handgreep Hoogteverstelling Achteruitrijblokkering Wiel met rem gegeven wanneer er bijvoorbeeld sprake is van een ver- Indicatie | contra-indicatie keerd staande voet of pijnsymptomen. INDICATIE: Als u twijfelt over een indicatie of contra-indicatie, kunt Looprek voor kinderen en jongeren in 4 verschillende u dit bespreken met de behandelend arts en/of de the- maten voor binnenshuis waarmee een beperkt loopver-... -
Page 32: Veiligheidsinstructies
Veiligheidsinstructies Trekker-basisframe instellen • Lees deze gebruiksaanwijzing aandachtig. Frame met handgreep instellen • Controleer vóór ingebruikname of alle onderdelen ste- vig vastzitten en niet zijn beschadigd. Gebruik het pro- Druk op de hendel (J) en duct niet als het defect is! houd deze ingedrukt om •... -
Page 33: Opvouwen Voor Transport
Opvouwen voor transport Accessoires monteren (optioneel verkrijgbaar) De looptrainer Trekker (alleen maten M en L) kan voor eenvoudig transport worden samengevouwen. Zet de Algemeen accessoires en het bovenframe daarvoor in de laagste De accessoires kunnen afh ankelijk van de gewenste the- stand. -
Page 34: Accessoires Instellen (Optioneel Verkrijgbaar)
Heupgordel Verschuif vervolgens de klemveer (D) door de beide (S = artikelnr.: TK1080S; M = artikelnr.: TK1080M; L = arti- lipjes op de veer samen te drukken, strak tegen het ach- kelnr.: TK1080L) terwiel, zodat de stang niet meer kan bewegen (afb. 15). Handgreep De fixatiehulp voor de heu- (S = artikelnr.: TK1045) - Page 35 Zitharnas (S = artikelnr.: TK1070S; L = artikelnr.: TK1070L) 1. Als u de hoogte van het achterste deel van de zitting wilt verstellen, drukt u op de knop (X), stelt u de gewenste hoogte in en laat u de knop weer los. De verstelstang is goed vergrendeld wanneer de knop hoorbaar vastklikt.
-
Page 36: Positionering Van De Gebruiker
3. Wanneer u de schroef (D) losmaakt, kunt u de bovenbeen- gordel op het frame naar voren of naar achteren verstel- len of volledig verwijderen, zoals weergegeven in afb. 19. 4. Met behulp van de gordelsluiting (E) kan de gordel op het bovenbeen worden aangebracht of versteld (afb. -
Page 37: Technische Gegevens
Waarschuwing! In afb. 27 wordt de instelling van een extreem naar vo- Wanneer de steunen alleen worden gebruikt en op het ren gebogen houding weergegeven. Let op het verschil uiteinde van het frame worden geplaatst, bestaat er een in instelling van de bovenste en onderste gordel van risico op omvallen! de heupgordel. - Page 38 Inhalt Introduzione ................39 Dichiarazione di conformità ..........39 Durata ..................39 Smaltimento................39 Targhetta tipologica ............... 39 Riutilizzo ..................39 Garanzia ................... 39 Parti del prodotto ..............40 Indicazioni | Controindicazioni ..........40 Materiale in dotazione ............40 Avvertenze di sicurezza ............40 Preparazione all‘uso ..............41 Regolazione telaio base Trekker ..........41 Ripiegamento per il trasporto ..........41...
-
Page 39: Introduzione
Introduzione Targhetta tipologica La ringraziamo di avere scelto un prodotto Drive DeVilbiss. Il design, la funzionalità e la qualità di questo prodotto non La deluderanno. Legga attentamente queste istruzioni per l’uso prima di utilizzarlo per la prima volta. Riceverà così importanti in- formazioni sulla sicurezza e preziosi consigli sull’uso e la manutenzione corretti. -
Page 40: Parti Del Prodotto
Parti del prodotto TREKKER Telaio base Telaio con impugnatura Regolazione in altezza Blocco anti-indietreggiamento Blocco anti-indietreggiamento Ruota con freno Indicazioni | Controindicazioni Materiale in dotazione INDICAZIONI: Deambulatore Trekker per bambini Deambulatore per bambini e ragazzi in 4 misure diverse Istruzioni per l'uso per interno, per compensare o migliorare le limitazioni alla deambulazione e per correggere problemi di postura. -
Page 41: Preparazione All'uso
• Non appendere borse alle manopole di spinta – peri- Attenzione colo di ribaltamento! Assicurarsi che le leve siano correttamente inserite (l’in- nesto produce un clic) e che il telaio non si muova più. • Quando si apre o si chiude il prodotto prestare attenzione che non vi si impiglino parti del corpo o Regolazione delle ruote (freno e blocco del senso di indumenti. -
Page 42: Istruzioni Per La Manutenzione
Per ripiegarlo, posizionarsi dietro al deambulatore. Alzare 3. Si consiglia di montare l’appoggio per braccio prima i due fermi (J) e ribaltare il telaio come in figura (Fig. 6). dei tubi del telaio (Fig. 9) principale. Ciò consente una posizione stabile e lascia spazio sufficiente per il montaggio di altri accessori. -
Page 43: Regolazione Accessori (Disponibili Come Optional)
Supporti per caviglie • Ruotare i bracci angolandoli verso l’interno o l’esterno (S = Art. n.: TK1060S; M = Art. n.: TK1060M; L = Art. n.: • Spostare gli appoggi in avanti o indietro. TK1060L) 2. Per regolare l’appoggio per braccio in altezza, pre- Montaggio dei supporti per mere il pulsante (L), portare l’appoggio per braccio nella caviglie. -
Page 44: Posizionamento Dell'utente
3. Allentare la vite (T) per regolare la posizione del sup- porto pelvico in avanti o indietro sul telaio, oppure per rimuoverlo completamente (Fig. 20). 4. Utilizzare le quattro cin- ghie (V) per adattare o allentare il supporto, oppure per modificare l’angolo di inclinazione in avanti della postura (v. -
Page 45: Note Per L'uso
Attenzione! Pericolo elevato di ribaltamento in caso di impiego di singoli appoggi posizionati all’estremità del telaio! La Fig. 26 mostra la posizione normale. Tenere presente che la postura inclinata in avanti si ottiene regolando la cinghia superiore e inferiore dietro il supporto del tron- co e posizionando il fissaggio del bacino dietro le spalle. -
Page 46: Dati Tecnici
Dati tecnici DIMENSIONE TREKKER S TREKKER M TREKKER L Colore verde verde grigio Numero articolo 706000100 706000110 706000200 706000210 706000300 Altezza (fino a ca.) 114 cm 122 cm 155 cm Lunghezza complessiva 82,5 cm 81 cm 96 cm Larghezza ingombro 57 cm 66 cm 70 cm... - Page 47 NOTIZEN | notes | notes | notities | note TREKKER Drive Medical GmbH & Co. KG | Stand: 21.04.2021...
- Page 48 Ihr Fachhändler: Irrtum und Änderungen vorbehalten | Stand: 25.11.2022 | Version: MDR-2.0 Importer for United Kingdom Drive DeVilbiss Healthcare Ltd • Sidhil Business Park, Holmfield, Halifax, West Yorkshire • HX2 9TN, GB T +44 (0) 845 0600 333 info@drivedevilbiss.co.uk • www.drivedevilbiss.co.uk Drive Medical GmbH &...
Need help?
Do you have a question about the TREKKER GT and is the answer not in the manual?
Questions and answers