Table of Contents
Advertisement
Quick Links
INSTRUCTION SHEET
Precision Miter Gauge
For your own safety, read the machine's instruction manual before
using any accessory. Failure to heed these warnings may result in
serious personal injury and damage to the tool and the accessory.
• Before using the Precision Miter Gauge, read and follow all
instructions and safety information provided.
• Always keep hands clear of the blade, cutter, sanding disc/belt.
• Before making adjustments to the Precision Miter Gauge,
turn off the power, allow the blade, cutter or sanding disc/
belt to come to a complete stop and unplug the machine.
• Ensure handle and lock knob are tight before using.
• Before turning on the power after adjustments, ALWAYS verify
there is a safe clearance between the blade and fence.
UNPACKING CONTENTS
NOTE: Check for shipping damage. Check immediately whether
all parts and accessories are included.
ITEM
DESCRIPTION
A
Miter Gauge
B
Handle
C
Washer for Handle
D
5/16" Round Knobs
E
T-Bolt 5/16"-18x3/4"
F
Extra Expansion Discs (Retain for future use)
G
M4 Screws (for Expansion Discs)
H
3 mm Hex Wrench
I
2.5 mm Hex Wrench
WARNING
Risk of accidental starting and serious personal injury.
Unplug the machine before attaching the Precision Miter Gauge.
ASSEMBLY
No additional tools needed.
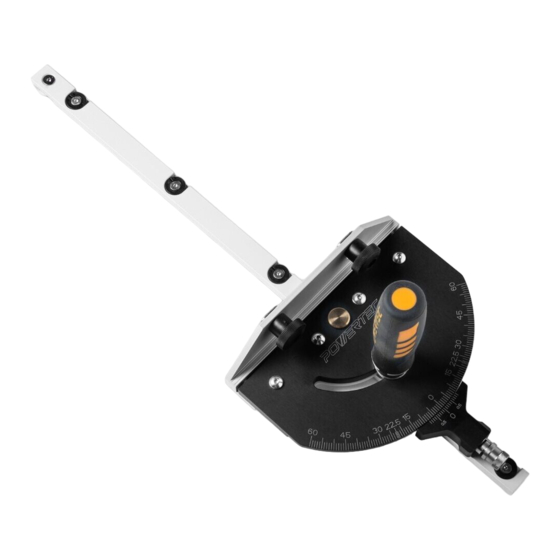
NOTE: This miter gauge is equipped with a Locking Plunger
with spring loaded pin. The most commonly used angles are
notched with positive stops 0°, 15°, 22.5°, 30°, 45° and 60°.
To set or change the angles see TO USE on page 4.
Figure 1
QTY
1
1
1
2
2
4
4
1
1
See Figure 2. Place washer onto handle threads and thread the
handle onto the guide bar. Tighten handle.
Figure 2
Model No. 71767
Refer to Figures 1, 2
23-0228
Advertisement
Table of Contents

Related Manuals for PowerTec 71767


Summary of Contents for PowerTec 71767
- Page 1 INSTRUCTION SHEET Model No. 71767 Precision Miter Gauge WARNING For your own safety, read the machine's instruction manual before using any accessory. Failure to heed these warnings may result in serious personal injury and damage to the tool and the accessory.
- Page 2 SETTING THE GAUGE TO 90° FITTING MITER GAUGE TO MITER SLOT See Figure 3 NOTE: The Miter Gauge arrives factory calibrated. See Figures 4, 5. If the tool is equipped with a T-slotted miter For convenience, a Fence (not included) can also be used to verify slot, use the 3 mm hex wrench (included) to ensure the screw perpendicularity to the miter bar.
- Page 3 This Precision Miter Gauge is designed to work with allows the miter gauge face to be set perpendicular to the table. POWERTEC and DuBois Fences (not included). It can also be used as a conventional Miter Gauge on various other fences.
- Page 4 TO USE For Example: See Figure 10. Loosen the Handle. To unlock the Adjustment The protractor scale on the Miter Gauge head acts like a Vernier Plunger pull and twist left (counter clockwise). Release. Plunger scale and precise angles can be set. is now in neutral position.
Need help?
Do you have a question about the 71767 and is the answer not in the manual?
Questions and answers