Table of Contents
Advertisement
Quick Links
Advertisement
Table of Contents

Related Manuals for Gateway E-1000 Series


Summary of Contents for Gateway E-1000 Series
- Page 1 E-1000 Series User's Guide...
- Page 2 E-1000 Series User’s Guide Part #8502976 MAN SYS US E1000 USR GDE R2 6/98 In our effort to use nature’s resources efficiently and wisely, we print all manuals on recycled papers that meet the minimum requirements established by the Federal EPA in its guidelines for recycled paper products.
- Page 3 This publication is protected by copyright and all rights are reserved. No part of it may be reproduced or transmitted by any means or in any form, without prior consent in writing from Gateway 2000. The information in this manual has been carefully checked and is believed to be accurate. However, changes are made periodically.
-
Page 4: Table Of Contents
Contents Preface ..................iii Conventions Used in This Guide............iv Safety Instructions................... v Chapter 1: Getting Started ........... 1 Setting Up Your System................2 Starting Your System ................3 Creating a Startup Diskette .............. 4 Using Power Management..............6 Using Suspend Mode ............... 6 Turning Off Your System ............... - Page 5 Appendix ................29 Acronyms and Abbreviations............... 30 Terms and Definitions ................32 Regulatory Compliance Statements............. 35 Index ..................39 E-1000 Series User’s Guide...
-
Page 6: Preface
Preface Contents Conventions Used in This Guide......iv Safety Instructions ........... v... -
Page 7: Conventions Used In This Guide
Names of publications and files are printed in italic. An important informs you of special Important! circumstances. A caution warns you of possible damage Caution! to equipment or loss of data. A warning indicates the possibility of Warning! personal injury. iv E-1000 Series User’s Guide... -
Page 8: Safety Instructions
Safety Instructions Observe the following safety instructions when using your system: Warning! Do not attempt to service • Follow all instructions marked on the system and in the the system yourself except as explained elsewhere in documentation. the system documentation. •... - Page 9 Liquid has been spilled into the system. • The system does not operate properly when the operating instructions are followed. • The system was dropped or the cabinet is damaged. • The system’s performance changes. vi E-1000 Series User’s Guide...
-
Page 10: Chapter 1: Getting Started
Chapter 1: Getting Started Contents Setting Up Your System.......... 2 Starting Your System ..........3 Using Power Management........6 Turning Off Your System ........7 Resetting Your Computer ........8... -
Page 11: Setting Up Your System
• Keep your system away from equipment that generates magnetic fields, such as unshielded stereo speakers. Even a telephone placed too closely to the system may cause interference. 2 E-1000 Series User’s Guide... -
Page 12: Starting Your System
Starting Your System Before you start your system for the first time: • Check that the voltage selector switch on the back of the computer is still set to the correct voltage for your area. This switch is set at the factory to the correct voltage. -
Page 13: Creating A Startup Diskette
You will need one diskette. To create a startup diskette for Windows 95 and Windows 98 Double-click the icon. The window opens. My Computer My Computer Double-click the icon. Control Panel 4 E-1000 Series User’s Guide... - Page 14 In the window, double-click the icon. Control Panel Add/Remove Programs The Add/Remove Programs window opens. Click the tab. Startup Disk Place the diskette in the drive. Click Create Disk Windows tells you to place the diskette in the drive and warns that all files on the diskette will be deleted.
-
Page 15: Using Power Management
Suspend the state it was in before it entered Suspend mode. However, if your mode does not disconnect system is part of a Novell network, putting your computer in Suspend you from your network. 6 E-1000 Series User’s Guide... -
Page 16: Turning Off Your System
mode disconnects you from your network connection. To reestablish your network connection: Click the button, and then click Start Shut Down From the options, select Shutdown Windows Close all programs and log on . Selecting that option will bypass the restart process as a different user and display your network logon dialog box. -
Page 17: Resetting Your Computer
Click , select the program that is not responding, and click Task Manager End Task If the computer does not respond, press the power button to turn the computer off. 8 E-1000 Series User’s Guide... - Page 18 Wait a few seconds and then press and release the power button to turn on the computer. As a part of the regular startup process, a program to check the disk status will automatically run. When the checks are finished, Windows will start. Getting Started 9...
- Page 19 10 E-1000 Series User’s Guide...
-
Page 20: Chapter 2: System Features
Chapter 2: System Features Contents Computer Features ..........12 Front Panels ............13 Rear Panel.............. 16 System Board Features.......... 20... -
Page 21: Computer Features
• Keyboard port, mouse port, serial port, parallel port, and two USB ports • Integrated Crystal CS4236B16-bit audio • Integrated AMD PCI 10/100 TP networking (Novell and NT compatible) • AMI BIOS • 120-watt power supply E-1000 Series User’s Guide... -
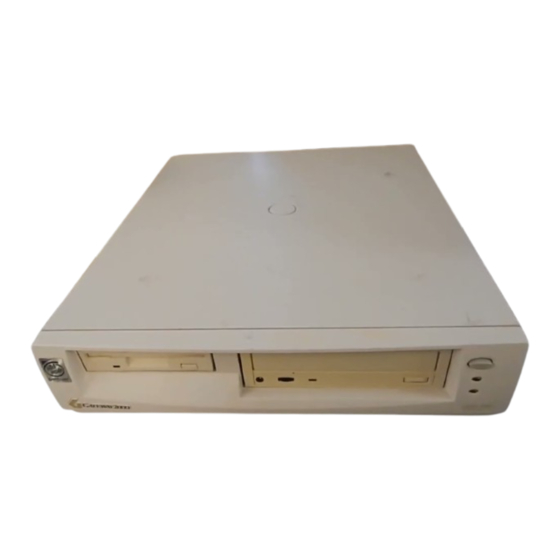
Page 22: Front Panels
Front Panels This section illustrates and describes the front panels of the E-1000 and E-1000N systems. E-1000 Front Panel 3.5-inch device drive bay 5.25-inch device drive bay Power on/off switch Power-on LED Hard drive LED Headphone jack 3.5-inch device bay The 3.5-inch device bay comes standard with a 1.44-MB disk drive installed. -
Page 23: E-1000N Front Panel
Headphone jack The headphone jack is available to plug in headphones or powered speakers to listen to music CDs, multimedia programs, or computer games. E-1000N Front Panel Power on/off switch Power-on LED Hard drive LED Headphone jack E-1000 Series User’s Guide... - Page 24 Power on/off switch The power switch is a push button. Push in to turn on the system on and push in and hold in for 5 seconds to turn the system off. Power-on LED The power-on LED is lit when power is applied to the system. Hard drive LED The hard drive LED lights when the hard disk drive is active.
-
Page 25: Rear Panel
This section illustrates and describes the rear panel of both the E-1000 and E-1000N systems. AC power-in connector Kensington lock receptacle Locking thumbscrew (optional) Fax/data modem (optional) Line in Phone jack Case lock tabs (2) Voltage selector Audio in Audio out USB ports (2) Mouse port Keyboard port E-1000 Series User’s Guide... - Page 26 Fax/data modem (optional) A fax/data modem lets the system communicate via phone line with Internet service providers (such as Gateway.net or America Online), online services, bulletin boards, and other fax/modem users. Line in The line-in jack connects to the modular telephone cable that comes from the phone jack in the wall.
- Page 27 Plug-and-Play devices that are automatically configured when they are plugged into the system via one of these ports. Mouse port Plug the mouse cable (PS/2) into this port to enable the mouse to communicate with the system. E-1000 Series User’s Guide...
- Page 28 Keyboard port Plug the keyboard cable into this port to enable the keyboard to communicate with the system. Parallel (printer) port A printer or other parallel device may be plugged into this port to enable it to communicate with the system. Serial port Serial devices, such as midi interface cables, may be plugged into this port to enable communication with the system.
-
Page 29: System Board Features
You can fill Bank 0, Bank 1, or both banks with DIMMs. No jumper settings are required for the memory size or type because this information is automatically detected by the BIOS. Refer to Maintaining and Troubleshooting Your E-1000 Series System for information on installing additional memory. BIOS Your system board comes equipped with an American Megatrends (AMI) BIOS chip. -
Page 30: Lm78 Hardware Management
• Changing system boot options For additional information on the BIOS Setup program, refer to Maintaining and Troubleshooting Your E-1000 Series System. LM78 Hardware Management LM78 is an integrated data acquisition system that lets you monitor the status of your system hardware. Monitored information includes internal temperature, fan speed, voltage, and chassis intrusion (to alert you in case of tampering). - Page 31 E-1000 Series User’s Guide...
-
Page 32: Chapter 3: Maintaining And Cleaning Your System
Chapter 3: Maintaining and Cleaning Your System Contents Maintaining Your System ........24 Maintaining the Hard Drive......24 Installing and Restoring LANDesk ....24 Using the System Restoration CD ....25 Protecting Against Viruses......25 Cleaning Your System .......... 26 Cleaning the Mouse........ -
Page 33: Maintaining Your System
Refer to these documents and the program’s Help for any LANDesk concerns. If you ever need to restore LANDesk from the System Restoration CD that came with your system, enter if prompted for a password. LOWTCO E-1000 Series User’s Guide... -
Page 34: Using The System Restoration Cd
Using the System Restoration CD The System Restoration CD included with your system can be used to: • Restore your Windows 95 or Windows 98 operating system • Install hardware drivers for Windows 95, Windows 98, and Windows NT • Reinstall selected software applications, such as LANDesk®... -
Page 35: Cleaning Your System
Let surfaces to dry completely after cleaning. Return the mouse ball to the socket and replace the cover. E-1000 Series User’s Guide... -
Page 36: Cleaning The Keyboard
Cleaning the Keyboard Occasionally you should clean the keyboard to free it of dust and lint particles trapped under the keys. The easiest way to do this is to blow trapped dirt from under the keys using an aerosol can of air with a narrow, straw-like extension. - Page 37 E-1000 Series User’s Guide...
-
Page 38: Appendix
Appendix Contents Acronyms and Abbreviations ....... 30 Terms and Definitions........... 32 Regulatory Compliance Statements ..... 35... -
Page 39: Acronyms And Abbreviations
Mbps - Megabits per second MIDI - Musical instrument digital interface MHz - Megahertz MS-DOS - Microsoft disk operating system NTFS - NT file system POST - Power-on self-test PS/2 - Personal System/2 RAM - Random-access memory 30 E-1000 Series User’s Guide... - Page 40 ROM - Read-only memory SCSI - Small computer system interface SDRAM - Synchronous dynamic random access memory TCP/IP - Transmission control protocol/Internet protocol V - Volt Appendix 31...
-
Page 41: Terms And Definitions
Default - The option that the software or system uses when you have not made a choice yourself. Disc - A compact disc (CD). Disk - The device used by the computer to store and retrieve information. Disk can refer to a diskette or a hard disk. 32 E-1000 Series User’s Guide... - Page 42 Diskette - A removable disk, also called a floppy. Hard drive - The drive installed inside your system that stores all your system and data files. Depending on its configuration, the computer may have more than one hard drive. Each drive is assigned its own drive letter. If you have only one drive, its drive letter is C, and it is often called “the C drive.”...
- Page 43 ROM - Read-only memory. Permanent computer memory dedicated to a particular function. For example, the instructions for starting the computer when you first turn on power are contained in ROM. You cannot write to ROM. 34 E-1000 Series User’s Guide...
-
Page 44: Regulatory Compliance Statements
Regulatory Compliance Statements This device has been tested and found to comply with the limits for a Class American Users B digital device, pursuant to Part 15 of the FCC rules. These limits are designed to provide reasonable protection against harmful interference in a residential installation. - Page 45 EN 61000-3-2:1995 or EN 60555-2:1986 EN 61000-3-3: 1995 -EN50082-1:1992 according to EN 61000-4-2:1995 or IEC 801-2:1984 ENV 50140:1994 or IEC 801-3:1984 EN 61000-4-4:1988 or IEC 801-4:1998 [ii]Low Voltage Directive (Safety) 73/23/EEC as per EN 60950:1992, A1, A2, and A3 36 E-1000 Series User’s Guide...
- Page 46 This is a Class B product based on the standard of the Voluntary Control Japanese Users: Council for Interference by Information Technology Equipment (VCCI). If this is used near a radio or television receiver in a domestic environment, it may cause radio interference. Install and use the equipment according to the instruction manual.
- Page 47 38 E-1000 Series User’s Guide...
-
Page 48: Index
Index abbreviations keyboard acronyms cleaning ampere requirements port audio LANDesk installing restoring battery, warning LM78 hardware management BIOS magnetic fields, interference cases, cleaning computer and memory monitor modem computer features, listed monitor screen, cleaning computer, resetting mouse, cleaning mouse, port definitions of terms Novell network, reconnecting to DIMMs... - Page 49 Suspend mode ventilation requirement system board features terms, defined turning off your system USB ports ventilation, system requirement video, port viruses, protecting against voltage, checking correct setting E-1000 Series User’s Guide...
- Page 50 MAN SYS US E1000 USR GDE R2 6/98 8502976...
Need help?
Do you have a question about the E-1000 Series and is the answer not in the manual?
Questions and answers