Table of Contents
Advertisement
Advertisement
Table of Contents

Related Manuals for Decathlon RIVERSIDE 520E


Summary of Contents for Decathlon RIVERSIDE 520E
- Page 1 Date of last update : 16/01/2023 EN - User manual RIVERSIDE 520E...
- Page 2 Dear Than We in bike. Neve faster We s to get An el SIDE You m in cas Here...
- Page 3 Dear Customers, Thank you for purchasing a RIVERSIDE electrically-assisted bike. We invite you to read the instruction manual to get the most out of your RIVERSIDE 520E bike. Never forget that an electrically-assisted bike is not a moped. It needs your help to go further, faster and longer.
- Page 4 How to get the most from your PAB < 3 bar 4 - 5 bar Elect Gene 2. Under-inflated tyres are more prone to punctures 1. The bike will operate better and more efficiently with tyres inflated between 4 and 5 bar Scree 20°...
-
Page 5: Table Of Contents
TABLE OF CONTENTS PRODUCT DESCRIPTION ................6 Electrically-assisted bike technical features ..............6 General operation of the electrical assistance ..............6 SCREEN AND CONTROL ELEMENTS ............7 Screen data and function ..................... 7 MOTOR ......................9 BATTERY AND CHARGER ................9 Battery properties and warranty .................. -
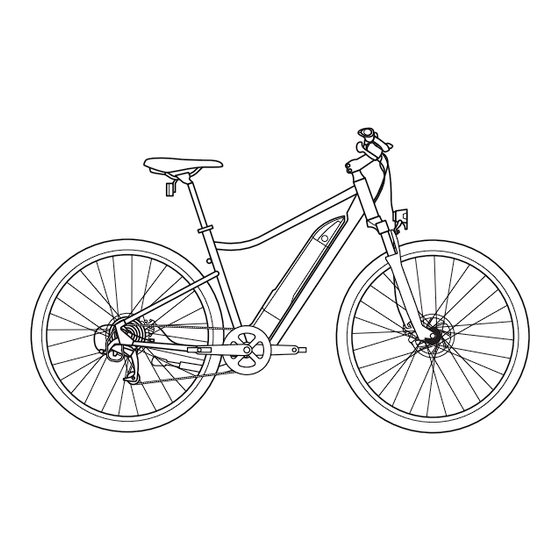
Page 6: Product Description
PRODUCT DESCRIPTION Power The sp You’re Electrically-assisted bike technical features The re «0» is When In case system Battery Battery lock handle and barrel Controller Control screen Cable from the control screen to the controller MOTOR spee Pedal housing with torque sensor General operation of the electrical assistance The power-assisted bike can be used with or without assistance by pressing the ON/OFF button or altering the modes 0-1-2-3. -
Page 7: Screen And Control Elements
Power assistance does not activate or shuts down in the following situations: The speed is above 25km/h You’re not pedalling The remaining charge in the battery is not sufficient «0» is the power assistance mode selected When the control screen is switched off In case of intensive use and in exceptional climatic conditions, assistance may be cut off to safeguard the whole system SCREEN AND CONTROL ELEMENTS... - Page 8 Lighting button Short press the power button to turn the front and rear lights, and display backlight, on The m and off. can ha Go to the settings by holding the button down for a few seconds ears is Speed indicator** «Walk assist»...
-
Page 9: Motor
- Complying with the proper conditions for charging and storing the battery: For a cyclist weighing 75kg, adhering to these best practices, and cycling in light wind using mode 1, the battery range of the RIVERSIDE 520E is estimated to... -
Page 10: Precautions For Use
Important: Under certain conditions, the controller, charger and mechanical brake discs may reach high temperatures. Never dismantle it. Do not dispose of the battery in non-suitable containers. Return the used battery to your Decathlon store for recycling. Risk of fire. Risk of electrocution. To be handled with care. - Page 11 Never permit children to play with or handle the battery. Do not immerse in water. Do not clean using a high-pressure washer. The battery and other electrical components are designed to withstand rain. Your battery can be fully charged and discharged 500 times without any signifi- cant drop in performance.
-
Page 12: Installing And Removing The Battery
Installing and removing the battery Installation: Before inserting your battery in its housing, make sure that the lock is in the open position and does not interfere with the insertion of the battery. Removal: Remember to unlock your battery before removing it from its housing. -
Page 13: Recharging The Battery
Recharging the Battery Start of charging red LED. 6h30 Green LED when charging is complete. LED flashing red, problem during char- ging, contact customer services. A full charge (from 0 to 100%) takes 6 hr 30 Maintenance and lifetime (warranty conditions) Do not store the discharged battery (1 flashing blue LED) to avoid deep discharge, which may cause it to malfunction. -
Page 14: Battery Self-Diagnostic
Battery self-diagnostic 11% - 20% 21% - 40% 41% - 60% 61% - 80% 81% - 100% Battery recharge is needed urgently <10% Undervoltage protection temperature protection short circuit protection Return your battery to your af - ter-sales service other protection LED off LED on LED flashing... -
Page 15: Safety Information
Never modify the bike’s components or electrical system! Any change is dangerous and prohibited by law. If a modified bike breaks down or is damaged, Decathlon will in no case take care of repairs (warranty cancelled)). You will also be legally responsible for any accident that arises with the bike. -
Page 16: Maintenance
MAINTENANCE Warning - the maintenance of electrical components requires special skills and is not carried in stores but in Decathlon regional workshops and can take several days. All cleaning work must be done with the battery on the bike but the bike turned off! That way, the battery connections will be hidden and protected from the water. -
Page 17: Error Code A
The motorised wheel is also subject to higher stress than a standard bike wheel, and although it is reinforced, it is possible that spokes may break. If a spoke breaks, contact your DECATHLON store. For more information on use, maintenance, after-sales services or in case of questions, visit DECATHLON’s support website: www.support.decathlon.fr/... -
Page 18: Error Code B
Turn off the bike and remove the battery. Replace the Abnormal voltage in the torque sensor battery and turn on the bike. If the fault has not disap- peared, go to a Decathlon workshop for repair. 32 / 33 Check the positioning and condition of the motor Motor fault connectors. - Page 19 Allow the electrical system to cool down. plug- Overheating controller If the fault has not disappeared, go to a Decathlon workshop for repair. Check the battery charge Make sure that the battery is correctly inserted in its housing. Check that the Communication error battery control control screen connection is fully pressed in.
-
Page 20: Appendix 1: Component Tightening Torque
APPENDIX 1: COMPONENT TIGHTENING TORQUE Component Tightening torque Seatpost clamp screw 9 +/- 1 Nm Pleas The b Handlebar/Stem 9 +/- 2 Nm parts The w Fork/Stem 9 +/- 2 Nm impro This b Control screen No movement The w Each Seat collar 10 +/- 1.5 Nm... -
Page 21: Contents Of The Commercial Warranty For Your Electrically-Assisted Bike
To benefit from the warranty covering one of the parts listed above, you must simply visit the repair shop of a DECATHLON retail store, bringing either your DECATHLON store loyalty card or your warranty certificate with you. - Page 22 å ‐ Производитель и адрес, Франция: - DECATHLON - 4 BOULEVARD DE MONS - BP 299 - 59650 VILLENEUVE D'ASCQ CEDEX - FRANCE Pack Ref: 5104428...
Need help?
Do you have a question about the RIVERSIDE 520E and is the answer not in the manual?
Questions and answers
Replacement axle washers - rear wheel with motor