Table of Contents
Advertisement
Quick Links
Advertisement
Table of Contents

Related Manuals for ATD Tools SPI-77109


Summary of Contents for ATD Tools SPI-77109
- Page 1 User’s Manual SPI-77109...
-
Page 2: Table Of Contents
Contents Toggle Switch Setup ........................1 1.1. Where to find the toggle (DIP) switches? ..............1 1.2. Set the toggle switch ....................1 1.3. Problem from Toggle switch setup incorrectly ..............2 Dashboard Removal ........................3 Kit Contents ..........................3 3.1. Cable Connection Chart ....................3 3.2. Power Cable Connection .....................5 3.3. -
Page 3: Toggle Switch Setup
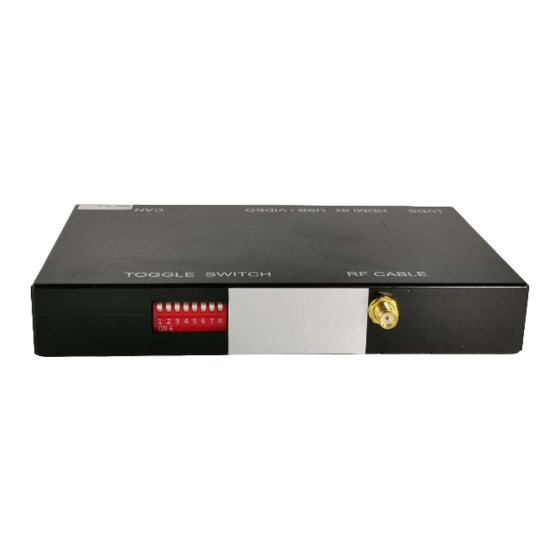
1. Toggle Switch Setup 1.1 Where to find the toggle (DIP) switches? Set the toggle switch Tips: Pin 7: with OEM parking sensor Off / 0, No OEM parking sensor On /1 1/19... -
Page 4: Problem From Toggle Switch Setup Incorrectly
1.3 Toggle switch setup incorrectly will result in a black screen, flash screen, half-screen, etc. Please contact us for the correct toggle switch setup code if you meet problems as in the follow chart. Black screen when switch to CarPlay function Flash screen in OEM function Half-screen when switch to CarPlay function Half-screen when switch to CarPlay function... -
Page 5: Dashboard Removal
2. Dashboard Removal Please scan QR code, view the detail via YouTube video on dashboard removal guidance. For A4 A5 Q5 3. Kit Contents 3.1 Cable connection chart 3/19... - Page 6 Please follow the connection chart accurately (detailed instructions below). After the cables are all connected, you will be able to switch between the original Audi and the CarPlay interfaces by long pressing the “MEDIA” button or “CAR” button on the MMI controller. or “NAV” button from the steering wheel control.
-
Page 7: Power Cable Connection
3.2 Head Unit power cable connection Unplug the OEM original power cable from the head unit and reconnect it to the new cable harness. Then plug the new cable into the head unit. Note: In the power cable, don’t need to connect the grey cable to the green cable. -
Page 8: A/C Controller Power Cable Connection
3.3 A/C controller power cable connection 6 / 19... -
Page 9: Fpc Adapter Board Installation
3.4 FPC adapter board installation Please scan QR code, view the detail via YouTube video on the FPC adapter board installation guidance. FPC board installation video 7 / 19... -
Page 10: Lvds Cable Connection
3.5 LVDS cable connection 1 ) New LVDS cable 1 goes to the LVDS port of OEM the head unit. 2 ) New LVDS cable 2 goes to the original LVDS cable. Note: Connecting the LVDS cables incorrectly will result in a black screen! 8 / 19... -
Page 11: Wifi Antenna And Usb-Av Cable Connection
3.6 WiFi antenna and USB-AV cable connection Note: To avoid losing the WiFi signal, make sure the antenna is not placed close to metal objects. 3.7 AMI audio cable connection (only for Audi cars with AMI function) If your car has AMI port, you need to connect the AMI cable to your car AMI port, so that the sound from the CarPlay function will work via the car’s AMI AUX function. - Page 12 Where to find the AMI port? in the glove-box in the glove-box in the central console box behind media interface doors AMI cable connection 10 / 19...
-
Page 13: Microphone Connection
3.8 Microphone connection Aftermarket mic should be installed close to the driver position. 11 / 19... -
Page 14: Where To Put The Carplay Box
3.9 Where to put the CarPlay box? The CarPlay interface decoder box should be installed in an appropriate space near, or on, the OEM head unit. Or in the glove box. on the OEM head unit Beside the OEM head unit In the glove box In the glove box 12 / 19... -
Page 15: Carplay Sound Setup
4. CarPlay Decoder Sound Setup 4.1 Bluetooth settings If your phone already has a Bluetooth connection to your car, disconnect it. 4.2 Set AUX Before using the CarPlay system, you need to set the sound input on your OEM interface to “AUX”, otherwise the CarPlay /Android Auto system will have sound! On the original Audi System, navigate to the “Media”... -
Page 16: Set Ami
4.3 Set AMI (only for Audi cars with AMI function) If your car has AMI port, after connect the AMI cable to your car AMI port, you need to set the “Media” into “AMI” After the cables are all connected, you will be able to switch between the original Audi and the CarPlay interfaces by long pressing the “MEDIA”... - Page 17 CarPlay Decoder main interface 15 / 19...
-
Page 18: Reverse And Front Cameras
5. Reverse and Front Cameras 5.1 Original OEM camera Enter the “Setup” menu from the decoder main menu, choose “Reverse”, then make sure the “Reverse Camera” option is set to “Original”. Make sure that the following three options are all set to “off”. 5.2 Aftermarket camera Aftermarket rear view camera cable connection 16 / 19... -
Page 19: Settings For Aftermarket Reverse Camera And Front Cameras
Aftermarket front view camera cable connection 5.3 Settings for aftermarket reverse camera and front cameras After the aftermarket camera cables are connected, you need to check the camera settings (click the “Setup” button from the decoder main menu). “Reverse” camera settings: choose “Reverse”, from the menu and set the reverse camera to “Aftermarket”. -
Page 20: Faq
6. FAQ 1. Why is there no sound during the call? Solution: Disconnect the Bluetooth between your phone and your car. 2. Why is there no sound during CarPlay function? Solution: Check the car, if the car has AMI port, AMI cable needs to be connected to the original AMI port. -
Page 21: Contact Us
7. Contact Us Please contact us via purchase platform if you need any help. Tip: before contacting us, please help us to collect the following information. 1. the order ID 2. the car model 3. the year of the car 4.
Need help?
Do you have a question about the SPI-77109 and is the answer not in the manual?
Questions and answers